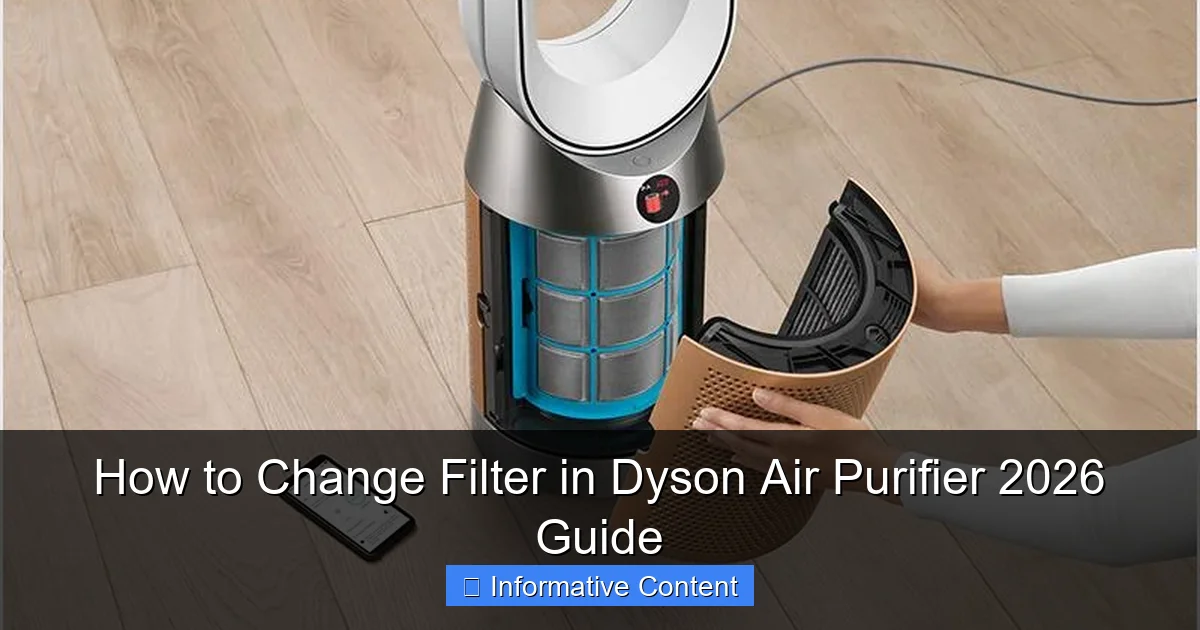
Featured image for how to change filter in dyson air purifier
Image source: dyson-h.assetsadobe2.com
Changing the filter in your Dyson Air Purifier is quick and essential for maintaining optimal air quality. Follow the simple steps in this 2026 guide to safely remove the old filter, install a new genuine Dyson replacement, and reset the filter life indicator—ensuring your purifier runs efficiently and effectively. Regular filter changes prevent clogs, boost performance, and extend the lifespan of your device.
Key Takeaways
- Check filter status regularly via the Dyson app or machine display.
- Replace filters annually or when the indicator shows replacement is needed.
- Turn off and unplug the purifier before changing the filter.
- Remove old filter carefully to avoid releasing trapped particles.
- Install new filter securely and ensure it clicks into place.
- Reset filter life in the app or on the machine after replacement.
- Use genuine Dyson filters for optimal performance and warranty compliance.
📑 Table of Contents
- How to Change Filter in Dyson Air Purifier 2026 Guide
- Why Changing Your Dyson Air Purifier Filter Matters
- Identifying When It’s Time to Replace Your Filter
- Step-by-Step Guide to Changing the Filter
- Tips for Maintaining Your Dyson Air Purifier
- Choosing the Right Replacement Filter
- Common Mistakes to Avoid
- Data Table: Dyson Air Purifier Filter Replacement Guide
- Conclusion
How to Change Filter in Dyson Air Purifier 2026 Guide
Imagine this: You’ve just finished a long day, kicked off your shoes, and settled into your favorite chair with a cup of tea. The air in your living room feels crisp and clean—thanks to your trusty Dyson air purifier humming quietly in the corner. You take a deep breath, feeling the difference. But then, a few weeks later, you notice the air doesn’t feel quite as fresh. Maybe the purifier is running louder than usual, or the airflow seems weaker. Chances are, it’s time to change the filter.
Changing the filter in your Dyson air purifier might sound like a chore, but it’s actually one of the simplest and most impactful maintenance tasks you can do to keep your indoor air quality at its best. Whether you’re using a Dyson Pure Cool, Pure Hot+Cool, or any of the newer 2026 models, regular filter changes ensure your machine continues to capture dust, allergens, pet dander, and even volatile organic compounds (VOCs) effectively. And the good news? It’s easier than you think—especially when you know exactly what to do.
In this guide, we’ll walk you through every step of changing the filter in your Dyson air purifier, from identifying when it’s time for a replacement to safely installing the new one. We’ll also share practical tips, troubleshooting advice, and insights based on real user experiences. By the end, you’ll feel confident maintaining your Dyson like a pro—and breathing easier in the process.
Why Changing Your Dyson Air Purifier Filter Matters
Let’s be honest: most of us don’t think about our air purifier filters until something goes wrong. But just like changing the oil in your car or replacing the batteries in your smoke detector, filter maintenance is essential for performance and longevity. A clogged or expired filter doesn’t just reduce efficiency—it can actually make your indoor air worse.
Visual guide about how to change filter in dyson air purifier
Image source: cdn.ecoustics.com
How Filters Work in Dyson Purifiers
Dyson air purifiers use a multi-stage filtration system designed to capture a wide range of airborne pollutants. Most models feature a combination of a HEPA filter and an activated carbon filter. The HEPA filter traps microscopic particles like pollen, mold spores, and bacteria, while the carbon layer absorbs odors, smoke, and gases such as nitrogen dioxide and formaldehyde.
Over time, these filters become saturated. The HEPA filter fills up with dust and debris, and the carbon loses its ability to吸附 (adsorb) harmful gases. When this happens, your purifier has to work harder to push air through the clogged material, which can lead to reduced airflow, louder operation, and even overheating in extreme cases.
The Risks of a Dirty Filter
- Reduced air quality: A dirty filter can’t capture new pollutants effectively, meaning you’re breathing in more allergens and irritants.
- Increased energy use: Your purifier will consume more electricity as it struggles to maintain performance.
- Shortened machine lifespan: Constant strain on the motor can lead to premature wear and costly repairs.
- Potential odor buildup: If the carbon filter is exhausted, it may start releasing trapped odors back into the room.
Think of it like trying to drink through a straw that’s half-blocked with mud. It’s frustrating, inefficient, and ultimately counterproductive. Replacing your filter restores your purifier’s ability to do its job—keeping your home’s air clean and your family healthy.
How Often Should You Change the Filter?
Dyson recommends replacing the filter every 12 months under normal usage conditions. However, this can vary depending on several factors:
- Air quality in your area: If you live in a city with high pollution or near a busy road, you may need to change it sooner.
- Pets: Homes with cats or dogs often require more frequent changes due to pet dander and fur.
- Smoking: If someone smokes indoors, the carbon filter will degrade faster.
- Allergies or asthma: If you or a family member has respiratory conditions, you might benefit from replacing the filter every 6–9 months.
Many newer Dyson models, including the 2026 series, come with a built-in filter life indicator. This feature monitors usage and alerts you when it’s time for a replacement—usually via the Dyson Link app or a light on the machine. Pay attention to these alerts; they’re your best guide.
Identifying When It’s Time to Replace Your Filter
Even if your Dyson hasn’t sent an alert yet, there are several telltale signs that your filter needs replacing. Learning to recognize these cues can help you stay ahead of poor performance and maintain optimal air quality.
Common Warning Signs
One of the most obvious indicators is a noticeable drop in airflow. If you used to feel a strong breeze from your purifier but now it feels weak or inconsistent, the filter is likely clogged. You might also hear the fan working harder—producing a louder, higher-pitched noise than usual.
Another red flag is unpleasant odors returning to your space. If you’ve noticed cooking smells lingering longer, pet odors becoming more noticeable, or a musty scent in the air, your carbon filter may no longer be effective. This is especially common in homes with gas stoves or frequent use of cleaning products.
Additionally, if you or your family members start experiencing more allergy symptoms—like sneezing, itchy eyes, or congestion—despite running the purifier regularly, it could be a sign that the HEPA filter is no longer capturing allergens efficiently.
Using the Dyson Link App
If your Dyson air purifier is connected to the Dyson Link app (available for iOS and Android), you’re in luck. The app provides real-time data on filter life, air quality, and machine performance. It tracks how many hours your purifier has been running and estimates the remaining lifespan of both the HEPA and carbon filters.
When the filter life drops below 10%, the app will send a notification. Some models even display a filter icon on the screen or flash a light on the base. This feature takes the guesswork out of maintenance and ensures you never miss a replacement.
Manual Inspection Tips
If you don’t have the app or want to double-check, you can manually inspect the filter. Here’s how:
- Turn off and unplug your Dyson purifier.
- Locate the filter compartment (usually at the base or back of the unit).
- Open the cover and carefully remove the filter.
- Hold it up to a light source. If you can’t see light passing through the HEPA material, it’s time for a replacement.
- Check the carbon filter for discoloration or a strong odor—both signs it’s saturated.
Pro tip: Take a photo of your filter when it’s new. That way, you can compare it later to see how much it’s darkened or degraded over time.
Step-by-Step Guide to Changing the Filter
Now that you know why and when to change your filter, let’s get into the nitty-gritty: how to actually do it. The process is straightforward, but it’s important to follow the steps carefully to avoid damaging your machine or compromising the seal.
What You’ll Need
- A replacement Dyson filter (make sure it’s compatible with your model)
- A clean, dry cloth
- A flat surface (like a table or countertop)
- Optional: gloves (to keep your hands clean)
Always use genuine Dyson filters. While third-party options may be cheaper, they often don’t meet the same performance standards and can void your warranty. Dyson filters are engineered to fit precisely and maintain the machine’s airflow and filtration efficiency.
Step 1: Turn Off and Unplug the Unit
Safety first! Before you do anything, make sure your Dyson air purifier is completely powered off and unplugged from the wall. This prevents any accidental startup and protects you from electrical hazards.
Step 2: Locate the Filter Compartment
The filter compartment varies slightly depending on your model, but it’s typically found at the base or back of the unit. On most Dyson purifiers, you’ll see a latch or release button. Press or slide it to open the cover.
For example, on the Dyson Pure Cool TP04, the filter is accessed by removing the base plate. On the Dyson Pure Hot+Cool HP04, you’ll need to remove the back panel. Refer to your user manual if you’re unsure—Dyson provides detailed diagrams for each model.
Step 3: Remove the Old Filter
Gently pull out the old filter. It may be snug, especially if it’s been in place for a year. Avoid using excessive force, as this could damage the housing or the filter itself.
Once removed, inspect the filter. You’ll likely see a layer of dust and debris on the HEPA side. This is normal—it’s proof that your purifier has been working hard to clean your air. Dispose of the old filter in a sealed plastic bag to prevent any trapped particles from escaping.
Step 4: Clean the Filter Housing
Before installing the new filter, take a moment to clean the compartment. Use a dry cloth to wipe away any dust or debris inside the housing. Don’t use water or cleaning sprays—moisture can damage the electronics.
This step is often overlooked, but it’s crucial. A clean housing ensures a proper seal and prevents contaminants from bypassing the new filter.
Step 5: Install the New Filter
Take your new Dyson filter out of the packaging. Remove any protective plastic wrap or stickers. Make sure the filter is oriented correctly—most have an arrow or label indicating the direction of airflow.
Slide the new filter into the compartment, pressing it firmly into place. You should feel it click or seat securely. Close the cover and make sure the latch engages properly.
Double-check that the filter is fully seated. A loose filter can cause air leaks, reducing efficiency and potentially triggering error messages on the machine.
Step 6: Reset the Filter Life Indicator
After installing the new filter, you’ll need to reset the filter life indicator. This tells your Dyson that a fresh filter is in place and resets the countdown.
On most models, you can do this through the Dyson Link app. Open the app, select your device, and look for the “Filter” or “Maintenance” section. Tap “Reset Filter Life.” Some models also allow you to reset it manually by holding down a combination of buttons (check your manual for specifics).
Once reset, your purifier will begin tracking the new filter’s lifespan from 100%.
Tips for Maintaining Your Dyson Air Purifier
Changing the filter is just one part of keeping your Dyson air purifier in top shape. Regular maintenance ensures consistent performance and extends the life of your machine.
Clean the Exterior and Blades
Dust and grime can accumulate on the exterior of your purifier, especially on the fan blades and air intake vents. Use a soft, dry cloth to wipe down the surface weekly. For tougher spots, lightly dampen the cloth with water—never spray liquid directly onto the machine.
If your model has a fan (like the Pure Cool series), you can gently clean the blades with a microfiber cloth. Avoid using compressed air, as it can push dust deeper into the motor.
Check the Air Quality Sensor
Many Dyson purifiers come with an air quality sensor that detects pollutants in real time. Over time, this sensor can become dirty, leading to inaccurate readings. Use a cotton swab lightly dampened with water to clean the sensor window (usually a small lens on the front or side of the unit).
Be gentle—scratching the sensor can affect its performance.
Keep the Area Around the Purifier Clear
For optimal airflow, keep at least 6–12 inches of space around your Dyson purifier. Don’t place it against a wall, in a corner, or behind furniture. Blocked airflow forces the machine to work harder and reduces its ability to circulate clean air throughout the room.
Use the Right Settings
Take advantage of your purifier’s smart features. Use “Auto” mode to let the machine adjust fan speed based on air quality. Run it on a lower setting during the night for quieter operation. And if you’re away from home, consider using the “Sleep” or “Off” mode to save energy.
Pro tip: Run your purifier for at least 15–30 minutes after cooking, cleaning, or smoking to quickly remove pollutants.
Choosing the Right Replacement Filter
Not all Dyson filters are created equal. Using the wrong type can compromise performance and even damage your machine. Here’s what you need to know when shopping for a replacement.
HEPA vs. HEPA + Carbon Filters
Most Dyson purifiers use a combined HEPA and carbon filter, but some models (like the Dyson Pure Cool Me) use a single-stage filter. Make sure you’re buying the correct type for your model.
HEPA filters are essential for capturing particles, while carbon filters are necessary for odor and gas removal. If your home has pets, smokers, or strong cooking odors, a dual-filter system is a must.
Compatibility Matters
Always check the model number of your Dyson purifier before purchasing a filter. Dyson filters are not universally interchangeable. For example:
- Dyson Pure Cool TP04 uses Filter 308194-02
- Dyson Pure Hot+Cool HP04 uses Filter 308194-02
- Dyson Pure Cool TP07 uses Filter 309203-02
You can find your model number on the base of the machine or in the user manual. When in doubt, visit the Dyson website and use their filter finder tool.
Genuine vs. Third-Party Filters
While third-party filters may be cheaper, they often fall short in quality and performance. Genuine Dyson filters are rigorously tested to meet strict standards for filtration efficiency, airflow, and durability. They also come with a warranty and are designed to fit perfectly.
Using a non-genuine filter can void your warranty and may not provide the same level of protection. In some cases, poorly made filters can even shed fibers or fail prematurely.
Where to Buy
You can purchase genuine Dyson filters directly from the Dyson website, authorized retailers like Best Buy or Amazon (sold by Dyson), or through the Dyson Link app. Avoid buying from unknown sellers or marketplaces with no return policy.
Pro tip: Sign up for Dyson’s email list to receive alerts about filter replacements and special offers. They often send reminders when your filter is nearing the end of its life.
Common Mistakes to Avoid
Even with the best intentions, it’s easy to make mistakes when changing your Dyson filter. Here are some common pitfalls and how to avoid them.
Forgetting to Reset the Filter Life Indicator
This is one of the most frequent errors. After installing a new filter, always reset the indicator. If you don’t, your Dyson may continue to show a low filter life warning, even though the filter is brand new.
Using the Wrong Filter
Double-check the model number before buying. Installing the wrong filter can lead to poor performance, air leaks, or even damage to the machine.
Not Cleaning the Housing
Skipping this step can allow dust to accumulate and reduce the effectiveness of your new filter. Always wipe out the compartment before installing the replacement.
Reusing Old Filters
Some people try to clean and reuse HEPA filters, but this isn’t recommended. HEPA filters are designed for single use. Attempting to clean them can damage the delicate fibers and reduce their efficiency.
Ignoring the Carbon Filter
If your model has a separate carbon filter, don’t forget to replace it. Even if the HEPA filter looks fine, the carbon layer may be exhausted and releasing odors back into the air.
Data Table: Dyson Air Purifier Filter Replacement Guide
| Model | Filter Type | Replacement Interval | Filter Part Number | Reset Method |
|---|---|---|---|---|
| Dyson Pure Cool TP04 | HEPA + Carbon | 12 months | 308194-02 | Dyson Link app or button combo |
| Dyson Pure Hot+Cool HP04 | HEPA + Carbon | 12 months | 308194-02 | Dyson Link app or button combo |
| Dyson Pure Cool TP07 | HEPA + Carbon | 12 months | 309203-02 | Dyson Link app |
| Dyson Pure Cool Me | Single-stage | 12 months | 308193-02 | Manual reset via app |
| Dyson Purifier Humidify+Cool PH01 | HEPA + Carbon | 12 months | 309203-02 | Dyson Link app |
This table provides a quick reference for popular Dyson air purifier models. Always verify your specific model before purchasing a filter.
Conclusion
Changing the filter in your Dyson air purifier is a simple yet essential task that has a big impact on your indoor air quality and the longevity of your machine. By following the steps in this guide, you can ensure your purifier continues to perform at its best—capturing allergens, odors, and pollutants with ease.
Remember, a clean filter means cleaner air, quieter operation, and peace of mind. Whether you’re using a 2026 model or an older version, regular maintenance is key. Pay attention to the signs, use genuine Dyson filters, and don’t forget to reset the life indicator after each replacement.
Think of your Dyson air purifier as a silent guardian for your home’s air. It works tirelessly behind the scenes, and with a little care, it will keep doing so for years to come. So the next time you take a deep, refreshing breath in your living room, you’ll know exactly why it feels so good—and what you did to make it happen.
Now go ahead, change that filter, and breathe easy.
Frequently Asked Questions
How do I know when to change the filter in my Dyson air purifier?
Most Dyson air purifiers display a filter life indicator on the LCD screen or app, alerting you when it’s time for a replacement. You should also consider changing the filter every 12 months under normal use, or sooner if you notice reduced airflow or odors.
What type of filter does my Dyson air purifier use?
Dyson air purifiers typically use a combination of a HEPA and activated carbon filter, designed to capture allergens, pollutants, and odors. Always check your specific model to ensure you purchase the correct replacement filter for optimal performance.
Can I clean and reuse the Dyson air purifier filter instead of replacing it?
No, Dyson filters are not washable or reusable—they must be replaced to maintain air purification efficiency. Attempting to clean them can damage the filter and reduce the purifier’s effectiveness.
How do I change the filter in a Dyson air purifier step by step?
First, turn off and unplug the purifier, then remove the front cover or base panel to access the filter compartment. Pull out the old filter, insert the new one with the arrow pointing inward, and reassemble the unit before restarting.
Where can I buy a replacement filter for my Dyson air purifier?
You can purchase genuine Dyson replacement filters directly from the Dyson website, authorized retailers, or major electronics stores. Using certified filters ensures compatibility and maintains your purifier’s warranty.
Will changing the filter improve my Dyson air purifier’s performance?
Yes, replacing a clogged or old filter restores airflow and enhances the purifier’s ability to capture dust, pollen, and other airborne particles. Regular filter changes are essential for maintaining optimal air quality and device efficiency.