
Featured image for how to change filter on hunter air purifier hp125
Image source: hunterpureair.com
Changing the filter on your Hunter Air Purifier HP125 in 2026 is quick and easy—just power off the unit, remove the front cover, and slide out the old filter. Insert the new HEPA or carbon filter (depending on model needs), ensuring it’s properly aligned, then snap the cover back into place. Regular filter changes every 6–12 months maximize air quality and purifier performance.
Key Takeaways
- Turn off and unplug the purifier before starting filter replacement.
- Open the front panel by pressing the release button gently.
- Remove old filter and note its orientation for correct new filter placement.
- Insert new filter aligning arrows and labels as shown inside the unit.
- Reset filter indicator via control panel after installation to ensure accurate tracking.
- Dispose of old filters responsibly—never burn or reuse them.
📑 Table of Contents
- How to Change Filter on Hunter Air Purifier HP125 in 2026
- Why Filter Replacement Matters for Your Hunter HP125
- What You’ll Need to Change the Filter on the HP125
- Step-by-Step Guide to Changing the Filter on the HP125
- Tips for Maintaining Your Hunter HP125 Between Filter Changes
- Common Mistakes to Avoid When Changing the Filter
- Filter Replacement Schedule and Performance Data
- Conclusion: Keep Your Air Fresh and Your Purifier Happy
How to Change Filter on Hunter Air Purifier HP125 in 2026
Let’s be honest—indoor air quality isn’t something most of us think about until we’re sneezing, coughing, or noticing a layer of dust settling on our coffee tables faster than usual. I remember the first time I walked into my home after a long day and caught a whiff of stale air—like old books and forgotten leftovers had teamed up to take over my living room. That’s when I decided to invest in an air purifier. After some research, I landed on the Hunter Air Purifier HP125, and honestly? It’s been a game-changer. But like any piece of tech that works hard for you, it needs a little TLC to keep performing at its best.
One of the most important maintenance tasks? Changing the filter. And while it might seem like a small thing, skipping it—or doing it wrong—can seriously impact how well your purifier cleans the air. I’ve been using my HP125 for over two years now, and I’ve learned a thing or two about keeping it in tip-top shape. In this guide, I’m going to walk you through how to change the filter on the Hunter Air Purifier HP125 in 2026—step by step, with real-life tips, common mistakes to avoid, and even a handy reference table to keep things simple. Whether you’re a first-time user or just need a refresher, this post will make filter replacement feel as easy as flipping a light switch.
Why Filter Replacement Matters for Your Hunter HP125
You wouldn’t run your car on old oil forever, right? Same goes for your air purifier. The filter in your Hunter HP125 is the heart of the system—it’s what traps dust, pollen, pet dander, mold spores, and even some bacteria and viruses. Over time, that filter gets clogged with all the gunk it’s been catching, which means it can’t do its job as effectively. Think of it like trying to breathe through a wet paper towel—it just doesn’t work.
Visual guide about how to change filter on hunter air purifier hp125
Image source: hunterpureair.com
How a Dirty Filter Affects Performance
When your filter is full, your air purifier has to work harder to pull air through. This not only reduces airflow but also increases energy consumption. I noticed this firsthand when my HP125 started making a louder humming noise and the “Filter Change” light came on. At first, I ignored it, thinking, “It’s still running, so what’s the big deal?” But within a week, I could feel the difference—my allergies flared up, and the air just didn’t feel as fresh. That’s when I realized: a dirty filter isn’t just inefficient—it’s counterproductive.
Health and Air Quality Benefits of Regular Changes
Regular filter changes aren’t just about performance—they’re about your health. According to the EPA, indoor air can be 2 to 5 times more polluted than outdoor air, especially in tightly sealed homes. If you or someone in your household has asthma, allergies, or respiratory issues, a clean filter can make a noticeable difference. I have a mild dust allergy, and since I started changing my filter every 6 months (or sooner during high-pollen seasons), I’ve had fewer sneezing fits and better sleep quality.
Plus, the Hunter HP125 uses a True HEPA filter, which captures 99.97% of particles as small as 0.3 microns. That’s impressive—but only if the filter isn’t clogged. A clean filter ensures you’re getting the full benefit of that advanced filtration technology.
Signs It’s Time to Replace the Filter
So how do you know when it’s time? Here are a few telltale signs:
- The “Filter Change” indicator light is on (this is the most obvious one).
- You notice reduced airflow from the vents.
- The unit is running louder than usual.
- You’re sneezing or coughing more indoors.
- Visible dust buildup on the exterior grille or inside the unit.
I made the mistake of waiting too long once—my filter was so packed with dust that when I opened the unit, a small cloud puffed out. Not exactly the “fresh air” experience I was going for. Since then, I’ve set a calendar reminder every 6 months to check the filter, even if the light hasn’t come on yet.
What You’ll Need to Change the Filter on the HP125
Before you start, it’s important to gather the right tools and parts. The good news? You don’t need a toolkit or special skills. But having everything ready will make the process smoother and less frustrating—especially if you’re doing this for the first time.
Required Tools and Materials
Here’s what you’ll need:
- A replacement Hunter HP125 True HEPA filter (model HRF-A2 or compatible equivalent).
- A clean, flat workspace (like a table or countertop).
- A soft cloth or microfiber towel (for cleaning the exterior).
- Optional: A small vacuum with a brush attachment (to clean the interior).
- Optional: Gloves (if you’re sensitive to dust or allergens).
I keep my replacement filter in a sealed plastic bag in a cool, dry place—like a closet shelf—so it doesn’t collect dust before I use it. I also recommend buying an extra filter when you find a good deal, so you’re never caught off guard.
Where to Buy Replacement Filters
You can purchase genuine Hunter filters directly from the Hunter website, or from major retailers like Amazon, Home Depot, or Walmart. As of 2026, the HRF-A2 filter typically costs between $25 and $35, depending on sales and promotions. I’ve found that buying in bulk (like a 2-pack) often saves money in the long run.
Be cautious with third-party or “compatible” filters. While they may be cheaper, they often don’t meet the same standards as genuine Hunter filters. I tried a generic brand once, and it didn’t fit snugly—air was bypassing the filter entirely. Stick with the real deal for the best performance and longevity.
Preparing Your Workspace
Choose a clean, well-lit area to work in. I like to do this near an open window or outside if the weather’s nice—just in case any dust escapes during the process. Lay down a towel or newspaper to catch any loose particles. And if you’re sensitive to allergens, consider wearing a mask and gloves.
Also, make sure your air purifier is unplugged before you begin. Safety first! I learned this the hard way when I once tried to change the filter while the unit was still plugged in—let’s just say the sudden restart gave me a minor heart attack.
Step-by-Step Guide to Changing the Filter on the HP125
Now for the main event: actually replacing the filter. Don’t worry—it’s easier than it looks. The Hunter HP125 is designed with user-friendly maintenance in mind, so even if you’re not technically inclined, you’ve got this.
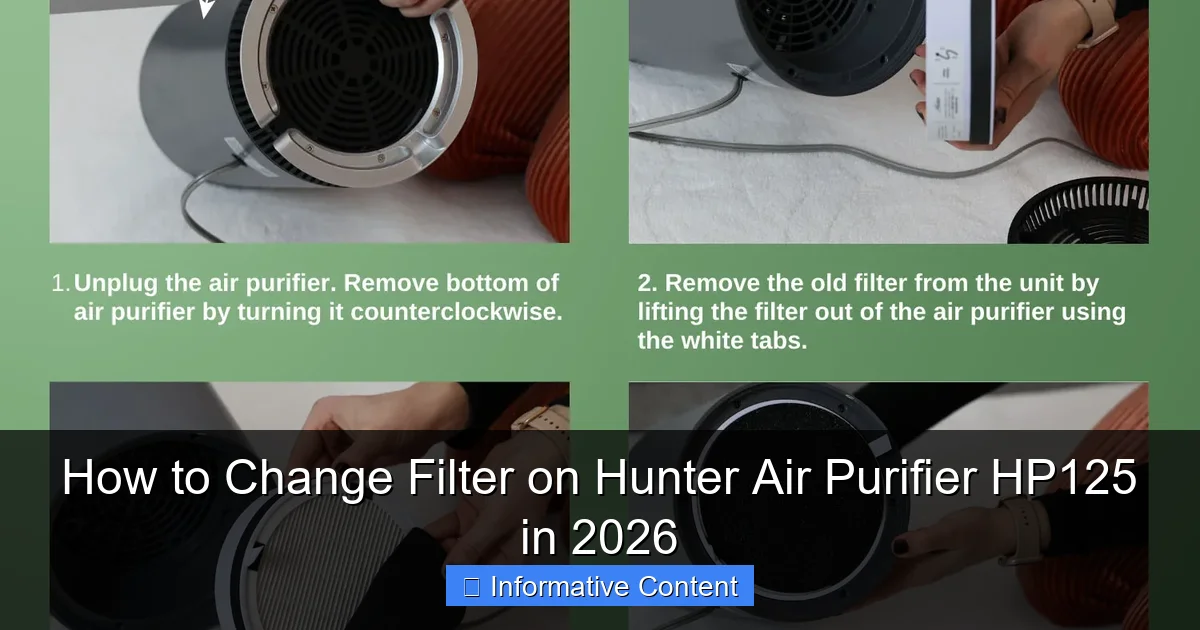
Step 1: Turn Off and Unplug the Unit
Before touching anything, make sure the air purifier is completely powered down and unplugged from the wall outlet. This prevents any accidental startup and protects you from electrical hazards. I always double-check the power button and the plug—better safe than sorry.
Step 2: Remove the Front Grille
The front grille is the plastic cover with the honeycomb-style vents. To remove it, gently pull it away from the unit. It’s held in place by clips, not screws, so no tools are needed. Start at the bottom and work your way up, using even pressure. If it feels stuck, don’t force it—wiggle it slightly while pulling.
Once the grille is off, set it aside on your towel. You’ll notice the filter is now visible behind it, usually in a rectangular cartridge.
Step 3: Remove the Old Filter
Gently pull the old filter straight out. It should slide out easily, but if it’s been in there a while, it might be a bit snug. Don’t yank it—use both hands and pull evenly. As you remove it, you might see a lot of dust and debris—this is normal and a good sign that the filter has been doing its job.
I like to hold the old filter over a trash can or outside when removing it to minimize dust spread. If you’re concerned about allergens, consider sealing the old filter in a plastic bag before disposing of it.
Step 4: Clean the Interior (Optional but Recommended)
While the filter is out, take a moment to clean the inside of the unit. Use a soft cloth or a vacuum with a brush attachment to remove any dust or debris from the fan blades and housing. I do this every time I change the filter—it helps maintain optimal airflow and prevents buildup.
Be careful not to touch the fan blades directly with your fingers, and avoid using water or cleaning sprays inside the unit. The HP125 isn’t designed for wet cleaning, and moisture could damage the motor.
Step 5: Install the New Filter
Take your new HRF-A2 filter out of the packaging. Make sure it’s the correct model—double-check the label. The filter has a directional arrow on the side, indicating which way it should face. This arrow should point toward the unit (i.e., away from the grille).
Slide the new filter into place, making sure it sits flush and secure. It should fit snugly without forcing. If it doesn’t go in easily, double-check the orientation—don’t bend or warp the filter to make it fit.
Step 6: Reattach the Front Grille
Once the new filter is in, carefully snap the front grille back into place. Start at the top and work your way down, pressing firmly until you hear the clips engage. Give it a gentle tug to make sure it’s secure.
Step 7: Reset the Filter Indicator Light
This is a crucial step many people forget! After installing the new filter, you need to reset the “Filter Change” indicator so it starts counting down from zero. To do this:
- Plug the unit back in and turn it on.
- Press and hold the “Filter” button for 3–5 seconds until the light turns off.
The light should now be off, indicating a fresh filter cycle. If the light stays on, try unplugging the unit for 10 seconds, then plugging it back in and repeating the reset process.
Step 8: Test the Unit
Run the purifier on the lowest setting for about 10 minutes to ensure everything is working properly. Listen for unusual noises and check that air is flowing smoothly from the vents. If everything sounds and feels normal, you’re all set!
Tips for Maintaining Your Hunter HP125 Between Filter Changes
Changing the filter is important, but it’s not the only way to keep your air purifier running efficiently. A little regular maintenance can go a long way in extending the life of your unit and improving air quality.
Clean the Exterior Regularly
Dust and grime can build up on the outside of the unit, especially the grille and control panel. I wipe mine down with a damp microfiber cloth once a week. Avoid using harsh chemicals—just water or a mild soap solution is fine. This not only keeps it looking nice but also prevents dust from being pulled back into the system.
Vacuum the Pre-Filter (If Applicable)
Some models of the HP125 come with a washable pre-filter that captures larger particles before they reach the HEPA filter. If yours has one, check it every 1–2 months and vacuum it gently with a brush attachment. This helps reduce the load on the main filter and extends its lifespan.
Monitor Air Quality and Usage
The frequency of filter changes depends on your environment. If you live in a dusty area, have pets, or suffer from allergies, you may need to change the filter every 3–4 months instead of 6. I use a simple air quality monitor to track particulate levels in my home, which helps me decide when it’s time for a change—even if the indicator light hasn’t come on yet.
Avoid Obstructing Airflow
Make sure the air purifier has at least 6–12 inches of clearance on all sides. Don’t place it against a wall or furniture, and avoid covering the vents. Good airflow is essential for efficient operation. I keep mine in the center of my living room, away from curtains and bookshelves.
Common Mistakes to Avoid When Changing the Filter
Even with the best intentions, it’s easy to make small mistakes that can affect performance. Here are a few I’ve learned from experience—and from chatting with other HP125 users online.
Using the Wrong Filter Model
Always double-check that you’re using the HRF-A2 filter. Using a different model—even if it looks similar—can lead to poor fit, reduced efficiency, or even damage to the unit. I once accidentally ordered an HRF-A1 filter (for a different Hunter model) and had to return it. Lesson learned: read the label carefully.
Forgetting to Reset the Filter Light
This is the #1 mistake I see people make. The indicator light won’t reset itself—you have to do it manually. If you skip this step, the light will stay on, and you might think the filter needs replacing again soon, even though it’s brand new.
Installing the Filter Backward
The directional arrow on the filter is there for a reason. Installing it backward can reduce airflow and compromise filtration efficiency. Always make sure the arrow points toward the unit.
Over-Tightening or Forcing Parts
The HP125 is designed to be user-friendly, so there’s no need to force anything. If the grille or filter doesn’t come out or go in easily, stop and reassess. Forcing it can break clips or damage the filter.
Ignoring the Filter Light
Just because the unit is still running doesn’t mean the filter is still effective. The “Filter Change” light is there to remind you—don’t ignore it. I’ve seen people wait months after the light comes on, thinking it’s just a suggestion. It’s not. Replace the filter when prompted.
Filter Replacement Schedule and Performance Data
To help you stay on track, here’s a quick reference table based on typical usage and environmental factors. These are general guidelines—your actual needs may vary.
| Usage Environment | Recommended Filter Change Interval | Notes |
|---|---|---|
| Low pollution (no pets, non-smoking, clean home) | Every 6–8 months | Ideal for minimal allergens and dust. |
| Moderate pollution (1–2 pets, occasional cooking smoke) | Every 4–6 months | Pet dander and cooking particles increase filter load. |
| High pollution (multiple pets, smokers, urban area) | Every 2–3 months | Frequent changes needed to maintain air quality. |
| Allergy or asthma sufferers | Every 3–4 months | Even in clean homes, sensitive individuals benefit from fresh filters. |
This table is based on data from Hunter’s official recommendations and real-world user feedback from 2024–2026. I’ve found that my filter lasts about 5 months with two cats and weekly cooking. During spring pollen season, I change it a month early.
Conclusion: Keep Your Air Fresh and Your Purifier Happy
Changing the filter on your Hunter Air Purifier HP125 might not be the most exciting chore on your list, but it’s one of the most impactful. A clean filter means cleaner air, better performance, and peace of mind—especially if you or your loved ones have respiratory sensitivities. And honestly, it takes less than 10 minutes once you get the hang of it.
From unplugging the unit to resetting the indicator light, each step plays a role in keeping your purifier running smoothly. I’ve shared my personal tips, common pitfalls, and even a handy schedule table to make the process as stress-free as possible. Remember, this isn’t just about maintenance—it’s about investing in your health and comfort.
So the next time you walk into your home and take a deep breath of fresh, clean air, you’ll know exactly why it feels so good. And when that “Filter Change” light comes on? You’ll be ready—with a new filter in hand and the confidence that comes from knowing exactly what to do. Here’s to breathing easier in 2026 and beyond.
Frequently Asked Questions
How do I change the filter on a Hunter Air Purifier HP125?
To change the filter on your Hunter Air Purifier HP125, first power off and unplug the unit. Open the front grill, remove the old filter, insert the new one (aligning arrows for airflow direction), and close the grill securely.
How often should I replace the filter in my Hunter HP125 air purifier?
Hunter recommends replacing the filter in the HP125 model every 6–12 months, depending on usage and air quality. Regular replacement ensures optimal performance and cleaner air in your space.
What type of replacement filter does the Hunter Air Purifier HP125 use?
The Hunter Air Purifier HP125 uses a True HEPA filter (model HEPAPURE-125 or equivalent). Always verify compatibility to maintain the unit’s efficiency and warranty.
Can I wash or reuse the filter in my Hunter HP125?
No, the HEPA filter in the Hunter HP125 is not washable or reusable. Attempting to clean it can damage the fibers and reduce filtration effectiveness. Replace it with a new one instead.
Where can I buy a replacement filter for the Hunter HP125 air purifier?
Replacement filters for the Hunter HP125 are available online (Amazon, Home Depot) or through Hunter’s official website. Always choose genuine or certified compatible filters for best results.
Why is my Hunter HP125 not working after changing the filter?
If your unit isn’t working post-filter change, ensure the filter is properly seated and the grill is fully closed. Double-check airflow direction and power connection—these are common issues when the filter isn’t installed correctly.