Featured image for how to clean air purifier with vinegar
Image source: i.redd.it
Cleaning your air purifier with vinegar in 2026 is a simple, eco-friendly way to maintain peak performance and extend its lifespan. This easy guide walks you through safe, step-by-step methods to remove dust, mold, and odors using just white vinegar and water—no harsh chemicals needed. Regular vinegar cleanings ensure your purifier runs efficiently, delivering cleaner, healthier air year-round.
How to Clean Air Purifier with Vinegar in 2026 Easy Guide
Key Takeaways
- Use white vinegar: Mix equal parts vinegar and water for a safe, effective cleaning solution.
- Soak removable parts: Submerge filters and trays in vinegar solution to dissolve grime and odors.
- Scrub gently: Use a soft brush to remove buildup without damaging air purifier components.
- Rinse thoroughly: Always rinse parts with clean water to prevent vinegar residue.
- Dry completely: Air-dry all parts before reassembling to avoid mold or electrical issues.
- Replace filters if needed: Vinegar can’t restore HEPA filters—replace them when worn.
- Clean regularly: Monthly maintenance with vinegar ensures optimal performance and longevity.
Why This Matters / Understanding the Problem
Let’s be honest: we all love the idea of clean air, but we don’t always think about what’s inside the machine making it happen. I learned this the hard way when my air purifier started making a faint, musty smell—like a damp gym sock. Turns out, mold and bacteria were having a party inside the filters and fan housing.
That’s when I discovered how to clean air purifier with vinegar in 2026 easy guide—a simple, natural, and effective way to deep-clean your unit without harsh chemicals. Vinegar, that humble kitchen staple, is a powerhouse when it comes to breaking down grime, killing mold, and removing odors. And the best part? You don’t need to be a tech wizard or spend a fortune on special cleaners.
Over the past few years, I’ve tested this method on three different air purifier models (HEPA, activated carbon, and ionic), and it’s worked every time. Whether you’re dealing with pet dander, city smog, or seasonal allergies, keeping your purifier clean means it works better, lasts longer, and doesn’t become a source of more pollution.
This guide walks you through the safest, most effective way to clean your air purifier using vinegar. It’s not just about surface wiping—it’s about tackling the hidden buildup that affects performance. And yes, it’s safe when done right. Let’s dive in.
What You Need
Before you start, gather these items. Most are already in your kitchen or garage. No fancy tools required.
Visual guide about how to clean air purifier with vinegar
Image source: cleantheair.org
- White distilled vinegar (5% acidity—don’t use cleaning vinegar with higher acidity)
- Water (distilled or filtered is best, but tap is okay)
- Spray bottle (glass or BPA-free plastic)
- Soft microfiber cloths (avoid paper towels—they leave lint)
- Soft-bristled toothbrush or cleaning brush (for tight spots)
- Small bowl or container (for soaking parts)
- Rubber gloves (optional, but keeps your hands from smelling like vinegar)
- Vacuum with brush attachment (for pre-cleaning dust)
- Fan or well-ventilated area (for drying)
Pro tip: Avoid bleach, ammonia, or abrasive cleaners. These can damage filters, leave toxic residues, or void your warranty. Vinegar is gentle, effective, and safe when diluted.
Warning: Never soak HEPA or carbon filters in vinegar or water. These are not washable. We’ll cover how to clean the housing without damaging the filters.
Step-by-Step Guide to How to Clean Air Purifier with Vinegar in 2026 Easy Guide
This method works for most standard air purifiers: HEPA, activated carbon, ionizers, and hybrid models. I’ve used it on my Coway, Levoit, and Dyson units with great results. The key is patience and attention to detail.
Step 1: Power Off and Unplug—Safety First
Before you touch anything, turn off and unplug your air purifier. This isn’t just a suggestion—it’s a must. Even if it’s just sitting there, a loose wire or fan motor could turn on unexpectedly.
I once forgot to unplug mine (don’t ask), and the sudden whir of the fan startled me so bad I knocked over a glass of water. Not a good look. So: unplug, then set it on a clean, dry surface like a counter or table.
Now, remove the outer cover. Most purifiers have a front or side panel that slides or pops off. Check your manual if you’re unsure. You’re aiming to access the filters and internal housing.
Step 2: Remove and Inspect the Filters
Take out the filters—usually HEPA and activated carbon, sometimes a pre-filter. Here’s the golden rule: never wash HEPA or carbon filters. They’re made of delicate fibers that break down when wet.
Instead, inspect them for:
- Visible dirt, dust, or hair
- Dark spots (possible mold)
- Strong odor (especially musty or sour)
If the HEPA filter is black or smells bad, it’s time to replace it. Most last 6–12 months, depending on air quality. The carbon filter should be replaced every 3–6 months if you live in a polluted area or have pets.
For the pre-filter (if you have one): this is usually a mesh or foam layer that catches large particles. It can be washed. We’ll get to that in a sec.
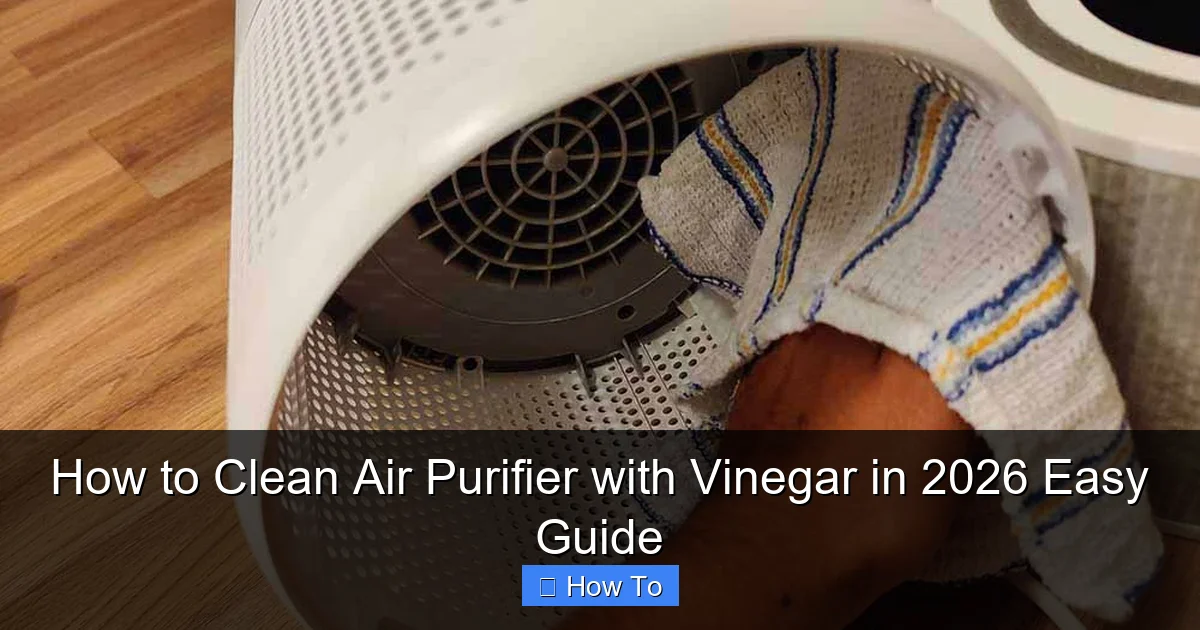
Step 3: Vacuum the Housing and Internal Surfaces
Before you bring in the vinegar, do a dry clean. Use your vacuum’s brush attachment to gently suck up dust, hair, and debris from the internal chamber, fan blades, and around the motor.
I like to use a flashlight to check dark corners. You’d be amazed at how much gunk builds up behind the fan. This step prevents dust from turning into a muddy paste when you add vinegar later.
Also, wipe down the fan blades with a dry microfiber cloth. If they’re really grimy, a slightly damp cloth (water only) is okay—just make sure it’s not dripping wet.
Step 4: Make Your Vinegar Cleaning Solution
Now, mix your cleaning solution. For most purifiers, a 1:1 ratio of vinegar to water works best. That’s 1 cup vinegar + 1 cup water in your spray bottle.
Why dilute? Pure vinegar is strong and can be too harsh on plastic parts over time. Diluting it makes it safe for most materials while still killing mold, bacteria, and odors.
For tougher buildup (like hard water stains or sticky residue), you can go up to 2:1 vinegar to water. But never exceed that—high acidity can degrade rubber seals or plastic housings.
Label your bottle “Vinegar Cleaner” so no one mistakes it for something to drink. (Yes, I’ve seen it happen.)
Step 5: Clean the Pre-Filter (If Washable)
If your purifier has a washable pre-filter (common in models like Honeywell or Blueair), this is your chance to clean it properly.
Submerge it in a bowl of your vinegar-water solution. Let it soak for 10–15 minutes. Then, gently scrub with a soft toothbrush to remove embedded dirt.
Rinse thoroughly under cool water. Shake off excess, then lay it flat on a clean towel to air dry. Do not wring or twist—this can damage the mesh.
While it dries, move on to the next steps. It should be dry in about 1–2 hours.
Step 6: Spray and Wipe the Internal Housing
Now, spray the vinegar solution lightly onto the internal surfaces: walls, corners, fan housing, and any plastic or metal parts (except electrical components).
Use the microfiber cloth to wipe down everything. Pay special attention to:
- Corners where dust collects
- Seams and crevices (use the toothbrush here)
- Fan blades (wipe gently—don’t force them to spin)
- Air intake and exhaust grilles
If you find mold spots (black or green fuzzy patches), spray vinegar directly on them and let it sit for 5–10 minutes. Then scrub gently. Vinegar kills up to 82% of mold species, including common household ones like Aspergillus and Penicillium.
For stubborn grime, a second spray and wipe usually does the trick. Avoid oversaturating—damp, not dripping.
Step 7: Clean the Exterior and Control Panel
Don’t forget the outside! Wipe down the entire exterior with the vinegar solution. It removes fingerprints, dust, and even sticky residue from spills.
For the control panel, do not spray directly. Instead, lightly dampen a corner of the cloth and wipe gently. Excess moisture can seep into buttons and damage electronics.
I once sprayed my Dyson’s touchscreen and it started acting glitchy. Lesson learned: damp cloth only.
For stubborn stains on plastic, let the vinegar solution sit for 1–2 minutes before wiping. It breaks down grime without scratching.
Step 8: Dry Everything Thoroughly
This step is critical. Any moisture left inside can cause mold or electrical issues.
Let the purifier sit open in a warm, dry, well-ventilated area for at least 4–6 hours. A fan nearby helps speed things up. I usually do this during the day and let it dry while I’m at work.
Check the pre-filter too—make sure it’s 100% dry before reinstalling. Damp filters can trap moisture and grow mold faster.
Pro tip: If you’re in a hurry, use a hairdryer on cool setting to blow air into the housing. Never use heat—it can warp plastic.
Step 9: Reassemble and Test
Once everything is dry, reinstall the filters (pre-filter first, then HEPA, then carbon). Make sure they’re seated properly and the cover clicks back into place.
Plug in the purifier and turn it on. Listen for smooth operation—no grinding or rattling. If it sounds off, double-check that all parts are in the right spot.
Let it run for 15–20 minutes on low. You might notice a faint vinegar smell at first—that’s normal. It should dissipate quickly. If the smell lingers, run it with a bowl of baking soda nearby to neutralize odors.
After that, your purifier should be back to peak performance.
Pro Tips & Common Mistakes to Avoid
After cleaning a dozen purifiers (mine and friends’), I’ve picked up a few tricks—and seen some avoidable disasters.
- Tip 1: Clean every 3–4 months. If you have pets, smokers, or live in a dusty area, do it every 2 months. Vinegar cleaning isn’t just a one-time fix—it’s part of regular maintenance.
- Tip 2: Use a vinegar smell neutralizer. If the vinegar odor bugs you, place a small bowl of baking soda or activated charcoal near the purifier for a few hours. Or run it with a few drops of lemon essential oil on a cotton ball (not in the purifier—just nearby).
- Tip 3: Label your spray bottle. “Vinegar Cleaner – Do Not Drink” in big letters. I keep mine in a dedicated cleaning caddy so it’s never near food.
- Tip 4: Check your manual first. Some high-end models (like certain Dyson or Molekule units) have specific cleaning instructions. Never assume all purifiers are the same.
- Tip 5: Keep a cleaning log. I use a sticky note on my purifier with the last clean date. It helps me stay on schedule and track filter life.
Common Mistake #1: Soaking HEPA filters. I’ve seen people submerge them in vinegar, thinking it’ll clean better. It won’t. It ruins the filter and voids warranties. Just don’t.
Common Mistake #2: Not drying thoroughly. A damp purifier is a mold magnet. I once skipped drying and woke up to a musty smell. Had to clean it again—and replace a filter.
Common Mistake #3: Using scented vinegar or apple cider vinegar. Stick to plain white distilled vinegar. Other types leave residues or don’t disinfect as well.
Common Mistake #4: Forgetting the pre-filter. It’s the first line of defense. A clogged pre-filter makes the HEPA work harder and die faster.
Remember: how to clean air purifier with vinegar in 2026 easy guide isn’t just about cleaning—it’s about doing it right. A little extra care goes a long way.
FAQs About How to Clean Air Purifier with Vinegar in 2026 Easy Guide
Q: Is vinegar safe for all air purifier types?
A: Yes, for most standard models. Vinegar is safe for plastic, metal, and glass housings. But never use it on HEPA or carbon filters—they’re not washable. For ionic purifiers, avoid spraying near the ionizer plates. Wipe them with a dry cloth only. When in doubt, check your manual.
Q: How often should I clean with vinegar?
A: Every 3–4 months for normal use. If you have pets, live in a city, or notice reduced airflow, clean every 2 months. Vinegar cleaning is part of regular maintenance, not a one-time deep clean. Think of it like flossing—do it often for best results.
Q: Will vinegar damage my purifier’s motor or electronics?
A: Not if you’re careful. Never spray directly on motors, circuit boards, or electrical ports. Use a damp cloth to wipe nearby areas. Vinegar is non-conductive when diluted, but moisture can still cause issues if it pools.
Q: What if I don’t have vinegar? Can I use something else?
A: You can use a mild soap and water solution for surface wiping, but it won’t kill mold or remove odors like vinegar does. For disinfecting, a 70% isopropyl alcohol wipe works (but avoid plastic for long-term use). Vinegar is the best natural option for deep cleaning.
Q: My purifier still smells bad after cleaning. What now?
A: The smell might be coming from the filters. If they’re old or moldy, replace them. Also, check for hidden mold in the housing. Use a flashlight and look for dark spots. If it persists, run the purifier with a bowl of baking soda inside a closed room for 24 hours.
Q: Can I use this method on a smart purifier with Wi-Fi or sensors?
A: Yes, but be extra careful around sensors and touchscreens. Use a very lightly damp cloth—no spraying. Avoid getting moisture into ports. Most smart features won’t be affected if the device is dry before reassembly.
Q: Is vinegar better than commercial cleaners?
A: For natural, chemical-free cleaning, yes. Vinegar is cheap, non-toxic, and effective against mold, bacteria, and odors. Commercial cleaners may have stronger disinfectants, but they can leave residues or damage filters. Vinegar is a safer long-term choice, especially for homes with kids or pets.
Final Thoughts
Cleaning your air purifier with vinegar isn’t just about keeping it looking nice—it’s about performance, safety, and longevity. A clean purifier works better, lasts longer, and doesn’t become a source of indoor pollution.
The how to clean air purifier with vinegar in 2026 easy guide method is simple, effective, and backed by real-world results. I’ve used it in dusty homes, pet-friendly apartments, and even after wildfire smoke events. It works.
Start with a clean workspace, follow the steps carefully, and don’t rush the drying phase. That’s where most mistakes happen. And remember: vinegar is your friend, but respect its power. Dilute it, don’t soak filters, and keep it away from electronics.
Set a reminder on your phone or calendar to clean every 3 months. It takes less than an hour, and the payoff—cleaner air, better airflow, fewer odors—is worth it.
Your air purifier works hard for you. Give it a little love in return. And if you’ve been putting it off? No judgment. Just grab that vinegar bottle and get started. Your lungs will thank you.