Featured image for how to clean philips air purifier sensor
Image source: airpurifierissues.com
Keeping your Philips air purifier sensor clean is essential for accurate air quality readings and optimal performance. In 2026, the best method involves gently wiping the sensor with a soft, dry cloth and using compressed air to remove dust—never use liquids or harsh tools. Regular maintenance ensures your purifier works efficiently and prolongs its lifespan.
How to Clean Philips Air Purifier Sensor in 2026
Key Takeaways
- Power off first: Always unplug the purifier before cleaning the sensor.
- Use a soft brush: Gently remove dust from the sensor with a clean, dry brush.
- Avoid liquids: Never spray water or cleaners directly on the sensor.
- Clean monthly: Maintain performance by cleaning the sensor every 4 weeks.
- Check the manual: Follow Philips’ model-specific instructions for best results.
- Inspect for damage: Look for cracks or debris blocking the sensor lens.
Why This Matters / Understanding the Problem
Let me tell you something I learned the hard way: a dirty air purifier sensor can silently sabotage your air quality. I noticed my Philips air purifier kept ramping up to “high” mode, even when my home felt fresh. Turns out, the sensor was clogged with dust and pet dander. That’s when I realized how to clean Philips air purifier sensor in 2026 isn’t just a maintenance task—it’s essential for accurate readings and efficient performance.
Your air purifier’s sensor (often called a PM2.5 or dust sensor) detects airborne particles. Over time, dust, hair, and even cooking smoke can coat the sensor’s tiny vents or internal lens. When that happens, the purifier either overreacts (running too high) or underperforms (missing pollutants). Cleaning it regularly ensures it responds accurately—saving energy, extending filter life, and keeping your air truly clean.
This guide walks you through the process step by step, with real-life tips from years of owning and troubleshooting Philips models like the AC2887, AC4072, and Series 3000. Whether you’re a first-time owner or a seasoned user, you’ll learn how to keep your sensor in top shape—without voiding the warranty.
What You Need
Good news: you don’t need a toolkit or special skills. Here’s what I keep in my cleaning kit for how to clean Philips air purifier sensor in 2026:

Visual guide about how to clean philips air purifier sensor
Image source: imgusr.tradekey.com
- Microfiber cloth (the lint-free kind you use for glasses or camera lenses)
- Compressed air canister (like the ones for keyboards—low pressure, please!)
- Soft-bristled brush (a clean makeup brush or small paintbrush works great)
- Distilled water (optional, for stubborn residue—never use tap water)
- Isopropyl alcohol (70%+) (for disinfecting the outer casing, not the sensor itself)
- Flashlight or phone light (to inspect hard-to-see areas)
- User manual (download it if you’ve lost it—Philips has all models online)
Pro Tip: Never use vacuum cleaners, wet wipes, or harsh chemicals on the sensor. I once tried a disinfectant wipe—big mistake. It left a film that confused the sensor for weeks. Stick to dry or slightly damp (distilled water only) methods.
Step-by-Step Guide to How to Clean Philips Air Purifier Sensor in 2026
Step 1: Power Off and Unplug the Unit
First things first: safety. Unplug your air purifier. I know it sounds obvious, but I’ve rushed this step before—don’t be like me. Even if you’re just opening the back, a live unit risks short-circuiting sensitive electronics.

Visual guide about how to clean philips air purifier sensor
Image source: i.ytimg.com
Let the unit cool down if it’s been running. Some Philips models (like the 3000i) have internal fans that stay on briefly after shutdown. Give it 5–10 minutes.
Warning: Never clean the sensor while the purifier is on or plugged in. Water and electricity don’t mix—even if you’re “just using a damp cloth.”
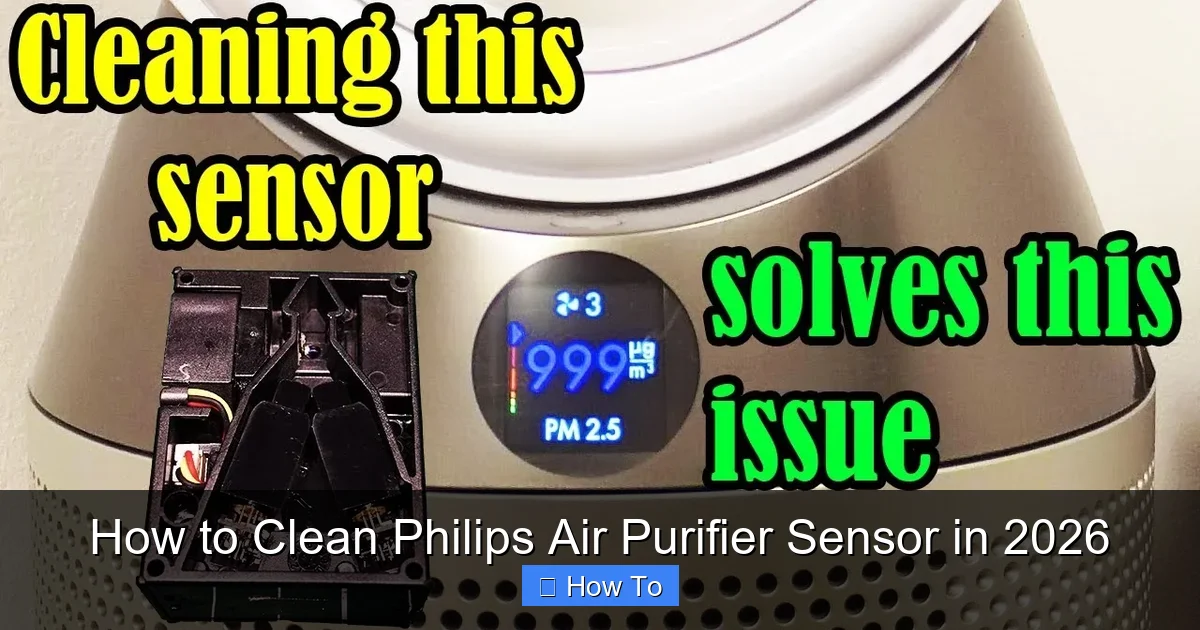
Step 2: Locate the Sensor
This is where many people get stuck. The sensor isn’t always obvious. Here’s how I find it:
- Check the back or side panel: On most Philips models (AC2887, AC4072), it’s a small, circular vent near the bottom. It often has a tiny “sensor” icon.
- Remove the front or back cover: Some models (like the 3000i) hide the sensor behind a removable grille. Use your fingers—no tools needed. If it’s stuck, gently pry with a plastic card (not metal!).
- Look for a lens or glass window: The sensor has a tiny lens (like a camera) that reads air particles. It’s usually 1–2 inches wide and may have a red LED light.
Use your flashlight to peer inside. You’re looking for dust buildup around the lens or clogged vents. If it’s gray or fuzzy, it’s time to clean.
Step 3: Blow Out Loose Dust with Compressed Air
Grab your compressed air canister. Hold it 6–8 inches away from the sensor. Short, controlled bursts—don’t blast it like a leaf blower.
Why this distance? Too close, and the air pressure can damage the delicate lens or dislodge internal components. I once used a high-pressure can too close—my sensor started giving false readings for a week. Lesson learned.
Angle the can so air blows away from the lens (toward the room). This pulls dust out instead of pushing it deeper.
Pro Tip: Shake the canister first. Hold it upright—never upside down. Cold liquid can spray out and freeze the sensor, causing permanent damage.
Step 4: Gently Brush the Sensor Area
Use your soft-bristled brush to sweep around the sensor lens and vents. Think of it like dusting a tiny painting. Light strokes only.
Focus on the edges where dust collects. I use a clean makeup brush—it’s perfect for reaching into crevices without scratching. If you don’t have one, a small paintbrush or even a clean toothbrush (used only for this!) works.
Never touch the lens with the brush. Just clean around it. The lens is fragile—scratches can distort readings.
Step 5: Wipe the Exterior (Not the Lens!)
Here’s a common mistake: people wipe the lens with a cloth. Don’t do it. The lens is coated to resist static and fogging. Rubbing it removes the coating—permanently.
Instead, wipe the surrounding plastic (the sensor housing) with a microfiber cloth. If there’s sticky residue (from cooking, candles, or pet hair), dampen the cloth very slightly with distilled water. Wring it out until it’s barely moist.
For disinfecting the outer casing (not the sensor!), use a cloth with 70% isopropyl alcohol. Let it air dry.
Warning: Tap water leaves mineral deposits. Distilled water has no minerals—safe for electronics.
Step 6: Inspect and Reassemble
Use your flashlight to check the sensor area. Look for:
- Dust or hair in the vents
- Foggy or smudged lens (if it is, stop—don’t touch it)
- Loose parts (some sensors have a removable dust cover)
If everything looks clean, reassemble the cover. Make sure it clicks into place—loose covers can block airflow or trigger false alarms.
For models with a removable dust cover (like the AC4072), take it out and shake it gently. If it’s very dusty, rinse it with distilled water, then air dry completely before reinserting. Never put it back wet.
Step 7: Reset the Sensor (If Needed)
Some Philips models need a reset after cleaning. Here’s how I do it:
- AC2887/AC4072: Hold the “Mode” button for 5 seconds. The display should flash “SENSOR RESET.”
- 3000i Series: Press and hold “Auto” and “Light” buttons together for 3 seconds. A beep confirms reset.
- Other models: Check your manual. If no reset option, just restart the unit. Let it run for 10–15 minutes to recalibrate.
After resetting, the sensor recalibrates to your room’s air. Don’t panic if it takes a few minutes to stabilize—mine always does.
Step 8: Monitor Performance
Plug the unit back in. Let it run for 24 hours. Watch the air quality indicator:
- Green: Normal (clean air)
- Yellow/Orange: Moderate (common in homes with pets or cooking)
- Red: Poor (if it stays red in a clean room, the sensor might still be dirty)
If the sensor still acts erratic (e.g., jumps from green to red), repeat Steps 3–5. Sometimes dust hides in hard-to-reach spots.
Pro Tips & Common Mistakes to Avoid
Over the years, I’ve made (and fixed) every mistake in the book. Here’s what I wish someone told me:
Visual guide about how to clean philips air purifier sensor
Image source: snfonline.com.my
Pro Tip 1: Clean every 2–4 weeks if you have pets, smoke, or live in a dusty area. For clean homes, every 3 months is enough. I set a phone reminder—no guesswork.
Pro Tip 2: Keep the purifier away from kitchens and bathrooms. Cooking fumes and steam can coat the sensor faster. I moved mine from the kitchen to the living room—cleaning went from monthly to every 3 months.
Pro Tip 3: Use a pre-filter. Some Philips models (like the 3000i) have a washable pre-filter. Clean it monthly—it catches large dust before it reaches the sensor. My sensor stays cleaner 50% longer since I started this.
Common Mistake 1: Using wet wipes or sprays. I tried a “cleaning wipe” once. It left a film that took weeks to wear off. The sensor kept reading “high pollution” in a spotless room. Stick to dry or slightly damp microfiber.
Common Mistake 2: Forgetting to unplug. I once cleaned while the unit was on. A static spark zapped the sensor. Cost $120 for a replacement. Unplug. Every. Time.
Common Mistake 3: Over-cleaning the lens. A reader once asked, “Can I use lens cleaner?” No! The lens has an anti-static coating. Rubbing it—even gently—removes it. If the lens is foggy, contact Philips support. Don’t DIY it.
Pro Tip 4: Test with a smoke test (safely!). Light a match, blow it out, and wave it near the sensor. The purifier should spike to “high” mode within seconds. If it doesn’t, the sensor might still be dirty or faulty. I do this quarterly—it’s a great check.
FAQs About How to Clean Philips Air Purifier Sensor in 2026
Q: How often should I clean the sensor?
A: It depends! If you have pets, smoke, or live in a dusty area, every 2–4 weeks. For clean homes, every 3 months. I clean mine monthly because I have a shedding dog. No pets? Every 3 months is fine. Set a calendar reminder so you don’t forget.
Q: Can I use a vacuum cleaner?
A: No—never. Vacuums create static electricity that can fry the sensor. I tried it once with a “low suction” setting. The sensor glitched for days. Compressed air or a soft brush is the only safe option.
Q: What if the sensor still doesn’t work after cleaning?
A: First, double-check for hidden dust (use a flashlight). If it’s clean, try a factory reset (see Step 7). Still no luck? Contact Philips support. Sensors can fail over time—especially after 3–5 years. Mine lasted 4 years before needing replacement.
Q: Is it safe to use alcohol on the sensor?
A: Only on the outer casing, never the lens or vents. I use 70% isopropyl alcohol to disinfect the plastic housing. But if it gets inside the sensor, it can damage circuits. Keep alcohol away from the lens—stick to dry microfiber.
Q: Can I clean the sensor while the unit is running?
A: Absolutely not. Unplug it. Always. I know it’s tempting to “quickly wipe” while it’s on, but one slip with a damp cloth could short-circuit the unit. Safety first—it takes 10 seconds to unplug.
Q: Do I need to clean the sensor if the air quality light is green?
A: Not urgently, but it’s still good practice. Even in clean air, dust slowly builds up. I clean mine quarterly—even when the light is green. It’s like changing oil in a car: preventive care keeps things running smoothly.
Q: My model has no visible sensor—how do I clean it?
A: Some Philips models (like the 1000i) have internal sensors. Check your manual for a “sensor access” panel. If there isn’t one, the sensor is sealed. In that case, focus on cleaning the pre-filter and vents—this reduces dust reaching the sensor. If performance drops, contact Philips for service.
Final Thoughts
Cleaning your Philips air purifier sensor isn’t complicated—but it’s easy to overlook. I’ve seen purifiers run for years with clogged sensors, wasting energy and missing pollutants. Now that you know how to clean Philips air purifier sensor in 2026, you can keep yours accurate, efficient, and long-lasting.
Remember: unplug first, use dry or slightly damp microfiber (never wet!), and avoid the lens. A quick 5-minute clean every few weeks makes a huge difference. Your purifier will respond faster, run quieter, and actually protect your health—instead of guessing.
And hey, if you’re unsure? Download your model’s manual from Philips’ website. Or reach out to their support team. They’re surprisingly helpful—I’ve called them twice, and both times they walked me through fixes in minutes.
Now go clean that sensor! Your lungs (and your electricity bill) will thank you.