
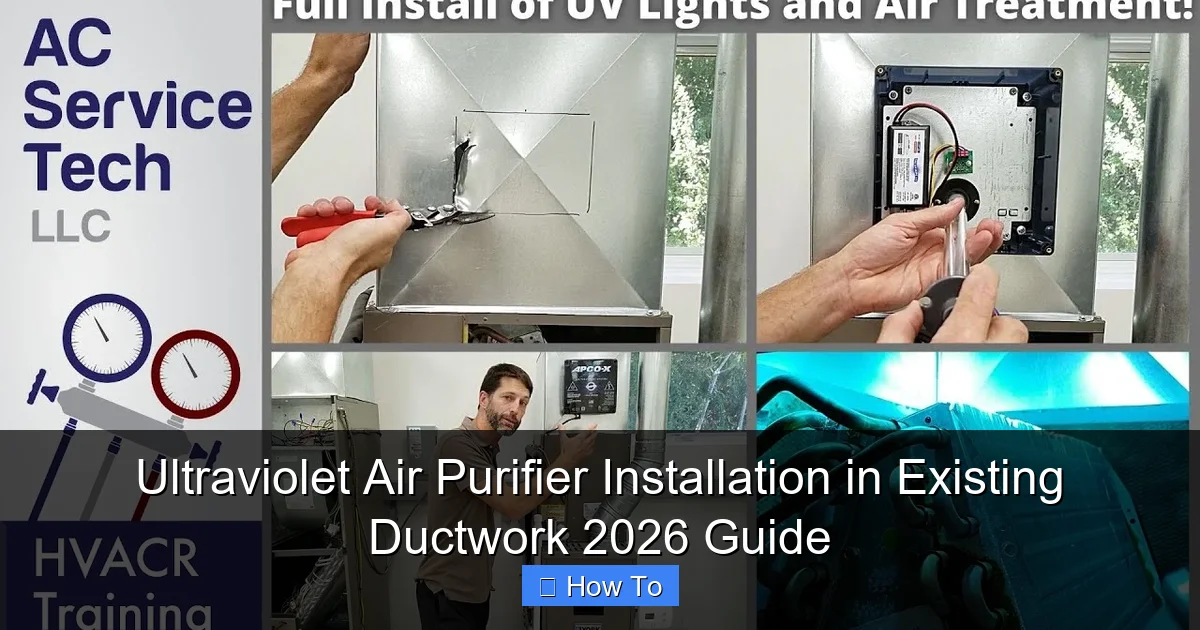
Featured image for how to install a ultraviolet air purifier in exsisting ductwork
Image source: airpurey.com
Installing an ultraviolet air purifier in existing ductwork is a powerful way to eliminate airborne pathogens and improve indoor air quality without replacing your entire HVAC system. This 2026 guide walks you through the essential steps—from selecting the right UV unit and identifying optimal placement near the evaporator coil or return air duct, to safely cutting into the ductwork and securing the purifier with proper electrical connections. With minimal tools and careful planning, homeowners and HVAC professionals can enhance air sanitation efficiently and effectively.
“`html
How to Ultraviolet Air Purifier Installation in Existing Ductwork 2026 Guide
Key Takeaways
- Turn off HVAC power before starting installation to ensure safety.
- Measure duct size accurately to select the right UV purifier model.
- Install near coil/filter for maximum germicidal effectiveness and coverage.
- Seal all connections to prevent air leaks and maintain efficiency.
- Use UV-safe gloves when handling lamps to avoid skin exposure.
- Schedule annual maintenance to replace bulbs and clean components.
Why This Matters / Understanding the Problem
Let’s be honest—your home’s air quality might not be as clean as you think. Even with regular HVAC maintenance, dust, mold spores, bacteria, and viruses can quietly circulate through your ductwork. I learned this the hard way when my youngest started getting frequent colds last winter. Our HVAC technician pointed out that while our furnace was running fine, the air inside our ducts was a breeding ground for invisible pollutants.
That’s when I started researching ultraviolet (UV) air purifiers. These devices use UV-C light to neutralize airborne pathogens right inside your ductwork—no filters to replace every month, no extra noise, just silent, continuous disinfection. But here’s the catch: installing one isn’t as simple as plugging in a plug-in air cleaner. You’re working with your home’s central air system, which means precision, safety, and compatibility matter.
If you’re looking for a long-term solution to improve indoor air quality without overhauling your entire HVAC setup, then **Ultraviolet Air Purifier Installation in Existing Ductwork 2026 Guide** is exactly what you need. This isn’t just about slapping a UV light into a duct—it’s about doing it right so it actually works, lasts years, and doesn’t cause more problems than it solves.
Whether you’re a DIY enthusiast or planning to hire a pro, understanding the process will help you make smarter decisions. And trust me, once you see how much fresher your home feels, you’ll wonder why you waited so long.
What You Need
Visual guide about how to install a ultraviolet air purifier in exsisting ductwork
Image source: i.ytimg.com
Before we dive into the steps, let’s get your toolkit and materials ready. Don’t worry—you probably already have most of this lying around the garage or basement.
Here’s what you’ll need for a successful **Ultraviolet Air Purifier Installation in Existing Ductwork 2026 Guide**:
- UV-C air purifier kit – Look for models specifically designed for HVAC ductwork (not just room units). Popular brands include Honeywell, AprilAire, and EcoQuest. Make sure it’s compatible with your system size (check CFM rating).
- Measuring tape – You’ll need to measure your duct diameter and available space.
- Drill with metal-cutting bits – Most ducts are galvanized steel, so standard wood bits won’t cut it.
- Screwdriver set (Phillips and flathead) – For mounting brackets and electrical connections.
- Wire strippers and electrical tape – If hardwiring (recommended for reliability).
- Safety gear – Gloves, safety goggles, and a dust mask. UV light and metal shavings are no joke.
- HVAC sealant or foil tape – To prevent air leaks after cutting into the duct.
- Multimeter (optional but helpful) – To test voltage if you’re unsure about your wiring.
- Ladder or step stool – Most return ducts are near the ceiling.
Pro tip: If your home has flexible ducting (the corrugated plastic kind), double-check that your UV purifier model supports it. Some only work with rigid metal ducts.
Also, check your local electrical codes. In many areas, hardwiring a device like this requires a licensed electrician—especially if you’re tapping into your HVAC’s control board. When in doubt, consult a pro. It’s better to spend $150 now than $1,500 later fixing a fried circuit board.
Step-by-Step Guide to Ultraviolet Air Purifier Installation in Existing Ductwork 2026 Guide
Visual guide about how to install a ultraviolet air purifier in exsisting ductwork
Image source: berkpurifier.com
Alright, let’s get to the good stuff. I’ll walk you through each step like we’re standing in your attic together, coffee in hand, ready to make your air cleaner than ever.
Step 1: Choose the Right Location in Your Ductwork
Not all spots in your duct system are created equal. The goal is to expose as much airflow as possible to the UV light while minimizing shadow zones where germs can hide.
The best place? The return air duct, close to your HVAC unit’s air handler. Why? Because this is where air gets pulled in from your home before being heated or cooled. Killing microbes here means they never reach your living spaces.
Avoid installing near bends, dampers, or insulation—these block UV exposure. Also, stay at least 12–18 inches away from the evaporator coil if you’re placing it on the supply side. Moisture from the coil can reduce UV effectiveness over time.
Use your measuring tape to find a straight, unobstructed section of duct that’s at least 12 inches long. Mark the spot lightly with a pencil.
Step 2: Turn Off Power and Prepare the Area
Safety first! Before you touch anything electrical or cut into metal, shut off power to your HVAC system at the main breaker panel. Don’t just flip the thermostat—go straight to the breaker. I made that mistake once and got a nasty shock (lesson learned!).
Once the power’s off, clear the area around the duct. Remove any insulation or debris. If you’re working in an attic or crawlspace, lay down a tarp to catch metal shavings—they’re sharp and hard to clean up later.
Put on your gloves, goggles, and mask. Trust me, you don’t want to breathe in galvanized steel dust.
Step 3: Measure and Mark the Installation Spot
Now, lay your UV purifier’s mounting template (usually included in the box) against the duct. Most kits come with a paper or cardboard guide that shows exactly where to drill.
Hold it firmly in place and trace the outline with a pencil. Double-check your measurements—once you cut, there’s no going back.
If your kit doesn’t include a template, measure the diameter of the UV lamp housing and mark a circle slightly larger than that. Most residential units need a 3–4 inch hole.
Step 4: Cut the Duct and Install the Mounting Bracket
This is where things get real. Grab your drill with a metal-cutting hole saw attachment (usually 3–4 inches). Start slowly to avoid warping the duct.
Drill your pilot hole first, then switch to the hole saw. Keep the drill perpendicular to the duct—tilting can create uneven edges that leak air later.
Once the hole is cut, clean up any burrs with a file or sandpaper. Sharp edges can damage the UV lamp sleeve during installation.
Next, attach the mounting bracket according to your kit’s instructions. Most use self-tapping screws that bite into the metal duct. Tighten them securely, but don’t overdo it—you don’t want to crack the bracket or deform the duct.
Step 5: Insert the UV Lamp and Seal the Opening
Carefully slide the UV lamp assembly into the bracket. Many models have a quartz sleeve that protects the bulb—handle it like a wine glass: gently and by the ends.
Make sure the lamp sits flush and doesn’t wobble. A loose fit can cause vibration, which shortens bulb life.
Now, seal around the edges with HVAC-approved foil tape or mastic sealant. This prevents conditioned air from escaping and keeps contaminants from bypassing the UV zone. I like to use foil tape—it’s durable and reflects UV light slightly, boosting efficiency.
Step 6: Wire the Unit (Hardwiring vs. Plug-In)
Here’s a big decision: hardwire or plug-in?
Hardwiring is more reliable and permanent. It connects directly to your HVAC’s 24V control circuit, so the UV light turns on only when the fan runs—saving energy and extending bulb life. This is the method recommended in most **Ultraviolet Air Purifier Installation in Existing Ductwork 2026 Guide** resources.
To hardwire:
- Locate the 24V transformer on your air handler (usually near the blower motor).
- Run low-voltage wire from the UV unit to the transformer’s “R” and “C” terminals.
- Use wire nuts or terminal blocks to secure connections.
- Wrap all joints with electrical tape.
Plug-in is easier but less efficient. You’ll need an outlet nearby (within 6 feet). The unit runs continuously, even when the HVAC isn’t on—which wastes power and burns out the bulb faster.
If you go plug-in, use a GFCI outlet and secure the cord with zip ties to prevent strain on the connection.
Step 7: Restore Power and Test the System
Once everything is wired and sealed, turn the breaker back on. Set your thermostat to “fan on” (not just “auto”) so the blower runs continuously.
Listen for unusual noises. Watch for flickering lights or tripped breakers—signs of a wiring issue.
Most UV purifiers have a small indicator light (usually blue or green) that shows the bulb is active. If it’s not lit, double-check your connections.
Let the system run for 10–15 minutes. Feel the air coming from your vents—it should feel noticeably fresher, almost “crisp.” That’s the UV doing its job.
Step 8: Schedule Maintenance and Monitor Performance
UV bulbs don’t burn out like regular lightbulbs—they lose intensity over time. Most last 9–12 months before needing replacement.
Mark your calendar! I use a phone reminder every 10 months. Replacing the bulb is simple: turn off power, unscrew the housing, swap the old bulb, and reassemble.
Also, check the quartz sleeve every 6 months for dust buildup. A clean sleeve = maximum UV output. Just wipe it gently with a soft cloth and isopropyl alcohol.
Pro Tips & Common Mistakes to Avoid
Visual guide about how to install a ultraviolet air purifier in exsisting ductwork
Image source: berkpurifier.com
After installing three UV purifiers in different homes (including my own), I’ve learned a few things the hard way. Here’s what I wish I knew sooner:
Pro Tip: Install the UV light before your air filter. That way, the filter catches dead microbes instead of letting them recirculate. It also protects the filter from UV degradation.
Warning: Never look directly at a UV-C bulb when it’s on—even through the duct. It can cause eye damage in seconds. Always turn off power before inspecting.
Common Mistake: Installing too close to the evaporator coil. Condensation reduces UV effectiveness and can shorten bulb life. Keep at least 18 inches of clearance.
Pro Tip: Pair your UV purifier with a high-MERV filter (MERV 11–13). The filter traps particles; the UV kills what gets through. Together, they’re a powerhouse.
Common Mistake: Skipping the sealant. Even a tiny gap around the mounting bracket can leak 10–15% of your conditioned air—wasting energy and reducing UV exposure.
And one last thing: don’t expect miracles overnight. UV purifiers work best as part of a holistic air quality strategy. Combine with regular duct cleaning, humidity control (ideally 40–60%), and source control (like banning smoking indoors).
FAQs About Ultraviolet Air Purifier Installation in Existing Ductwork 2026 Guide
Do I really need a UV air purifier if I already have a good filter?
Great question! Filters catch particles, but they don’t kill germs. A UV purifier adds a layer of protection by neutralizing mold, bacteria, and viruses that pass through the filter. Think of it like sunscreen for your HVAC system—it doesn’t replace soap, but it adds essential defense.
Can I install a UV purifier myself, or do I need a professional?
If you’re comfortable with basic electrical work and drilling into metal, yes—you can DIY. But if hardwiring feels intimidating, hire an HVAC technician. Many offer installation for $100–$200, which is cheaper than fixing a botched job.
Will a UV purifier increase my energy bill?
Not noticeably. Most units use 20–60 watts—about the same as a nightlight. If hardwired to run only when the fan is on, the impact is minimal. Plug-in models use slightly more since they run 24/7.
How do I know if my UV purifier is working?
Look for the indicator light. Some advanced models have sensors that alert you when UV output drops below 70%. You can also use a UV-C meter (available online for $30–$50) to test intensity annually.
Can UV light damage my ductwork or HVAC components?
Modern UV purifiers are designed to minimize ozone production and UV exposure to non-target areas. As long as you follow the manufacturer’s placement guidelines (away from plastic parts and insulation), damage is extremely rare.
What’s the difference between coil sterilization and air sterilization UV units?
Coil sterilization units mount directly on the evaporator coil to prevent mold growth. Air sterilization units go in the duct to treat moving air. For whole-home protection, many experts recommend both—but start with air sterilization if you can only choose one.
Are UV purifiers safe for pets and kids?
Absolutely. The UV light is contained entirely within the ductwork. No radiation escapes into your living space. In fact, by reducing airborne allergens and pathogens, they can improve respiratory health for everyone—including furry family members.
Final Thoughts
Installing a UV air purifier in your existing ductwork isn’t just a smart upgrade—it’s a long-term investment in your family’s health and comfort. From reducing allergy symptoms to preventing mold growth inside your HVAC system, the benefits are real and measurable.
By following this **Ultraviolet Air Purifier Installation in Existing Ductwork 2026 Guide**, you’re not just adding a gadget; you’re taking control of your indoor air quality with science-backed technology. And the best part? Once it’s installed, it works silently behind the scenes, year after year.
So grab your tools, turn off that breaker, and give your home the breath of fresh air it deserves. Your lungs (and your HVAC system) will thank you.
Ready to start? Pick a weekend, gather your supplies, and take that first step toward cleaner, healthier air—today.
“`