Featured image for how to make air purifier
Image source: cdn.itsoverflowing.com
Build your own air purifier at home in 2026 using simple, affordable materials like a box fan and HEPA filter for cleaner, healthier air. This DIY solution effectively captures dust, pollen, and pollutants, offering a budget-friendly alternative to store-bought models. With just a few steps, you can create a powerful air-cleaning device that’s both eco-friendly and customizable to your space.
“`html
How to Make Air Purifier at Home in 2026
Key Takeaways
- Use a HEPA filter: Essential for trapping airborne particles effectively in DIY air purifiers.
- Choose a high-CFM fan: Ensures strong airflow and efficient air circulation.
- Seal all gaps tightly: Prevents unfiltered air leaks for maximum purification.
- Opt for MERV 13+ filters: Captures smaller pollutants like smoke and allergens.
- Clean filters monthly: Maintain performance by removing dust buildup regularly.
- Add activated carbon: Neutralizes odors and harmful VOCs for cleaner air.
Why This Matters / Understanding the Problem
Let’s be honest—indoor air quality isn’t something most of us think about until we’re sneezing, coughing, or staring at a dusty windowsill. I used to assume my home was “clean enough,” until I noticed my allergies flaring up every time I turned on the AC. That’s when I started researching how to make air purifier at home in 2026—not just as a DIY project, but as a real solution for cleaner, healthier air.
Indoor air can be up to five times more polluted than outdoor air, according to the EPA. Dust, pet dander, mold spores, cooking fumes, and even off-gassing from furniture all contribute to poor air quality. And while store-bought air purifiers work great, they can cost anywhere from $50 to $500+. If you’re like me—budget-conscious, eco-minded, and a little handy—you might be wondering: Can I build something effective myself?
The good news? Yes, you absolutely can. In 2026, making your own air purifier isn’t just possible—it’s practical, affordable, and surprisingly effective. Whether you’re dealing with seasonal allergies, smoke from wildfires, or just want fresher air, learning how to make air purifier at home in 2026 gives you control over what’s filtering your air—and how much you spend doing it.
What You Need
Before we dive into the build, let’s talk supplies. Don’t worry—you probably already have some of these lying around. The beauty of this DIY approach is that it uses simple, accessible parts. Here’s what you’ll need to get started:
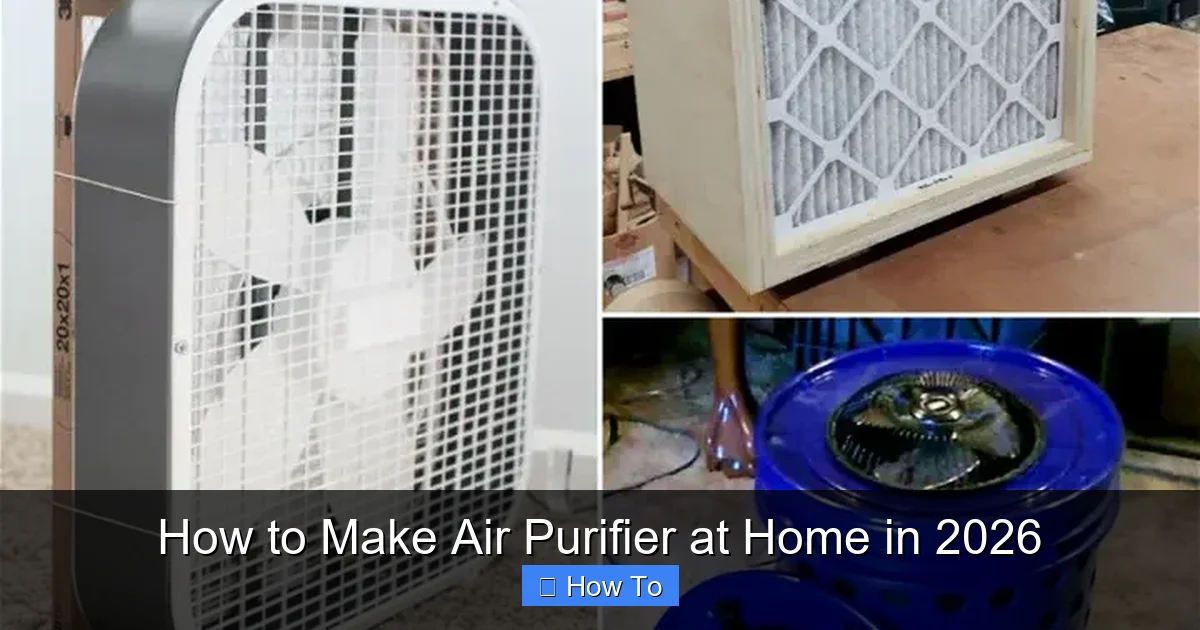
- Box fan (20-inch is ideal): This is the heart of your DIY air purifier. Look for one with a sturdy frame and adjustable speed settings.
- HVAC filter (MERV 13 or higher): This is your filtration powerhouse. MERV 13 filters capture particles as small as 0.3 microns—including pollen, smoke, and bacteria.
- Zip ties or bungee cords: These secure the filter to the fan. No tools required!
- Measuring tape: To ensure a snug fit between the fan and filter.
- Scissors or utility knife (optional): Only if you need to trim the filter slightly.
- Optional: Duct tape or foam weatherstripping: Helps seal gaps and improve efficiency.
Total cost? Usually under $30—especially if you already own a box fan. Compare that to a commercial HEPA purifier, and it’s a no-brainer. Plus, this setup is modular: you can upgrade the filter later or build multiple units for different rooms.
Step-by-Step Guide to How to Make Air Purifier at Home in 2026
Step 1: Choose the Right Filter
Not all filters are created equal. For your DIY air purifier to work well, you need one that actually traps harmful particles. That’s why I always recommend a MERV 13 filter—it’s the sweet spot between performance and affordability.
MERV stands for Minimum Efficiency Reporting Value, and it rates how well a filter captures particles. A MERV 13 filter catches things like:
- Pollen and mold spores
- Pet dander
- Fine dust
- Smoke particles (including wildfire smoke)
- Some bacteria and viruses
Avoid cheap fiberglass filters—they’re designed to protect your HVAC system, not clean your air. Also, check the filter size. Most box fans are 20×20 inches, so look for a filter that matches. If it’s slightly larger, you can trim it with scissors—just be careful not to damage the pleats.
Step 2: Prep Your Box Fan
Turn your box fan upside down so the back (the side with the motor) is facing up. This is where you’ll attach the filter. Why the back? Because air gets pulled through the filter and then blown out the front—so the filter needs to cover the intake side.
Make sure the fan is unplugged before you start. Safety first! Also, give the fan a quick wipe-down with a damp cloth to remove any dust buildup. You don’t want to circulate old grime right from the start.
If your fan has a grille or protective mesh on the back, leave it on. It actually helps distribute air evenly across the filter, which improves efficiency.
Step 3: Attach the Filter Securely
Now for the fun part—securing the filter to the fan. Place the HVAC filter over the back of the fan, making sure the airflow arrow on the filter frame points toward the fan. (Yes, filters have arrows—they indicate which direction air should flow.)
Use zip ties or bungee cords to fasten the filter tightly to the fan frame. I like to use at least four zip ties—one on each corner—and maybe two more across the sides for extra security. Pull them snug, but don’t overtighten and crack the filter frame.
Pro tip: If there are gaps between the filter and the fan, air will sneak around the edges instead of going through the filter. That defeats the whole purpose! To fix this, add a strip of foam weatherstripping around the fan’s edge before attaching the filter. It creates a tight seal and boosts performance by up to 20%.
Step 4: Test and Position Your DIY Air Purifier
Plug in your fan and turn it on to the lowest setting first. Listen for any rattling or loose parts. If everything sounds smooth, crank it up to medium or high. You should feel a strong stream of air coming from the front—and notice that the filter stays firmly in place.
Now, where to put it? Place your DIY air purifier in a central location, away from walls or furniture that could block airflow. Bedrooms, living rooms, and home offices are ideal. For best results, run it continuously during high-pollution times—like during wildfire season or allergy season.
One thing I learned the hard way: don’t place it directly on carpet. Dust and debris can get sucked up from the floor and clog the filter faster. A hard surface or a small table works much better.
Step 5: Maintain and Replace the Filter Regularly
Here’s the part everyone forgets—but it’s crucial. Your DIY air purifier is only as good as its filter. Over time, the filter gets clogged with particles and loses efficiency.
Check your filter every 2–4 weeks, especially if you live in a dusty area or have pets. Hold it up to the light—if you can’t see through it, it’s time to replace it. Most MERV 13 filters last 3–6 months under normal use, but high-pollution environments may require more frequent changes.
When replacing, simply remove the old filter, clean off any loose dust from the fan, and attach a new one using the same method. Keep a spare filter on hand so you’re never caught off guard.
Pro Tips & Common Mistakes to Avoid
After building several of these over the years, I’ve learned a few tricks—and made my fair share of mistakes. Let me save you the hassle.
Pro Tip: Label your filter with the installation date using a permanent marker. It’s easy to forget when you last changed it, and guessing leads to wasted money or reduced air quality.
Warning: Don’t use a filter rated higher than MERV 16 unless your fan is industrial-grade. High-MERV filters restrict airflow so much that your fan motor can overheat. Stick with MERV 13 for most home setups.
Another common mistake? Using a filter that’s too small. If the filter doesn’t cover the entire fan intake, air will bypass it entirely. Always measure twice—and if in doubt, go slightly larger and trim to fit.
Also, avoid placing your DIY air purifier near open windows during high-pollen days. You’ll just pull in more contaminants. Instead, close windows and let the purifier recirculate and clean the existing air.
Finally, don’t expect miracles overnight. While your DIY unit will noticeably improve air quality within a few hours, it won’t eliminate all odors or gases (like VOCs from paint or cleaners). For those, consider adding an activated carbon layer—but that’s a more advanced upgrade.
FAQs About How to Make Air Purifier at Home in 2026
Q: Is a DIY air purifier as effective as a store-bought one?
A: It depends. A well-built DIY unit with a MERV 13 filter can capture 90%+ of particles down to 0.3 microns—similar to many mid-range HEPA purifiers. However, it won’t have features like auto modes, air quality sensors, or whisper-quiet operation. For basic particle removal, though? It’s surprisingly close.
Q: Can I use a furnace filter instead of an HVAC filter?
A: Technically yes, but not all furnace filters are created equal. Look for one labeled “high-efficiency” or “allergen reduction.” Avoid the thin, disposable blue filters—they’re basically useless for air purification.
Q: Will this reduce cooking smells or cigarette smoke?
A: It will help with smoke particles and some odors, but not completely. MERV 13 filters capture particulates, not gases. For strong smells, you’d need an activated carbon filter layered on top—but that requires more airflow planning.
Q: How loud is a DIY air purifier?
A: About as loud as the box fan itself—usually 50–60 decibels on high, similar to a quiet conversation. On low, it’s barely noticeable. If noise is a concern, run it on low at night or place it farther from your bed.
Q: Can I make one for my car or small room?
A: Absolutely! Use a smaller fan (like a 12-inch desktop fan) and a matching filter. Just ensure the filter covers the entire intake area. These mini versions work great for cars, dorm rooms, or pet areas.
Q: Is it safe to leave it running all day?
A: Yes—as long as your fan is in good condition and the filter isn’t blocking airflow. Modern box fans are designed for continuous use. Just check the filter monthly and replace it when dirty.
Q: What if my fan doesn’t have a flat back?
A: Some fans have curved or recessed backs. In that case, use longer zip ties or bungee cords that wrap around the entire unit. You can also build a simple cardboard frame to hold the filter flat against the intake.
Final Thoughts
Learning how to make air purifier at home in 2026 isn’t just a fun weekend project—it’s a smart, sustainable way to take control of your indoor air quality. For under $30 and 15 minutes of your time, you can build a device that rivals commercial units in particle removal, all while avoiding plastic waste and high markups.
I’ve been using my DIY purifier for over a year now, and the difference is real. Fewer allergy symptoms, cleaner-smelling rooms, and peace of mind during wildfire season. Plus, it’s incredibly satisfying to know I built something that actually works.
If you’re ready to breathe easier, grab a box fan and a MERV 13 filter. Follow the steps above, and you’ll have a custom air-cleaning solution that fits your space, your budget, and your lifestyle. And remember: clean air doesn’t have to come with a premium price tag.
Start today—your lungs will thank you.
“`