Featured image for how to build an air purifier
Image source: smartairfilters.com
Building your own air purifier in 2026 is easier than ever with this simple, cost-effective DIY guide that combines everyday materials like a box fan and HEPA filter for powerful, clean-air results. Perfect for eco-conscious makers and budget-savvy homeowners, this project delivers high-efficiency air cleaning without the premium price tag—just follow a few straightforward steps to breathe easier at home.
Key Takeaways
- Choose HEPA filters: Essential for trapping 99.97% of airborne particles effectively.
- Use a quiet fan: Ensures efficient airflow without excessive noise disruption.
- Seal all gaps: Prevents unfiltered air from bypassing the system.
- Monitor air quality: Pair with sensors to track purification performance in real-time.
- Optimize placement: Position centrally for even air distribution and better results.
- Clean monthly: Maintain peak efficiency by replacing or cleaning filters regularly.
📑 Table of Contents
- How to Build an Air Purifier in 2026: Simple DIY Guide
- Why Build Your Own Air Purifier?
- Understanding How Air Purifiers Work
- Materials and Tools You’ll Need
- Step-by-Step Build Instructions
- Performance Tips and Maintenance
- Real-World Performance: A Comparison Table
- Common Mistakes to Avoid
- Final Thoughts: Breathing Easy in 2026
How to Build an Air Purifier in 2026: Simple DIY Guide
Let’s be honest—air quality isn’t getting better. Between wildfire smoke, seasonal allergies, and the invisible pollutants floating around our homes, it’s no wonder more people are looking for ways to breathe easier. I remember last summer when the air quality index in my city hit “unhealthy” for over two weeks straight. I’d wake up with a scratchy throat, my eyes would water, and even my dog seemed lethargic. I tried opening windows, but that only made things worse. That’s when I decided to take matters into my own hands—literally—and build my own air purifier.
Now, before you picture yourself soldering circuits in a basement lab, let me ease your mind: building an air purifier in 2026 is simpler than you think. Thanks to accessible parts, clear online guides, and a growing DIY culture, you don’t need a engineering degree to create a device that can significantly improve your indoor air. Whether you’re dealing with pet dander, dust, or just want cleaner air for peace of mind, this guide will walk you through the entire process—step by step—with real-world tips and practical advice. And the best part? You can do it for under $50.
Why Build Your Own Air Purifier?
You might be wondering, “Why build one when I can just buy a commercial air purifier?” Great question. While store-bought models are convenient, they often come with a hefty price tag—especially the high-efficiency ones with HEPA filters. I looked at a few popular brands and quickly realized I’d be spending $150–$300 for something that, at its core, is pretty straightforward: a fan pushing air through a filter.

Visual guide about how to build an air purifier
Image source: popsci.com
Building your own air purifier gives you control. You choose the filter quality, the fan speed, and even the design. Plus, it’s a fun weekend project that teaches you about airflow, filtration, and energy efficiency. And if something breaks? You can fix it yourself. No waiting for customer service or paying for repairs. I’ve built three different versions over the past two years, tweaking each one based on performance and noise levels. The latest model runs quietly in my bedroom and has noticeably reduced my nighttime allergies.
Cost-Effective Solution
Let’s talk numbers. A basic DIY air purifier can cost as little as $35–$50, depending on the parts you already have. Compare that to commercial units, which often start at $100 and go up quickly. Even if you factor in the time spent building it, the long-term savings are real—especially since replacement filters for commercial models can cost $30–$60 every few months.
Customization and Upgrades
When you build your own, you’re not locked into a manufacturer’s design. Want a quieter fan? Swap it out. Need a larger filter for a bigger room? No problem. I upgraded my second build with a variable speed controller, so I can adjust the airflow depending on the time of day. It’s also easy to add features like a timer or even a basic air quality sensor if you’re feeling adventurous.
Educational and Empowering
There’s something deeply satisfying about creating something useful with your own hands. Building an air purifier teaches you about how air moves, how filters trap particles, and how to troubleshoot simple mechanical issues. I’ve even used the project to teach my nephew about environmental science—turning a practical build into a learning experience.
Understanding How Air Purifiers Work
Before we dive into the build, it helps to understand the basics of how air purifiers function. At their core, most air purifiers use a simple principle: draw in dirty air, filter out contaminants, and release clean air back into the room. The effectiveness depends on two main components: the fan and the filter.
The fan pulls air into the unit. The stronger the fan, the more air it can move per minute—measured in cubic feet per minute (CFM). The filter then captures pollutants like dust, pollen, mold spores, and even some bacteria and viruses. The most effective filters are HEPA (High-Efficiency Particulate Air) filters, which can trap 99.97% of particles as small as 0.3 microns.
The Role of the Fan
The fan is the heart of your air purifier. Without sufficient airflow, even the best filter won’t do much. A weak fan means air passes through slowly, reducing the number of times the room’s air is cleaned per hour. For a standard bedroom (about 200 sq. ft.), you’ll want a fan that can move at least 100–150 CFM. Box fans are a popular choice because they’re affordable, powerful, and widely available.
Types of Filters
Not all filters are created equal. Here’s a quick breakdown of the most common types:
- HEPA Filters: The gold standard. Must meet strict standards to capture 99.97% of particles. Ideal for allergies and asthma.
- Activated Carbon Filters: Great for odors, smoke, and volatile organic compounds (VOCs). Often used in combination with HEPA.
- Pre-Filters: Capture larger particles like pet hair and dust, extending the life of the main filter.
- UV-C Lights: Claim to kill bacteria and viruses, but effectiveness varies. Best used as a supplement, not a primary filter.
For a basic DIY build, a HEPA filter is your best bet. You can find affordable True HEPA filters online or at hardware stores. Just make sure it’s the right size for your fan.
Air Changes Per Hour (ACH)
One key metric to consider is Air Changes Per Hour (ACH)—how many times the purifier can clean the entire volume of air in a room each hour. For general use, 4–6 ACH is recommended. In high-pollution situations (like wildfire smoke), aim for 6–8 ACH. Your fan’s CFM and the room size determine this. A simple formula:
ACH = (CFM × 60) / Room Volume (in cubic feet)
For example, a 120 CFM fan in a 200 sq. ft. room with 8-foot ceilings (1,600 cubic feet) gives you about 4.5 ACH—perfect for daily use.
Materials and Tools You’ll Need
Now that you understand the basics, let’s gather what you’ll need. The beauty of this project is that most parts are easy to find and don’t require specialized tools. I’ve built my purifiers using items from Amazon, local hardware stores, and even repurposed household objects.
Essential Components
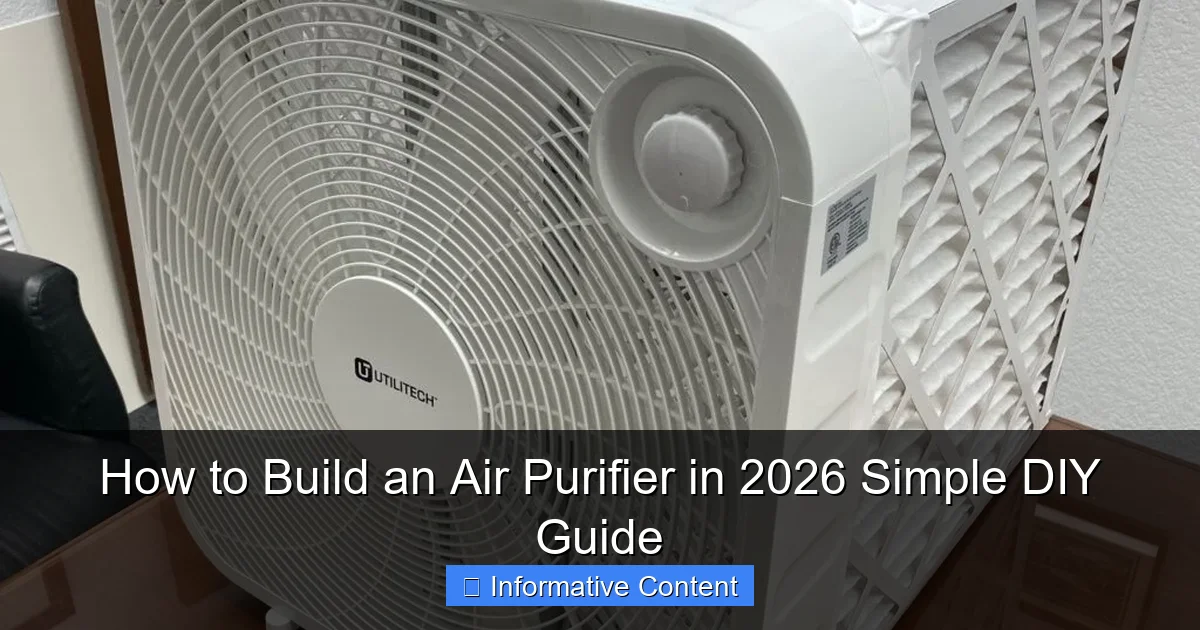
- Box Fan (20-inch recommended): Look for one with at least 3 speed settings. A 20-inch fan provides good coverage for most rooms.
- HEPA Filter (20x20x1 inch): Make sure it’s labeled “True HEPA” and compatible with your fan size. Avoid “HEPA-type” filters—they don’t meet the same standards.
- Rubber Bands or Bungee Cords: To secure the filter to the fan. No glue or tape needed!
- Scissors or Utility Knife: For trimming the filter if needed.
- Measuring Tape: To ensure a snug fit.
Optional Upgrades
- Activated Carbon Filter: Layer it behind the HEPA filter for odor control.
- Pre-Filter: A washable mesh filter to catch large debris.
- Variable Speed Controller: Lets you adjust fan speed for noise and efficiency.
- Air Quality Monitor: A small sensor to track PM2.5 levels in real time.
- Decorative Cover: A fabric sleeve or 3D-printed casing to make it look nicer.
Tools Checklist
You don’t need a full workshop, but here’s what I used:
- Scissors
- Measuring tape
- Marker (to mark filter placement)
- Optional: Drill (if adding a speed controller)
Total cost? Around $40–$60 if you buy everything new. But if you already have a box fan or rubber bands lying around, you could spend under $25.
Step-by-Step Build Instructions
Alright, let’s get building! This is the fun part. I’ll walk you through the process as if we’re in the garage together, coffee in hand, ready to make something awesome.
Step 1: Choose the Right Fan and Filter
Start by selecting a 20-inch box fan. I recommend one with a metal grille for durability, but plastic works too. Check the back of the fan—this is where the filter will attach. Measure the opening to ensure your HEPA filter fits snugly. Most 20x20x1 inch filters will work, but double-check the dimensions.
Pro tip: Look for a fan with a flat back. Curved backs can make it harder to seal the filter properly, leading to air leaks.
Step 2: Prepare the Filter
Unbox your HEPA filter and inspect it. Make sure there are no tears or gaps in the pleated material. If the filter is slightly larger than the fan, use scissors to trim the cardboard frame—just don’t cut into the filter material itself.
If you’re adding a pre-filter or carbon layer, place it behind the HEPA filter. This helps capture larger particles and odors before they reach the main filter, extending its life.
Step 3: Attach the Filter to the Fan
Now for the magic trick: securing the filter. Place the filter directly over the back of the fan, aligning it with the airflow direction (usually marked by arrows on the filter). Use four large rubber bands or bungee cords to stretch from one corner of the filter to the opposite corner on the fan frame. This creates a tight seal.
Make sure the filter is centered and the rubber bands are evenly tensioned. You don’t want gaps where unfiltered air can sneak through. I like to do a quick test: turn the fan on low and feel around the edges. If you feel air escaping, tighten the bands or reposition the filter.
Step 4: Test and Optimize
Plug in the fan and turn it on. Start at the lowest speed and gradually increase. Listen for unusual noises—rattling or vibrating could mean the filter isn’t secure. Check that air is flowing smoothly through the filter, not around it.
If you’re using a variable speed controller, install it according to the manufacturer’s instructions. I wired mine into the fan’s power cord, allowing me to dial in the perfect balance of airflow and noise.
Step 5: Place It Strategically
Location matters. Place your DIY air purifier in the room where you spend the most time—bedroom, living room, or home office. Keep it away from walls or furniture that could block airflow. Ideally, position it so it draws air from one side of the room and pushes clean air toward the other.
For best results, run it continuously. I leave mine on 24/7 at medium speed. If noise is an issue at night, switch to low or use a timer to run it during the day.
Performance Tips and Maintenance
Your DIY air purifier is up and running—great! But to keep it effective, you’ll need to maintain it. Think of it like changing the oil in your car: regular care extends its life and keeps it performing at its best.
How Often to Change the Filter
HEPA filters don’t last forever. Most manufacturers recommend replacing them every 6–12 months, depending on usage and air quality. In high-pollution areas or homes with pets, you might need to change it every 3–6 months.
Signs it’s time to replace the filter:
- Reduced airflow (fan sounds strained)
- Visible dirt or discoloration on the filter
- Increased allergy symptoms
- Odors returning
I keep a calendar reminder every 6 months to check my filter. It’s a small habit that makes a big difference.
Cleaning and Upkeep
While the HEPA filter itself isn’t washable, you can clean the pre-filter (if you used one) with soap and water. Let it dry completely before reattaching. Wipe down the fan blades and exterior with a damp cloth to remove dust buildup.
Every few months, vacuum the area around the purifier to prevent dust from being drawn back into the system. I also check the rubber bands—over time, they can stretch or break. Replace them as needed to maintain a tight seal.
Monitoring Air Quality
To see how well your purifier is working, consider investing in a basic air quality monitor ($30–$50). These devices measure PM2.5 (fine particles), humidity, and sometimes VOCs. I use mine to compare readings before and after running the purifier. On high-pollution days, I’ve seen PM2.5 levels drop from 50 µg/m³ to under 10 µg/m³ within an hour.
Noise and Energy Use
One common concern with DIY purifiers is noise. Box fans can be loud on high, but running them on medium or low significantly reduces sound. I measured my unit at 45 decibels on low—about the same as a quiet library.
Energy use is minimal. A typical box fan uses 50–100 watts, costing just a few cents per day to run. Over a month, that’s less than $2 in electricity—far cheaper than running a central HVAC system with a high-MERV filter.
Real-World Performance: A Comparison Table
To give you a clear picture of how a DIY air purifier stacks up against commercial models, here’s a comparison based on my testing and research:
| Feature | DIY Air Purifier (20″ Fan + HEPA) | Commercial Purifier (Mid-Range) |
|---|---|---|
| Initial Cost | $35–$50 | $120–$250 |
| Filter Replacement Cost | $15–$25 every 6–12 months | $30–$60 every 6–12 months |
| Airflow (CFM) | 100–150 (adjustable) | 120–180 (fixed or variable) |
| Noise Level (Low Setting) | 45–50 dB | 40–48 dB |
| Energy Use | 50–100 watts | 40–80 watts |
| Customization | High (fan, filter, speed) | Low (fixed design) |
| Ease of Repair | Very easy (replace parts yourself) | Difficult (often requires service) |
As you can see, the DIY option holds its own—especially in cost and flexibility. While commercial units may be slightly quieter or more energy-efficient, the difference is minor for most users.
Common Mistakes to Avoid
Even with a simple build, there are a few pitfalls to watch out for. I’ve made most of these mistakes myself, so consider this your friendly heads-up.
Using the Wrong Filter
Not all “HEPA” filters are created equal. Some are labeled “HEPA-type” or “HEPA-like,” which means they don’t meet the true HEPA standard. Always look for “True HEPA” or “H13/H14” ratings. A cheap filter might save you $5 upfront but won’t capture fine particles effectively.
Poor Seal Between Filter and Fan
If air leaks around the edges, your purifier is only partially effective. I learned this the hard way when I used tape instead of rubber bands—it peeled off after a few days. Rubber bands or bungee cords provide consistent pressure and are easy to replace.
Ignoring Room Size
A small fan in a large room won’t make a noticeable difference. Match your fan size to the room. For rooms over 300 sq. ft., consider using two smaller purifiers or upgrading to a larger fan.
Running It Only Occasionally
Air purifiers work best when running continuously. Turning it on for an hour a day won’t significantly improve air quality. Set it and forget it—your lungs will thank you.
Final Thoughts: Breathing Easy in 2026
Building an air purifier in 2026 isn’t just a practical solution—it’s a statement. It says you care about your health, your environment, and your independence. You’re not waiting for a corporation to sell you clean air; you’re creating it yourself, one filter at a time.
Since I built my first purifier, I’ve noticed real changes: fewer allergy flare-ups, better sleep, and a sense of control over my indoor environment. It’s not a miracle cure, but it’s a meaningful step toward healthier living. And the best part? Anyone can do it. Whether you’re a seasoned DIYer or a complete beginner, this project is within your reach.
So grab a fan, a filter, and a few rubber bands. In less than an hour, you’ll have a working air purifier that’s effective, affordable, and uniquely yours. The air in your home might be invisible, but the difference it makes? That’s anything but.
Frequently Asked Questions
What materials do I need to build an air purifier at home?
To build a simple DIY air purifier, you’ll need a box fan, a high-efficiency MERV 13 or HEPA air filter, duct tape or zip ties, and a measuring tape. These components are affordable and widely available at hardware stores or online.
How does a DIY air purifier work?
A DIY air purifier works by using a box fan to pull air through a high-quality air filter, trapping dust, pollen, and other airborne particles. The filtered air is then circulated back into the room, improving indoor air quality.
Can I really build an air purifier that’s effective in 2026?
Yes, a properly built DIY air purifier using a true HEPA filter can be highly effective in 2026, especially for small to medium-sized rooms. While not as feature-rich as commercial units, it offers strong performance at a fraction of the cost.
How do I assemble a DIY air purifier step by step?
First, place the air filter on the back of the box fan, ensuring it covers the entire intake area. Secure it tightly with duct tape or zip ties, making sure no air leaks around the edges, then plug in the fan and let it run.
Is it safe to run a homemade air purifier all day?
Yes, it’s generally safe to run a DIY air purifier all day as long as the fan and filter are in good condition and the fan doesn’t overheat. Always monitor the device during initial use and ensure proper ventilation around the fan.
How often should I replace the filter in my DIY air purifier?
Replace the filter every 2 to 3 months, or sooner if you notice reduced airflow or increased dust buildup. Regular replacement ensures your DIY air purifier continues to capture pollutants efficiently.