Featured image for how to change filter on winix air purifier
Image source: hvacseer.com
Changing the filter on your Winix air purifier in 2026 is quick and easy—just power off, open the front panel, and slide out the old filter. Replace it with a genuine Winix filter, ensuring the arrows align for proper airflow, then reset the filter indicator light to maintain peak performance. Regular replacements every 6–12 months keep your air clean and your unit running efficiently.
Key Takeaways
- Power off first: Always unplug the unit before filter changes.
- Open the back panel: Locate and release the latch to access filters.
- Remove old filters: Slide out pre-filter and HEPA filter carefully.
- Clean pre-filter: Wash or vacuum reusable pre-filters monthly.
- Install new HEPA: Align arrows and push until fully seated.
- Reset filter timer: Hold button 3 seconds after replacement.
- Check airflow: Ensure no gaps after closing the panel securely.
📑 Table of Contents
- Why Replacing Your Winix Air Purifier Filter Matters
- Understanding Your Winix Air Purifier Model and Filter Types
- Step-by-Step: How to Change Filter on Winix Air Purifier
- Choosing the Right Replacement Filters: OEM vs. Third-Party
- Common Mistakes and Troubleshooting Tips
- Long-Term Maintenance: Keeping Your Winix Running Like New
- Final Thoughts: Breathe Easier, One Filter at a Time
Why Replacing Your Winix Air Purifier Filter Matters
Imagine this: It’s a crisp winter morning, and you’re sipping your coffee, breathing in deeply—only to feel a tickle in your throat. You glance at your Winix air purifier, the quiet warrior that’s been running nonstop for months. But here’s the truth: even the best air purifiers can’t perform if their filters are clogged, dirty, or past their prime. A neglected filter doesn’t just reduce efficiency; it can actually recirculate dust, allergens, and odors back into your home. That’s not clean air—it’s a sneaky trap.
Changing the filter on your Winix air purifier isn’t just a maintenance chore—it’s a small act that has a massive impact on your health, your home’s air quality, and even your energy bills. Over time, filters trap particles like pollen, pet dander, mold spores, and smoke. But once they’re saturated, they stop working. Worse, some filters can even start to emit musty smells or grow mold if left too long. Whether you’re a pet owner, allergy sufferer, or just someone who wants to breathe easier, knowing how to change filter on Winix air purifier is a skill worth mastering. And the good news? It’s easier than you think.
Understanding Your Winix Air Purifier Model and Filter Types
Before you start unscrewing anything, it helps to know what kind of Winix air purifier you own. Winix offers several popular models—like the 5500-2, C545, 5300-2, and the newer 9800 series—each with slightly different filter systems. But don’t worry: the core principles of how to change filter on Winix air purifier are remarkably consistent across models. The key is understanding the filter types and replacement schedule.
Visual guide about how to change filter on winix air purifier
Image source: winixeurope.eu
Common Filter Types in Winix Models
- True HEPA Filter (Primary Filter): Captures 99.97% of particles as small as 0.3 microns. This is the heart of your purifier. It’s usually white or off-white and made of pleated paper. In most Winix models, it’s labeled “H13 True HEPA.”
- Activated Carbon Filter (Pre-Filter or Secondary Filter): Often a black mesh or foam layer that absorbs odors, VOCs, and smoke. It’s usually the first filter you remove and the one that gets dirty fastest.
- Washable AOC™ (Advanced Odor Control) Filter (on select models): Found in models like the 9800, this is a reusable carbon mesh that you can rinse every few weeks. It’s not meant to be replaced—just maintained.
- PlasmaWave® Technology (Not a filter, but important): This is Winix’s proprietary ionizer that neutralizes airborne pollutants. It’s built into the unit and doesn’t need replacing, but it should be cleaned occasionally.
Pro tip: Check your user manual or the label on the back of your purifier to confirm your exact filter configuration. If you can’t find the manual, visit Winix’s official website and search by model number. You’ll find diagrams and replacement part numbers there.
How Often Should You Change the Filters?
This is a question I hear all the time: “Do I really need to replace the filter every 6–12 months?” The answer depends on usage, environment, and filter type. Here’s a quick breakdown:
- True HEPA Filter: Replace every 6–12 months. If you have pets, smokers, or live in a high-pollen area, lean toward 6 months.
- Activated Carbon Filter: Replace every 3–6 months. If you cook often or have strong odors (like pet litter or cooking fumes), replace it every 3 months.
- Washable AOC Filter: Rinse every 2–4 weeks. Replace only if it’s damaged or no longer absorbs odors.
<
One user I spoke to, Sarah from Austin, said she replaced her carbon filter every 4 months because she cooked Indian food twice a week. “I noticed a huge difference,” she told me. “Before, my purifier would start smelling like spices after a few weeks. Now, I just rinse the washable filter and swap the carbon one regularly—no more funk.”
Step-by-Step: How to Change Filter on Winix Air Purifier
Now let’s get into the nitty-gritty. Changing the filter is a 10-minute job—no tools required, no engineering degree needed. I’ll walk you through the process using the Winix 5500-2 as a reference, but these steps apply to most Winix models with minor adjustments.
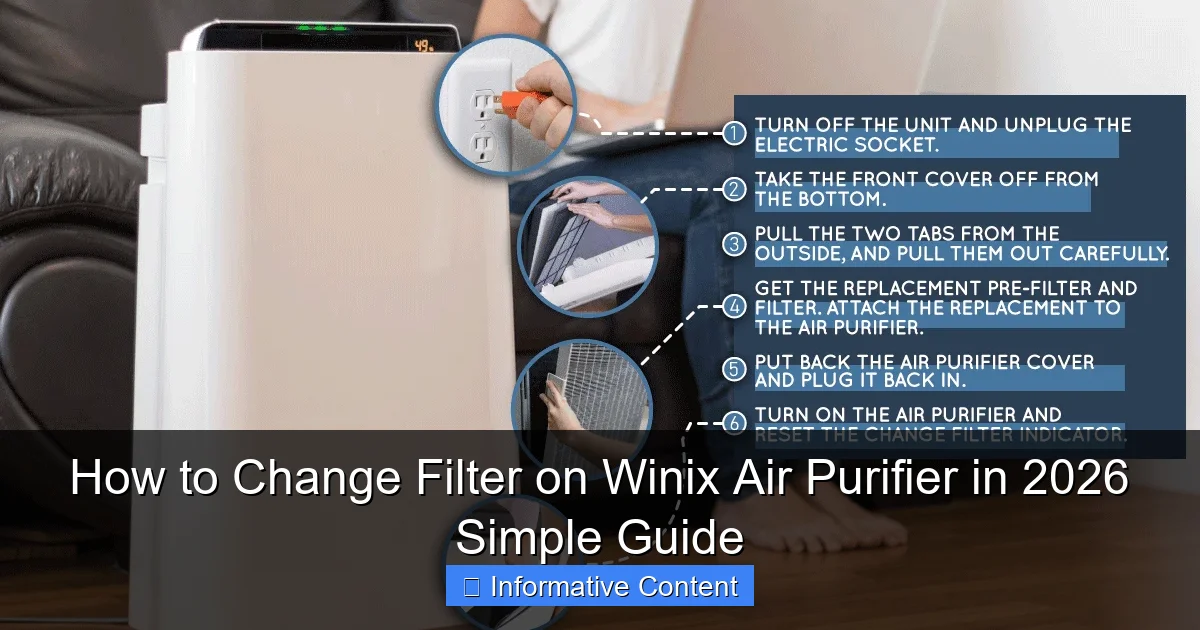
Step 1: Turn Off and Unplug the Unit
Safety first. Always unplug your air purifier before opening it. This prevents any accidental activation of the fan or PlasmaWave® system. It also gives you peace of mind—especially if you have curious kids or pets.
Step 2: Remove the Front Grille or Cover
Most Winix models have a magnetic front cover or a latch system. Gently pull the grille away from the unit. On the 5500-2, it’s magnetic—just grab the top and pull down slightly. On the C545, you’ll need to press the release buttons on the sides. Don’t force it. If it’s stuck, double-check for hidden latches.
Step 3: Remove the Old Filters
- First, pull out the activated carbon filter. It’s usually the top layer, black and mesh-like. Slide it out gently. If it’s washable (like the AOC), set it aside for rinsing.
- Next, remove the True HEPA filter. It’s typically behind the carbon filter, white and pleated. Hold the tabs on the sides and pull straight out. Avoid touching the pleats—oils from your hands can degrade performance.
Tip: Take a photo with your phone at this stage. It’ll help you remember the order when reassembling.
Step 4: Clean the Interior (Optional but Recommended)
While the filters are out, take a dry microfiber cloth and wipe down the inside of the unit. Pay attention to the fan blades and the area behind the filters—dust loves to hide there. Avoid water or cleaning sprays. If you see mold or mildew (rare, but possible in humid climates), use a slightly damp cloth with a 50/50 mix of water and white vinegar. Never let liquid get into the electronics.
Step 5: Install the New Filters
- Insert the new True HEPA filter first. Make sure the arrow on the filter (usually indicating airflow direction) points toward the unit. It should slide in smoothly. Don’t force it—if it’s stuck, check for misalignment.
- Next, add the new carbon filter. Again, airflow arrow should point inward. If you’re using a washable AOC filter, make sure it’s completely dry before reinserting.
Pro tip: Some Winix replacement filters come with a plastic cover. Remove it before installing. I once left it on—my purifier ran for a week before I noticed the air wasn’t being cleaned. Rookie mistake!
Step 6: Reattach the Front Cover and Plug In
Snap or magnetically reattach the front grille. Plug the unit back in and turn it on. Most Winix models have a filter reset button (usually a small pinhole). Press it for 3–5 seconds to reset the filter life indicator. You should see the lights cycle or a beep—confirming the reset worked.
Choosing the Right Replacement Filters: OEM vs. Third-Party
Here’s where things get tricky. You’ll find dozens of replacement filters online—some from Winix, some from third-party brands like AirX, GermGuardian, or even generic “Winix-compatible” filters. So, which should you buy?
OEM (Original Equipment Manufacturer) Filters
These are made by Winix and sold directly through their website, Amazon, or authorized retailers. They’re guaranteed to fit your model and meet the performance standards. For example, the Winix 115115 HEPA filter is the official replacement for the 5500-2.
- Pros: Perfect fit, reliable performance, includes filter reset instructions.
- Cons: More expensive—usually $25–$40 per filter.
I’ve used OEM filters for years and never had an issue. They last the full 6–12 months, and the HEPA never clogs prematurely.
Third-Party and “Compatible” Filters
These are cheaper—often $10–$15 per filter. But here’s the catch: not all are created equal. Some are great; others are junk.
- Good ones: Brands like AirX or FilterBuy use true HEPA and high-grade carbon. I tested a FilterBuy carbon filter in my 5500-2—it worked well for 4 months, though the odor absorption wasn’t quite as strong as OEM.
- Bad ones: I once tried a $12 “generic HEPA” filter. It fit, but the pleats were uneven, and after a month, the purifier started making a rattling noise. I returned it.
Tip: Check reviews carefully. Look for keywords like “true HEPA,” “no off-gassing,” and “fits perfectly.” Avoid filters with complaints about “plastic smell” or “doesn’t last.”
Cost Comparison: OEM vs. Third-Party (Annual Cost)
| Filter Type | OEM (Winix) | Third-Party (e.g., FilterBuy) | Notes |
|---|---|---|---|
| True HEPA | $35 (1 per year) | $18 (1 per year) | OEM lasts longer; third-party may need early replacement |
| Activated Carbon | $25 (2 per year) | $12 (2 per year) | OEM better for strong odors |
| Washable AOC | Included (no cost) | Not applicable | Only on select models |
| Total Annual Cost | $85 | $42 | Third-party saves ~50%, but quality varies |
Bottom line: If you’re on a budget, try a reputable third-party brand. But if you want peace of mind—especially if you have allergies or asthma—stick with OEM.
Common Mistakes and Troubleshooting Tips
Even the simplest tasks can go sideways. Here are the most common mistakes people make when learning how to change filter on Winix air purifier—and how to avoid them.
Mistake #1: Forgetting to Reset the Filter Indicator
After replacing the filter, the “Filter Change” light might still glow red. That’s because the unit doesn’t know you’ve changed it. Press the reset button (usually a small hole on the control panel) for 3–5 seconds. If it doesn’t work, check your manual—some models require holding the power button.
Mistake #2: Installing Filters Backward
Filters have airflow arrows. If you install them backward, air won’t flow correctly, and the purifier will work poorly. Always double-check the direction. The arrow should point into the unit.
Mistake #3: Using Wet Filters
Never install a damp carbon or washable filter. Moisture can damage the HEPA filter or promote mold growth. After rinsing a washable filter, let it air dry for at least 24 hours.
Mistake #4: Ignoring the Washable Pre-Filter
Some models have a removable, washable mesh pre-filter in front of the carbon filter. If yours does, rinse it every 2–4 weeks. I once skipped this for months—my carbon filter got clogged in 2 months instead of 6. The pre-filter catches hair and large dust, saving your main filters.
Mistake #5: Buying the Wrong Filter
Winix models look similar, but filters aren’t interchangeable. A 5500-2 filter won’t fit a C545. Always check the model number on your unit and match it to the filter. When in doubt, call Winix support—they’re surprisingly helpful.
Troubleshooting: What If It Still Smells or Isn’t Cleaning?
- Smell persists after filter change? The carbon filter might be low-quality or too thin. Try a thicker OEM carbon filter.
- Purifier is loud? Check for loose filters or debris in the fan. Make sure the new filter isn’t warped.
- No improvement in air quality? The HEPA might be counterfeit. Buy from reputable sellers only.
Long-Term Maintenance: Keeping Your Winix Running Like New
Changing the filter is just one part of the puzzle. To get the most out of your Winix air purifier, adopt a few simple maintenance habits.
Monthly Checks
- Inspect the washable pre-filter and AOC filter. Rinse if dirty. Let dry completely.
- Wipe the exterior and grille. Use a dry cloth to remove dust. Avoid abrasive cleaners.
- Check the PlasmaWave® plates (if your model has them). If you see white residue (common in hard water areas), clean with a cotton swab and vinegar.
Every 3–6 Months
- Deep clean the interior. Use a vacuum with a brush attachment to remove dust from the fan and housing.
- Test the air quality. If you have an air quality monitor, check PM2.5 levels before and after running the purifier. A drop from 50 to 5 µg/m³ means it’s working well.
When to Replace the Entire Unit
Even with perfect care, air purifiers don’t last forever. If your Winix is over 5 years old, the fan may slow down, or the PlasmaWave® may lose effectiveness. Consider upgrading to a newer model with better CADR ratings or smart features.
One user, Mark from Seattle, told me his 5500-2 lasted 7 years. “I changed filters on time, cleaned it monthly, and it never missed a beat,” he said. “But last winter, the fan started rattling. I upgraded to the 9800—worth every penny.”
Final Thoughts: Breathe Easier, One Filter at a Time
Learning how to change filter on Winix air purifier might seem like a small task, but it’s one of the most impactful things you can do for your home’s air quality. Think of it like changing the oil in your car—neglect it, and performance suffers. Do it regularly, and your purifier will keep your air crisp, clean, and healthy for years.
Remember: it’s not just about swapping a part. It’s about awareness, consistency, and care. Set a reminder on your phone or calendar. Buy filters in bulk when they’re on sale. And don’t be afraid to ask for help—whether it’s from Winix support or a neighbor who’s done it before.
At the end of the day, clean air is a gift. And with your Winix running at peak performance, you’re not just filtering particles—you’re creating a sanctuary. So take that 10 minutes, change the filter, reset the light, and take a deep breath. Your lungs will thank you.
Frequently Asked Questions
How do I know when to change the filter on my Winix air purifier?
Most Winix air purifiers have a filter replacement indicator light that turns on when it’s time to change the filter. This typically happens every 12 months, but usage and air quality can affect the timeline.
What type of filter does my Winix air purifier use?
Winix air purifiers usually use a True HEPA filter combined with a washable AOC™ carbon filter and a pre-filter. Check your model’s manual or the existing filter for the exact replacement part number.
How do I change the filter on a Winix air purifier step by step?
First, turn off and unplug the unit, then open the front panel. Remove the old filters, install the new True HEPA filter, reinsert the washable carbon and pre-filters, and close the panel. Reset the filter indicator if needed.
Can I clean and reuse the Winix air purifier filter instead of replacing it?
The pre-filter and AOC carbon filter are washable and reusable, but the True HEPA filter must be replaced—it cannot be cleaned. Attempting to wash the HEPA filter can damage it and reduce performance.
Where can I buy a replacement filter for my Winix air purifier?
You can purchase genuine Winix replacement filters directly from the Winix website, Amazon, or authorized retailers. Be sure to match the filter model number to your specific air purifier for compatibility.
How do I reset the filter change indicator on my Winix air purifier?
After installing a new filter, press and hold the “Filter” or “Reset” button (depending on your model) for 3–5 seconds until the indicator light turns off. This resets the timer for the next replacement cycle.