Featured image for how to change germguardian air purifier filter
Image source: m.media-amazon.com
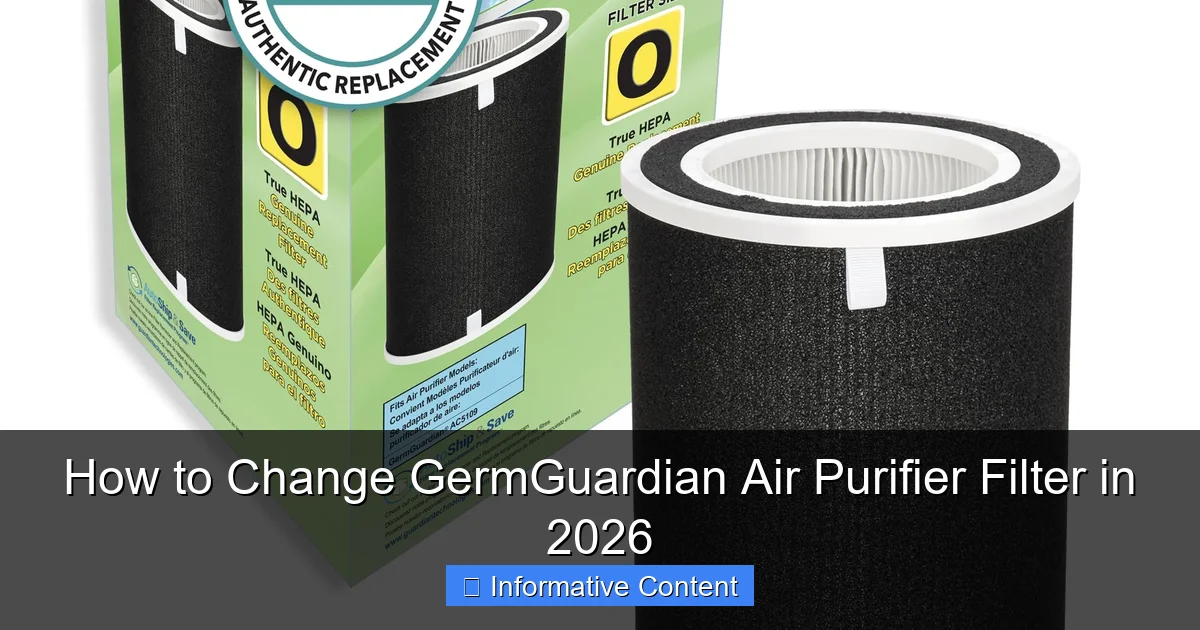
Changing your GermGuardian air purifier filter in 2026 is quick, easy, and essential for maintaining peak performance and clean air quality. Simply power off the unit, remove the front panel, take out the old filter, and insert the new one—ensuring it’s properly aligned before reassembling. Regular filter replacements every 6–12 months maximize efficiency and keep harmful pollutants at bay.
Key Takeaways
- Power off and unplug the unit before starting any filter changes.
- Open the back panel by pressing the release button or sliding latch.
- Remove old filter carefully to avoid spreading trapped particles.
- Insert new filter properly, aligning arrows for correct airflow direction.
- Reset filter indicator after replacement to ensure accurate monitoring.
- Dispose of old filters in sealed bags to prevent contamination.
- Replace every 6–12 months for optimal air purification performance.
📑 Table of Contents
- Why Changing Your GermGuardian Air Purifier Filter Matters
- Understanding Your GermGuardian Air Purifier Filter System
- Step-by-Step Guide: How to Change GermGuardian Air Purifier Filter
- Choosing the Right Replacement Filter for Your GermGuardian
- Common Mistakes to Avoid When Changing the Filter
- Maintenance Tips to Extend Filter Life and Improve Performance
- Filter Replacement Schedule and Performance Data
- Final Thoughts: Breathe Easy with a Fresh Filter
Why Changing Your GermGuardian Air Purifier Filter Matters
Imagine this: You’ve been diligently running your GermGuardian air purifier every day for months, proud of the clean, fresh-smelling air in your home. But one day, you notice a musty odor creeping back in, or worse—your allergies start acting up again. Chances are, your filter is overdue for a change.
Air purifiers like the GermGuardian aren’t just fancy appliances; they’re silent guardians of your indoor air quality. They trap dust, pollen, pet dander, mold spores, and even odors. But over time, those filters get clogged with all the gunk they’ve collected. When that happens, they stop working efficiently—sometimes even blowing dirty air back into your room. That’s why knowing how to change your GermGuardian air purifier filter isn’t just helpful—it’s essential for maintaining a healthy living space.
In 2026, with more people working from home and spending extra time indoors, clean air has never been more important. Whether you’re dealing with seasonal allergies, pets, or just want to breathe easier, keeping up with filter changes ensures your GermGuardian does what it was designed to do: protect your air and your health.
Understanding Your GermGuardian Air Purifier Filter System
Before you dive into replacing the filter, it’s important to understand how your GermGuardian air purifier works. Most models use a multi-stage filtration system, which means there’s more than one filter doing different jobs. Getting familiar with these components will help you maintain your unit properly and avoid common mistakes.
Visual guide about how to change germguardian air purifier filter
Image source: bestpurifierguide.org
Types of Filters in GermGuardian Models
GermGuardian air purifiers typically include three main types of filters:
- Pre-filter: This is the first line of defense. It captures large particles like pet hair, dust bunnies, and lint. It’s often washable and reusable, so you don’t need to replace it as frequently.
- True HEPA filter: This is the star of the show. True HEPA filters remove 99.97% of airborne particles as small as 0.3 microns—including pollen, mold spores, and even some bacteria. This is the filter that needs regular replacement.
- Activated carbon filter: This layer absorbs odors, smoke, and volatile organic compounds (VOCs). It’s especially useful in kitchens, near pets, or in homes with smokers.
Some newer GermGuardian models also include UV-C light technology, which helps kill germs and viruses. While the UV bulb doesn’t need replacing as often as the filters, it’s still something to check during maintenance.
How Often Should You Change the Filter?
The frequency of filter changes depends on several factors, including usage, air quality, and household conditions. However, here are some general guidelines:
- Pre-filter: Clean every 2–4 weeks (if washable). Replace if damaged.
- True HEPA filter: Replace every 6–12 months, depending on use.
- Carbon filter: Replace every 3–6 months, especially in high-odor environments.
For example, if you have pets or live in a city with high pollution, you might need to change your filters more often. On the other hand, if you only run the purifier occasionally in a low-traffic room, you might stretch the timeline a bit. Always check your user manual for model-specific recommendations.
Step-by-Step Guide: How to Change GermGuardian Air Purifier Filter
Now that you know what’s inside your GermGuardian, let’s walk through the actual process of changing the filter. Don’t worry—it’s simpler than it sounds. With a little preparation and the right tools, you can do it in under 10 minutes.
What You’ll Need
Before you start, gather these items:
- Replacement filter (make sure it’s compatible with your model)
- Soft cloth or microfiber towel
- Vacuum cleaner with a brush attachment (optional, for cleaning the unit)
- Gloves (optional, if you’re sensitive to dust)
Pro tip: Always unplug your air purifier before opening it. Safety first!
Step 1: Turn Off and Unplug the Unit
Never attempt to change the filter while the purifier is running or plugged in. This prevents accidental damage and protects you from electrical hazards. Let the unit cool down if it’s been running for a while.
Step 2: Locate the Filter Access Panel
Most GermGuardian models have a front or side panel that opens to reveal the filter compartment. Look for a latch, button, or sliding mechanism. On some models, like the AC4825 or AC5250W, you’ll need to press the release button on the front and gently pull the panel open.
If you’re unsure, check the user manual or look for a small icon near the panel indicating “Filter” or “Open.”
Step 3: Remove the Old Filter
Once the panel is open, you’ll see the filter(s) inside. Carefully pull them out one by one. Note the order and orientation—this will help when installing the new ones.
For example, in a typical 3-stage system, the pre-filter is usually on the outside, followed by the carbon filter, and then the HEPA filter. Some models have a single combined filter cartridge, so you’ll only remove one piece.
If the pre-filter is washable, rinse it under cool water and let it air dry completely before reusing. Never put a wet filter back into the unit—it can cause mold or damage the motor.
Step 4: Clean the Interior (Optional but Recommended)
While the filters are out, take a moment to clean the inside of the unit. Use a soft cloth to wipe away dust from the fan blades, vents, and housing. If there’s heavy buildup, use a vacuum with a brush attachment to gently remove debris.
This step isn’t required every time, but doing it every few filter changes helps maintain optimal performance and extends the life of your purifier.
Step 5: Install the New Filter
Now it’s time to put in the new filter. Make sure you’re using the correct replacement—check the model number on your old filter or in your user manual. Using the wrong filter can reduce efficiency or even damage the unit.
Insert the filters in the same order they were removed. For combined filters, align the tabs or arrows on the filter with the guides inside the compartment. Push gently until it’s snug—don’t force it.
Once all filters are in place, close the access panel securely. Make sure it clicks or locks into position.
Step 6: Reset the Filter Indicator (If Applicable)
Many GermGuardian models have a filter change indicator light that turns on after a certain number of hours of use. After replacing the filter, you’ll need to reset this light so it accurately tracks the new filter’s lifespan.
To reset:
- Press and hold the “Filter” or “Reset” button for 3–5 seconds.
- The indicator light should turn off or change color, signaling a successful reset.
If your model doesn’t have a reset button, you can manually track filter life using a calendar or reminder app.
Choosing the Right Replacement Filter for Your GermGuardian
Not all filters are created equal—and using the wrong one can hurt your purifier’s performance. Here’s how to make sure you’re getting the right replacement filter for your GermGuardian model.
Check Your Model Number
The first step is identifying your exact GermGuardian model. Look for a label on the back or bottom of the unit. Common models include:
- AC4825
- AC5250W
- AC5900W
- FLT4825 (filter model for AC4825)
- FLT5250T (filter model for AC5250W)
Once you have the model number, search for the corresponding filter. Most GermGuardian filters are labeled with a “FLT” prefix followed by numbers.
Original vs. Third-Party Filters
You’ll find two main types of replacement filters: OEM (Original Equipment Manufacturer) and third-party alternatives.
OEM filters are made by GermGuardian and guaranteed to fit and perform as intended. They’re usually more expensive but offer peace of mind.
Third-party filters are often cheaper and may claim to offer “enhanced” filtration. While some are high quality, others may not meet the same standards. Always read reviews and check for certifications like HEPA H13 or H14 if you’re considering a non-OEM option.
For most users, sticking with the original GermGuardian filter is the safest bet. But if you’re on a budget, look for reputable third-party brands with good customer feedback.
Where to Buy Replacement Filters
You can purchase GermGuardian filters from several sources:
- Official GermGuardian website: Best for OEM filters and warranty support.
- Amazon: Wide selection, fast shipping, and customer reviews.
- Home improvement stores: Like Home Depot or Lowe’s—great for in-person shopping.
- Subscription services: Some retailers offer auto-delivery every 6 months, so you never forget to replace your filter.
Pro tip: Buy filters in bulk if you use them regularly. It saves money and ensures you always have a spare on hand.
Common Mistakes to Avoid When Changing the Filter
Even simple tasks can go wrong if you’re not careful. Here are some common pitfalls to watch out for when changing your GermGuardian air purifier filter.
Forgetting to Reset the Filter Indicator
It’s easy to install the new filter and walk away—only to be reminded weeks later by a blinking light. Always reset the filter indicator after replacement. Otherwise, you might think the filter is still good when it’s actually overdue.
Installing the Filter Upside Down or Backwards
Filters are designed to work in a specific direction. Most have arrows or labels indicating airflow direction. Installing them incorrectly can reduce efficiency or cause the unit to overheat.
Double-check the orientation before closing the panel. If you’re unsure, refer to the user manual or a photo of the old filter.
Using Damaged or Expired Filters
Never use a filter that’s torn, bent, or visibly dirty. Even if it looks okay, filters have a shelf life. Using an expired filter—especially a HEPA filter—can release trapped particles back into the air.
Store replacement filters in a cool, dry place away from sunlight. Avoid basements or garages where humidity can degrade the material.
Skipping the Pre-Filter Maintenance
Some users assume that replacing the HEPA filter is enough. But the pre-filter plays a crucial role in protecting the more expensive HEPA filter. Neglecting it means the HEPA filter will clog faster, requiring more frequent (and costly) replacements.
Clean or replace the pre-filter regularly to extend the life of your entire system.
Not Checking for Compatibility
Not all GermGuardian filters are interchangeable. For example, the FLT4825 won’t fit the AC5250W model. Always verify compatibility before purchasing.
If you’re unsure, contact GermGuardian customer support or check the product description online.
Maintenance Tips to Extend Filter Life and Improve Performance
Changing the filter is just one part of keeping your GermGuardian running smoothly. Regular maintenance can help you get the most out of your investment and avoid unexpected issues.
Run the Purifier Consistently
Air purifiers work best when used regularly. Running your GermGuardian 24/7 on a low setting is more effective than turning it on only during allergy season. Consistent use helps maintain air quality and prevents pollutants from building up.
If you’re concerned about energy use, look for models with Energy Star certification or auto mode, which adjusts fan speed based on air quality.
Keep the Area Around the Unit Clean
Dust and debris near the air intake can clog the pre-filter faster. Vacuum or wipe down the area around your purifier weekly. Avoid placing it near curtains, furniture, or walls that block airflow.
For best results, position the unit at least 6 inches away from obstacles and in a central location for optimal air circulation.
Monitor Air Quality
If your model has a built-in air quality sensor, pay attention to the color-coded indicators. A red or orange light means pollution levels are high—this is a good time to check your filter or increase fan speed.
Even without a sensor, you can use a standalone air quality monitor to track PM2.5, VOCs, and humidity levels. This helps you understand how well your purifier is working.
Replace the UV-C Bulb (If Applicable)
Some GermGuardian models include a UV-C light that kills germs. While the bulb doesn’t need replacing as often as the filter, it does lose effectiveness over time.
Most manufacturers recommend replacing the UV-C bulb every 12–18 months. Check your user manual for instructions and replacement part numbers.
Schedule Regular Check-Ups
Set a calendar reminder every 3 months to inspect your purifier. Look for signs of wear, unusual noises, or reduced airflow. Early detection can prevent bigger problems down the line.
During your check-up, clean the exterior with a damp cloth, check the power cord for damage, and ensure the unit is level and stable.
Filter Replacement Schedule and Performance Data
To help you stay on track, here’s a quick reference table showing typical filter lifespans and performance data for popular GermGuardian models.
| Model | Filter Type | Replacement Interval | Coverage Area (sq ft) | CADR Rating (Dust/Pollen/Smoke) |
|---|---|---|---|---|
| AC4825 | FLT4825 (3-in-1) | 6–12 months | 153 | 100/110/90 |
| AC5250W | FLT5250T (3-in-1) | 6–12 months | 234 | 125/130/110 |
| AC5900W | FLT5900 (3-in-1) | 8–12 months | 338 | 150/160/140 |
| AC9200W | FLT9200 (3-in-1) | 8–12 months | 450 | 200/210/190 |
Note: Replacement intervals may vary based on usage and air quality. CADR = Clean Air Delivery Rate (higher is better).
This table shows that larger models like the AC9200W cover more space and have higher CADR ratings, meaning they clean the air faster. But even smaller units like the AC4825 are effective in bedrooms or home offices.
Remember: A clean filter is key to maintaining these performance levels. A clogged filter can reduce airflow by up to 50%, making your purifier work harder and less efficiently.
Final Thoughts: Breathe Easy with a Fresh Filter
Changing your GermGuardian air purifier filter might seem like a small task, but it has a big impact on your health and comfort. In 2026, as we continue to prioritize indoor air quality, staying on top of filter maintenance is more important than ever.
From understanding your filter system to choosing the right replacement and avoiding common mistakes, this guide gives you everything you need to keep your GermGuardian running like new. With just a few minutes of effort every few months, you can enjoy cleaner air, fewer allergens, and peace of mind.
So don’t wait for that musty smell or that sneeze to remind you—make filter changes part of your regular home care routine. Your lungs (and your GermGuardian) will thank you.
Frequently Asked Questions
How do I know when to change my GermGuardian air purifier filter?
Most GermGuardian models have a filter replacement indicator light that turns on when it’s time to change the filter. You should also check the filter every 6–8 months or if you notice reduced airflow or odor.
What type of filter does my GermGuardian air purifier use?
GermGuardian air purifiers typically use a combination HEPA and activated carbon filter, often labeled as a “True HEPA” filter. Check your model’s manual or the existing filter for the exact part number to ensure compatibility.
How often should I replace the GermGuardian air purifier filter?
For optimal performance, replace the GermGuardian air purifier filter every 6 to 12 months, depending on usage and air quality. Homes with pets, smokers, or high allergen levels may need more frequent changes.
Can I clean and reuse the GermGuardian HEPA filter?
No, the True HEPA filter in GermGuardian purifiers is not washable or reusable. Attempting to clean it can damage the fibers and reduce filtration efficiency—always replace it with a new one.
How do I change the filter in my GermGuardian air purifier?
Turn off and unplug the unit, then remove the front or back panel to access the filter. Take out the old filter, insert the new one with the arrow pointing inward, and reattach the panel securely.
Where can I buy a replacement filter for my GermGuardian air purifier?
You can purchase genuine GermGuardian replacement filters online through Amazon, the official GermGuardian website, or at major retailers like Walmart and Home Depot. Always verify the model number for compatibility.