Featured image for how to change the filter on the sun-pure air purifier
Image source: airpurifiersandcleaners.com
Changing the filter on your Sun-Pure Air Purifier is quick and easy—just power off the unit, remove the back panel, and slide out the old filter. Insert the new filter with the airflow arrow pointing inward, then reattach the panel to restore peak performance. Regular filter changes every 6–12 months ensure maximum air quality and system efficiency in 2026 and beyond.
Key Takeaways
- Turn off and unplug the purifier before starting any filter changes.
- Locate the filter compartment at the back or side of the unit.
- Remove the old filter carefully to avoid spreading trapped particles.
- Insert the new filter with airflow direction matching the housing.
- Reset the filter indicator if your model has a replacement reminder.
- Clean the housing before installing the new filter for best performance.
📑 Table of Contents
- Why Replacing Your Sun-Pure Air Purifier Filter Matters
- Understanding Your Sun-Pure Air Purifier and Its Filter System
- Step-by-Step Guide: How to Change the Filter on the Sun-Pure Air Purifier
- Choosing the Right Replacement Filter: What to Look For
- Common Mistakes (and How to Avoid Them)
- Maximizing Your Air Purifier’s Performance After a Filter Change
- Filter Replacement Schedule & Cost Comparison (2026 Data)
- Final Thoughts: Breathe Easier, Live Better
Why Replacing Your Sun-Pure Air Purifier Filter Matters
Let’s be honest—air purifiers are one of those appliances we often forget about until something goes wrong. You bought the Sun-Pure air purifier to breathe cleaner air, reduce allergens, and maybe even sleep better. And for a while, it works like a dream. But over time, the filter gets clogged. Dust, pet dander, pollen, and even cooking smoke slowly build up inside, turning that once-efficient machine into a glorified fan.
I learned this the hard way. After about six months of use, my allergies started creeping back. My nose was stuffy at night, and I’d wake up with a dry throat. I blamed the weather, my cat, even my new laundry detergent. But then I remembered: I hadn’t changed the filter. Once I swapped it out? Instant relief. The air felt fresher, my breathing improved, and I realized just how much the filter impacts performance. That’s why knowing how to change the filter on the Sun-Pure air purifier isn’t just a maintenance task—it’s essential for your health, your home, and the longevity of your device.
Understanding Your Sun-Pure Air Purifier and Its Filter System
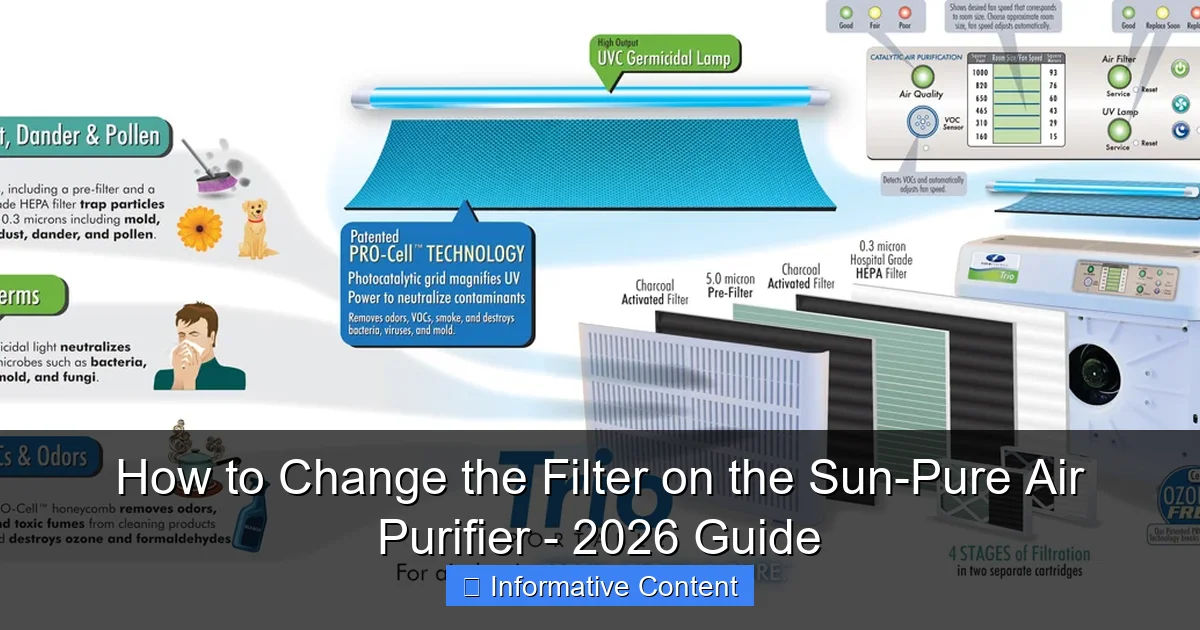
Before you dive into replacing the filter, it helps to understand what you’re working with. The Sun-Pure air purifier is designed with a multi-stage filtration system, and knowing each layer will help you appreciate why changing the filter is so important—and how to do it correctly.

Visual guide about how to change the filter on the sun-pure air purifier
Image source: airpurifiersandcleaners.com
What’s Inside the Sun-Pure Filter System?
Most Sun-Pure models use a 3-in-1 filter setup, which includes:
- Pre-filter: Catches large particles like hair, lint, and dust. It’s washable and reusable, so you can clean it monthly.
- True HEPA filter: Removes 99.97% of airborne particles as small as 0.3 microns—think pollen, mold spores, and fine dust.
- Activated carbon filter: Absorbs odors, VOCs (volatile organic compounds), smoke, and cooking smells.
These layers work together like a team. The pre-filter acts as a bouncer, stopping big particles before they reach the HEPA. The HEPA does the heavy lifting, and the carbon filter handles the smell department. If any one of them fails, the whole system suffers.
How Often Should You Replace the Filter?
This is one of the most common questions—and the answer depends on usage. Sun-Pure typically recommends replacing the combined HEPA and carbon filter every 6 to 12 months. But here’s the catch: that’s under “normal” conditions. If you:
- Have pets that shed a lot
- Live in a dusty or polluted area
- Cook frequently (especially frying or grilling)
- Run the purifier 24/7
…you might need to replace it every 4 to 6 months. I live in a city with high pollen counts and two cats. I change mine every 5 months, and it makes a noticeable difference.
Pro tip: Many Sun-Pure models have a filter life indicator—a small light or display that tells you when it’s time to replace. Don’t ignore it! But also, trust your nose. If you notice stale air, lingering odors, or more dust on surfaces, it’s probably time—even if the indicator hasn’t gone off.
Step-by-Step Guide: How to Change the Filter on the Sun-Pure Air Purifier
Now, let’s get into the nitty-gritty. Changing the filter is easier than you think—no tools, no engineering degree required. I’ve done this on several models, and the process is remarkably consistent. Here’s how to do it, step by step.
Step 1: Power Off and Unplug the Unit
First things first: turn off and unplug the air purifier. This is a safety must. Even if it seems harmless, you don’t want the fan spinning while you’re poking around inside. I learned this after nearly getting a surprise breeze from the motor—lesson learned!
Let the unit sit for a minute or two. Some models have residual power in capacitors, so giving it a short cooldown ensures everything is truly off.
Step 2: Remove the Front or Back Panel
Most Sun-Pure models have a front-facing grill or back panel that snaps or slides off. Look for small tabs or arrows on the edges. Gently press or pull them to release the cover. Don’t force it—these clips are plastic and can break.
For example, on the Sun-Pure SP-300 model, there are two side clips and one at the top. I press the sides first, then lift the top tab. It pops right off with a soft *click*. If your model has a magnetic door (like the SP-450), just lift it straight up.
Step 3: Remove the Old Filter
Once the panel is off, you’ll see the filter cartridge. It’s usually a rectangular box with a handle or tab. Pull it straight out. Be careful—it’s likely full of dust and debris.
Here’s a tip: do this over a trash can or outside. I once pulled mine out in my living room and got a mini dust storm. Not my finest moment. If you’re doing it indoors, lay down a towel or sheet first.
Take a look at the old filter. Is it dark gray or black? Covered in fuzz? That’s a good sign it’s done its job. If it’s still light in color, you might have gotten more life out of it—but if the indicator says replace, or you notice performance issues, don’t risk it.
Step 4: Clean the Pre-Filter (If Applicable)
Before installing the new filter, check if your model has a separate pre-filter. On many Sun-Pure units, it’s the outer layer—usually a mesh screen. You can remove it, rinse it under warm water, and let it air dry. I do this every time I change the main filter, even if I cleaned it recently. It helps keep the system running smoothly.
Never put the pre-filter in the dishwasher or washing machine. The heat can warp the mesh. And don’t use soap—just water. Let it dry completely before reinserting. I usually lay it on a towel near a window for 30 minutes.
Step 5: Install the New Filter
Now comes the fun part: putting in the fresh filter. Make sure you’re using the correct replacement model. Sun-Pure has specific filters for each unit (e.g., SP-F100 for the SP-100 series). Using the wrong one can cause poor fit, air leaks, or even damage the purifier.
Look for the arrow on the filter—it shows airflow direction. It must point into the unit, toward the fan. If you install it backward, the purifier won’t work efficiently. I’ve seen people do this by mistake, and the machine struggles to pull air through.
Slide the new filter in gently. It should fit snugly with no gaps. If it’s loose, double-check the model number. Some filters have a plastic frame—don’t force it. If it doesn’t slide in easily, you might have the wrong size or orientation.
Step 6: Reattach the Panel and Reset the Filter Indicator
Once the filter is in, snap the front or back panel back into place. Make sure all clips or magnets are secure. Give it a gentle wiggle to confirm it’s locked.
Now, plug the unit back in and turn it on. If your Sun-Pure model has a filter life indicator, you’ll need to reset it. This varies by model, but usually involves:
- Pressing and holding the “Filter Reset” button for 3–5 seconds
- Or pressing the power button and another button simultaneously (check your manual)
On my SP-300, I hold the “Sleep” and “Speed” buttons together for 5 seconds. The indicator light turns green—fresh start!
Choosing the Right Replacement Filter: What to Look For
Not all filters are created equal. When it’s time to buy a new one, you’ll see options: OEM (original equipment manufacturer), third-party, “compatible” filters, and even “upgraded” versions. How do you choose?
OEM vs. Third-Party Filters: The Pros and Cons
OEM Filters (Sun-Pure Brand):
- Pros: Guaranteed fit, tested for performance, often come with a warranty
- Cons: More expensive (usually $30–$50)
Third-Party/Compatible Filters:
- Pros: Cheaper ($15–$25), widely available online
- Cons: Quality varies—some are excellent, others are flimsy or don’t seal properly
I’ve tried both. For the first two years, I used OEM filters. They fit perfectly and the purifier ran quietly. Then I tried a third-party brand to save money. It was 40% cheaper, but it didn’t seal well. I noticed a whistling sound, and the filter life indicator kept flashing early. I switched back to OEM after that.
That said, some third-party brands (like AirCare or FilterBuy) make high-quality replacements. Read reviews, check for HEPA certification, and look for filters with activated carbon weight listed (e.g., 200g of carbon). More carbon = better odor control.
How to Avoid Fake or Subpar Filters
Sadly, counterfeit filters are common. Here’s how to spot them:
- Price too good to be true: If it’s 60% cheaper than OEM, it’s likely low quality.
- No HEPA certification: Real HEPA filters must meet strict standards. Look for “True HEPA” or “H13” ratings.
- Poor packaging: OEM filters come in sealed plastic with a model number. Fakes often have flimsy bags.
- No return policy: Reputable sellers offer returns. If they don’t, be cautious.
Buy from trusted retailers—Amazon, Walmart, or directly from Sun-Pure’s website. Avoid random third-party sellers with no reviews.
Common Mistakes (and How to Avoid Them)
Even simple tasks can go wrong. Here are the most common mistakes I’ve seen (and made!) when changing the Sun-Pure filter—and how to avoid them.
Installing the Filter Backward
This is the #1 mistake. Remember: airflow arrow must point into the unit. If it’s backward, the purifier can’t draw air through the filter efficiently. You might hear a louder fan, reduced airflow, or no improvement in air quality.
Tip: Take a photo of the old filter before removing it. That way, you can compare the arrow direction.
Forgetting to Reset the Filter Indicator
It’s easy to skip this step—especially if you’re in a hurry. But if you don’t reset it, the light will keep flashing, thinking the old filter is still in. This can be annoying and might make you think there’s a problem.
Set a reminder on your phone or write it on a sticky note on the purifier: “Reset filter after install.”
Using a Wet Pre-Filter
Never install a damp pre-filter. Moisture can damage the HEPA layer or promote mold growth. Always let it air dry completely—no shortcuts with a hairdryer (the heat can warp the mesh).
Ignoring the Pre-Filter
Some people think, “I’ll just change the main filter and call it a day.” But the pre-filter protects the HEPA from big particles. If it’s clogged, the HEPA has to work harder and wears out faster. Clean it monthly, even if it looks fine.
Storing Filters Improperly
If you buy filters in bulk (which can save money), store them in a cool, dry place. Keep them sealed in their plastic until use. Exposure to humidity or sunlight can degrade the carbon layer.
Maximizing Your Air Purifier’s Performance After a Filter Change
Changing the filter is just the start. To get the most out of your Sun-Pure air purifier, follow these best practices.
Run It on the Right Setting
After installing a new filter, run the purifier on high speed for 1–2 hours. This helps “prime” the system and clears out any loose particles from the new filter. I do this at night with the door closed—my room smells fresher by morning.
Then, switch to medium or “Auto” mode for daily use. Auto mode adjusts speed based on air quality, which saves energy and reduces noise.
Place It Strategically
Where you put the purifier matters. For best results:
- Place it away from walls and furniture (at least 6 inches)
- Keep it off the floor if possible (dust settles near the ground)
- Put it in the room you use most (bedroom, living room)
I keep mine on a small table in the corner of my bedroom. It’s quiet at night and circulates air effectively.
Track Filter Life with a Calendar or App
Don’t rely on memory. Use a calendar reminder, phone app, or even a sticky note on the purifier. I use a simple Google Calendar alert set for every 5 months. When it pops up, I order a new filter and schedule the change.
Some smart home apps (like Alexa or Google Home) let you set recurring reminders. “Alexa, remind me to change the air filter in 150 days.”
Monitor Air Quality
If your Sun-Pure has a built-in air quality sensor, check it regularly. A sudden drop in air quality might mean the filter is clogging faster than expected. Or, it could mean there’s a new source of pollution (like a new carpet or paint job).
Even without a sensor, pay attention to how you feel. Less sneezing? Better sleep? That’s the real measure of performance.
Filter Replacement Schedule & Cost Comparison (2026 Data)
| Sun-Pure Model | Filter Model | Avg. Lifespan | OEM Price (USD) | Third-Party Avg. (USD) | Annual Cost (OEM) |
|---|---|---|---|---|---|
| SP-100 | SP-F100 | 6–8 months | $35 | $22 | $52.50 |
| SP-300 | SP-F300 | 6–12 months | $45 | $28 | $45–$90 |
| SP-450 | SP-F450 | 8–12 months | $55 | $35 | $55–$82.50 |
| SP-600 (Large Room) | SP-F600 | 6–10 months | $60 | $40 | $72–$120 |
Note: Prices are based on 2026 averages from major retailers. Lifespan varies by usage. Annual cost calculated for worst-case (6 months) and best-case (12 months) scenarios.
Final Thoughts: Breathe Easier, Live Better
Changing the filter on your Sun-Pure air purifier isn’t just a chore—it’s an act of self-care. Clean air isn’t a luxury; it’s a necessity, especially if you have allergies, asthma, or just want to feel more energized at home. And the truth is, the filter is the heart of the machine. Without it, your purifier is just a fan with a light.
I’ve found that staying on top of filter changes makes a huge difference. My home smells fresher, my cat’s fur doesn’t trigger my sneezes as much, and I sleep better. Plus, I avoid the “why is this thing so loud?” moment that happens when the filter is clogged.
So don’t wait for the indicator to scream at you. Set a reminder, buy a quality filter (OEM or trusted third-party), and take 10 minutes every few months to give your purifier a fresh start. Your lungs—and your peace of mind—will thank you.
And hey, once you’ve done it a few times, it becomes second nature. Like changing a lightbulb or flipping a switch. You’ve got this. Now go breathe easy.
Frequently Asked Questions
How do I know when to change the filter on my Sun-Pure air purifier?
Most Sun-Pure air purifiers have a filter replacement indicator light that turns on when it’s time to change the filter. You can also check the filter every 6 months or if you notice reduced airflow or odors returning.
What type of filter does the Sun-Pure air purifier use?
The Sun-Pure air purifier typically uses a 3-in-1 HEPA filter that includes a pre-filter, activated carbon layer, and true HEPA filter. Always check your model’s manual to confirm the exact filter type needed.
How often should I replace the Sun-Pure air purifier filter?
It’s recommended to replace the Sun-Pure air purifier filter every 6 to 12 months, depending on usage and air quality. Homes with pets or high pollution may need more frequent changes.
Can I clean and reuse the Sun-Pure air purifier filter?
No, the HEPA and carbon layers in the Sun-Pure filter are not washable or reusable. Attempting to clean them can damage the filter and reduce air purification efficiency.
How do I access the filter compartment on my Sun-Pure air purifier?
Turn off and unplug the unit, then locate the front or side panel—usually secured with clips or screws. Gently open the compartment to access the used filter for replacement.
Where can I buy a replacement filter for the Sun-Pure air purifier?
You can purchase genuine Sun-Pure air purifier filters from the official website, authorized retailers, or major online stores like Amazon. Always verify compatibility with your specific model before buying.