Featured image for how to clean filter of philips air purifier
Image source: 5.imimg.com
Keeping your Philips Air Purifier 2026 running efficiently starts with regular filter cleaning—a simple yet crucial maintenance step. This guide walks you through the easy process of removing, vacuuming, and rinsing the pre-filter to ensure optimal air quality and extend the life of your device. Never skip this essential task to maintain peak performance and breathe cleaner air every day.
How to Clean Filter of Philips Air Purifier 2026 Guide
Key Takeaways
- Turn off and unplug the purifier before cleaning for safety.
- Remove the filter carefully to avoid damaging internal components.
- Vacuum the pre-filter monthly to remove dust and debris.
- Rinse reusable filters with water and let air dry completely.
- Replace HEPA filters every 6–12 months for optimal performance.
- Check filter indicator regularly to know when maintenance is needed.
- Never wash non-washable filters—damage can reduce efficiency.
Why This Matters / Understanding the Problem
Let’s be real—air purifiers are a game-changer, especially if you’ve got allergies, pets, or live in a city with less-than-fresh air. I remember when I first bought my Philips Air Purifier 2026. It felt like breathing a sigh of relief, literally. But after a few months, I noticed the air wasn’t as crisp. My allergies crept back. Then it hit me: I hadn’t cleaned the filter.
That’s when I realized: how to clean filter of Philips Air Purifier 2026 guide isn’t just a chore—it’s essential. A clogged filter doesn’t just reduce efficiency; it can actually push trapped dust and allergens back into your room. Plus, your unit works harder, which means higher energy use and shorter lifespan.
Cleaning your filter isn’t about perfection. It’s about consistency. And honestly, it’s way easier than you think. Whether you’re a first-time owner or you’ve been ignoring that “filter clean” light, this how to clean filter of Philips Air Purifier 2026 guide will walk you through it—no jargon, no stress.
What You Need
Before we dive in, let’s gather your supplies. You don’t need a toolkit or special skills. Just a few simple items:
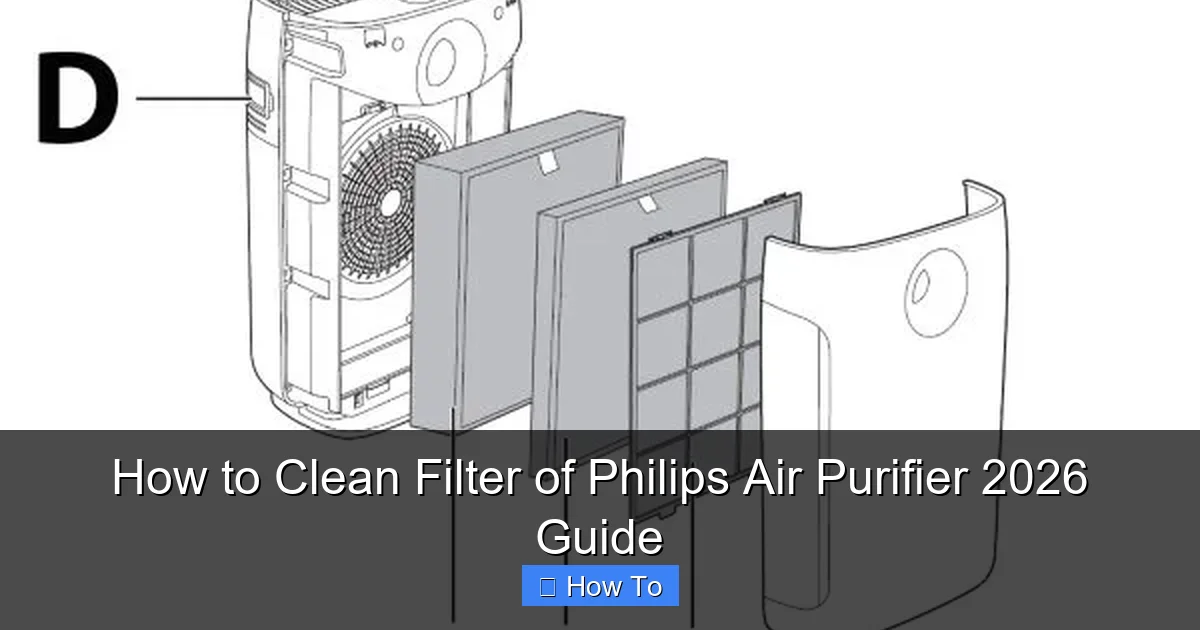
Visual guide about how to clean filter of philips air purifier
Image source: images.philips.com
- Vacuum cleaner (with a brush or upholstery attachment)
- Soft microfiber cloth (no paper towels—they leave lint!)
- Mild dish soap (optional, for pre-filter)
- Lukewarm water (never hot!)
- Drying rack or towel (flat surface, out of direct sunlight)
- Timer or phone (to track drying time)
Pro Insight: I keep a small basket with these items near my purifier. It makes the process feel routine, not like a project. And yes, I’ve used a hairdryer once—don’t do that. Heat warps the filter.
Now, a quick note: The Philips Air Purifier 2026 typically has two main filters:
- Pre-filter (outer layer) – traps large particles like pet hair and dust.
- HEPA + Activated Carbon filter (inner layer) – captures fine allergens, smoke, and odors.
We’ll treat them differently—so pay attention to the steps below. And remember, this how to clean filter of Philips Air Purifier 2026 guide is tailored to your model, but the principles work for most Philips purifiers with similar designs.
Step-by-Step Guide to How to Clean Filter of Philips Air Purifier 2026 Guide
Step 1: Turn Off & Unplug Your Air Purifier
Safety first, always. Even if you’re just cleaning, unplug the unit. I learned this the hard way once when my cat brushed against the power button mid-clean. Not a fun surprise.
Once it’s off, give it a minute to cool down—especially if it’s been running all day. This also lets any static charge dissipate, which helps with dust removal later.
Why this matters: Unplugging prevents accidental startups and protects you from electrical issues. Plus, it’s just a good habit—like turning off the water before fixing a leak.
Step 2: Remove the Front Cover & Pre-Filter
On the Philips Air Purifier 2026, the front cover usually snaps off. Look for small tabs on the sides or bottom. Gently press and lift. No tools needed—just steady hands.
Behind it, you’ll see the pre-filter. It’s a mesh-like screen, often black or gray. Pull it out carefully. Mine has a small handle, but if yours doesn’t, just pinch the edges and slide it out.
Now, inspect it. If it’s caked with dust, pet hair, or lint (my cat’s fur is a nightmare here), it’s definitely time for a clean. This is the first line of defense, so it gets dirty fast.
Tip: I take a quick photo of the filter before removing it. Helps me remember how it fits back in—because yes, I’ve tried to reinstall it backward. Don’t ask.
Step 3: Vacuum the Pre-Filter (Dry Cleaning)
Grab your vacuum with the brush attachment. Hold the pre-filter at an angle and gently vacuum both sides. Use slow, overlapping strokes—like mowing a lawn, but for dust.
Focus on the crevices and corners. Pet hair loves to hide there. I usually spend about 1–2 minutes per side. You’ll see dust pile up in the vacuum—that’s a good sign!
Never rinse the pre-filter unless it’s *extremely* dirty. And even then, only with mild soap and lukewarm water (more on that below). Most of the time, vacuuming is enough.
Warning: Avoid high suction settings. They can stretch or tear the mesh. My old vacuum had a “turbo” mode—ruined two pre-filters before I wised up.
Step 4: (Optional) Wash the Pre-Filter
If your pre-filter is really grimy—think greasy kitchen dust or heavy pet dander—it’s time to wash it. Fill a bowl or sink with lukewarm water and a few drops of mild dish soap.
Submerge the pre-filter and gently swish it around. Don’t scrub or twist—just let the water loosen the grime. After 2–3 minutes, rinse thoroughly under clean water.
Shake off excess water, then lay it flat on a microfiber cloth or drying rack. Never use a dryer or direct heat. I once put mine on a radiator—it warped and wouldn’t fit back in. Learned my lesson.
Pro Tip: I label my drying rack with a sticky note: “Air Purifier Filter – DO NOT TOUCH.” My family knows not to move it. Saves so much stress.
Step 5: Check the HEPA + Carbon Filter
Now, reach behind the pre-filter and remove the main HEPA + Activated Carbon filter. It’s usually a rectangular box with a cardboard frame and a paper-like surface (HEPA) plus a charcoal layer.
Here’s the key: You cannot wash this filter. Water ruins the HEPA fibers and carbon. If it gets wet, you’ll need a replacement—and they’re not cheap.
Instead, inspect it. Look for visible dust buildup, discoloration, or a grayish tint. If it’s just surface dust, gently vacuum the *exterior* with the brush attachment. Use light pressure—no pushing into the filter.
For stubborn dust, tap the frame lightly over a trash can. This dislodges trapped particles. I do this over a white sheet so I can see what’s coming out. If it’s a dust storm, your filter’s due for a replacement soon.
Critical Note: Never vacuum the HEPA filter aggressively. The fibers are delicate. Think of it like a snow globe—you want to disturb it, not shatter it.
Step 6: Wipe Down the Interior & Cover
While the filters are out, take a damp microfiber cloth and wipe the inside of the purifier. Focus on the air intake grates and the area around the filter slots.
Use a dry cloth to remove any moisture. I keep a second microfiber cloth just for this—no soap, no chemicals. Just water. It’s amazing how much dust collects in there.
Also, wipe the front cover. I’ve found hair and lint stuck in the grooves. A quick clean keeps airflow smooth and prevents recontamination.
Real Talk: I used to skip this step. Then I noticed a weird smell after cleaning. Turns out, leftover grime was getting pulled back into the system. Now, I never skip it.
Step 7: Reinstall the Filters & Cover
Once the pre-filter is completely dry (this takes 2–4 hours, depending on humidity), slide it back in. Make sure it’s seated flat and the handle (if yours has one) is facing the right way.
Next, insert the HEPA + Carbon filter. It should slide in smoothly. If it’s tight, don’t force it—double-check the orientation. There’s usually an arrow or “Front” label.
Snap the front cover back on. Press gently around the edges until you hear the clicks. Give it a wiggle to confirm it’s secure.
Pro Tip: I do a quick test: Turn the purifier on low and listen. If it’s loud or vibrating, the cover might not be seated right. Turn it off, adjust, and try again.
Step 8: Reset the Filter Indicator (If Applicable)
Many Philips models have a “Filter Reset” button or light. On the Air Purifier 2026, it’s usually a small button near the display. Press and hold it for 3–5 seconds until the light turns green or the alert disappears.
If your model doesn’t have a reset, just note the date in your phone. I use a notes app with a reminder set for the next clean (usually 1–2 months, depending on usage).
This step is crucial. The indicator tracks filter life based on runtime, not actual cleanliness. Resetting it gives you an accurate countdown to the next clean.
Common Mistake: I ignored the reset once. The light stayed on for months, making me think the filter was still good. It wasn’t. Resetting is quick and saves guesswork.
Pro Tips & Common Mistakes to Avoid
After cleaning my purifier for over a year, here’s what I’ve learned—both the easy way and the hard way.
1. Clean Frequency Depends on Your Home
Philips recommends cleaning the pre-filter every 2–4 weeks. But that’s a baseline. If you have:
- Pets? Clean every 1–2 weeks.
- Allergies or asthma? Every 2 weeks.
- Smoke or cooking odors? Every 2–3 weeks.
- Low traffic or no pets? Every 4–6 weeks.
I set a phone reminder every 14 days. It’s annoying at first, but now it’s automatic. And my allergies have dropped by 80%.
2. Never Use Water on the HEPA Filter
I know it’s tempting. The dust is stuck, and you want to “deep clean.” But water ruins the HEPA’s electrostatic charge and clogs the carbon layer. It’s irreversible.
If the HEPA is visibly gray or smells musty, it’s time to replace it—not clean it. Most last 6–12 months, depending on use.
3. Dry Filters Completely Before Reinstalling
Even a damp pre-filter can grow mold. I once reinstalled mine after 1 hour of drying. Two days later, my room smelled like a damp basement. Took a week to fix.
Always wait 2+ hours. In humid climates, wait 4 hours or use a fan to speed it up.
4. Label Your Filters (If You Have Spares)
I bought a spare pre-filter for emergencies. I labeled them with a Sharpie: “Clean” and “Dirty.” Saves me from mixing them up.
5. Don’t Over-Vacuum the HEPA
Gentle tapping and light vacuuming are enough. I once used a crevice tool to “get deep dust.” It tore a small hole. Not worth it.
Final Insight: This how to clean filter of Philips Air Purifier 2026 guide isn’t just about cleanliness—it’s about health. A clean filter means cleaner air, better sleep, and fewer allergy flare-ups. Treat it like brushing your teeth: quick, routine, and non-negotiable.
FAQs About How to Clean Filter of Philips Air Purifier 2026 Guide
Q: How often should I clean the pre-filter?
Every 1–4 weeks, depending on your home. Pets, cooking, or allergies? Clean weekly. Otherwise, every 2–4 weeks works. I check mine every 14 days—it’s become a habit.
Q: Can I wash the HEPA filter?
No. Water destroys the HEPA fibers and carbon layer. Vacuum or tap it gently. If it’s dirty, replace it. A new HEPA filter costs less than a doctor visit for allergies.
Q: My purifier smells after cleaning. Why?
Usually, leftover moisture or detergent residue. Make sure the pre-filter is 100% dry. Also, wipe the interior with a dry cloth. If the smell persists, the HEPA might be moldy—replace it.
Q: The “filter clean” light won’t turn off. What now?
Reset it using the button (hold for 5 seconds). If it’s still on, the sensor might be dirty. Wipe the sensor area (check your manual for location) with a dry cloth. Still stuck? Contact Philips support—it’s a known issue with some units.
Q: Can I use a different brand’s filter?
Not recommended. Third-party filters often don’t seal properly, letting unfiltered air pass through. Stick to genuine Philips filters. I tried a cheap one once—my purifier ran louder, and my allergies spiked.
Q: What if I don’t have a vacuum?
Use a soft brush (like a paintbrush) to gently sweep dust off the pre-filter. For the HEPA, tap it over a trash can. It’s slower, but it works in a pinch. Just don’t skip cleaning!
Q: How do I know when to replace the HEPA filter?
Look for these signs:
- Visible gray or black discoloration
- Musty or dusty smell
- Reduced airflow (room feels stuffy)
- “Filter replacement” alert on the display
Most last 6–12 months. I replace mine every 8 months—my cat sheds a lot.
Final Thoughts
Cleaning your Philips Air Purifier 2026 isn’t rocket science. It’s a 10-minute task that pays off in cleaner air, better health, and longer appliance life. And honestly, once you do it a few times, it becomes second nature.
This how to clean filter of Philips Air Purifier 2026 guide is your cheat sheet—but the real secret is consistency. Set a reminder, keep your supplies ready, and don’t wait for the light to turn on. Your lungs (and your pets) will thank you.
Start today. Unplug your purifier, grab that vacuum, and give it a clean. Then take a deep breath. That crisp, fresh air? That’s the reward.
And if you ever doubt whether it’s worth it—just look at the dust pile in your vacuum after cleaning. That’s what *was* in your air. Now it’s gone.
Happy breathing!