Featured image for how to clean my true air purifier
Image source: hamiltonbeach.ca
Regularly cleaning your True Air Purifier is essential to maintain peak performance and ensure fresh, healthy air in 2026. Follow the manufacturer’s guide to safely remove and wash filters, wipe down the unit, and eliminate dust buildup—simple maintenance that boosts efficiency and extends your purifier’s lifespan.
“`html
How to Clean My True Air Purifier in 2026 for Fresh Air
Key Takeaways
- Unplug before cleaning: Always disconnect the air purifier to ensure safety.
- Clean filters monthly: Remove and gently vacuum reusable filters to maintain efficiency.
- Wipe exterior weekly: Use a damp cloth to remove dust and prevent buildup.
- Replace filters as needed: Follow manufacturer guidelines for timely filter replacements.
- Check for blockages: Inspect vents and airflow paths to avoid reduced performance.
- Use mild cleaners only: Avoid harsh chemicals that can damage components.
Why This Matters / Understanding the Problem
Let’s be real—your True Air Purifier works hard every single day. It’s quietly pulling in dust, pet dander, pollen, and even those invisible airborne nasties you don’t want breathing in. But here’s the thing: if you don’t clean it regularly, all that gunk builds up inside, and your purifier starts working against you instead of for you.
I learned this the hard way last winter. My allergies were acting up worse than ever, even though my purifier was running nonstop. Turns out, the filters were clogged with months of buildup, and the fan was straining to push air through. Once I finally gave it a proper deep clean? Instant relief. The air felt lighter, cleaner—like I’d opened a window in the middle of January.
Cleaning your True Air Purifier isn’t just about maintenance—it’s about performance. A well-maintained unit runs more efficiently, lasts longer, and actually delivers on its promise of fresh, healthy air. And in 2026, with indoor air quality becoming more important than ever (thanks, wildfire season and urban pollution), knowing how to clean my True Air Purifier in 2026 for fresh air isn’t optional—it’s essential.
Whether you’ve got the True HEPA model, the True Carbon variant, or one of their newer smart units, the cleaning basics are similar. But skipping this chore? That’s like brushing your teeth once a year and wondering why your gums bleed.
What You Need
Before we dive in, let’s gather our supplies. You don’t need fancy tools or expensive cleaners—just a few household items and maybe 20 minutes of your time.
Visual guide about how to clean my true air purifier
Image source: cleancrispair.com
- Soft microfiber cloths (lint-free is best—no shedding!)
- Mild dish soap (unscented and gentle—no harsh chemicals)
- White vinegar (great for breaking down grease and mineral deposits)
- Distilled water (tap water can leave mineral spots; distilled keeps things pristine)
- Soft-bristle brush (an old toothbrush works perfectly)
- Vacuum cleaner with brush attachment (for dusting hard-to-reach areas)
- Replacement filters (if it’s time—check your manual or app reminder)
Pro tip: Always unplug your purifier before cleaning. Safety first, always. And if your model has a washable pre-filter, great—you’ll save money over time. But even then, don’t skip the deeper cleaning steps.
Step-by-Step Guide to How to Clean My True Air Purifier in 2026 for Fresh Air
Step 1: Turn Off and Unplug Your Unit
Before touching anything, make sure your True Air Purifier is completely powered down and unplugged from the wall. This isn’t just about avoiding shocks—it’s also about protecting the internal electronics from moisture during cleaning.
Visual guide about how to clean my true air purifier
Image source: dygtyjqp7pi0m.cloudfront.net
I once made the mistake of wiping down the exterior while it was still plugged in. Not dangerous, but definitely not smart. Now it’s rule #1 in my cleaning routine.
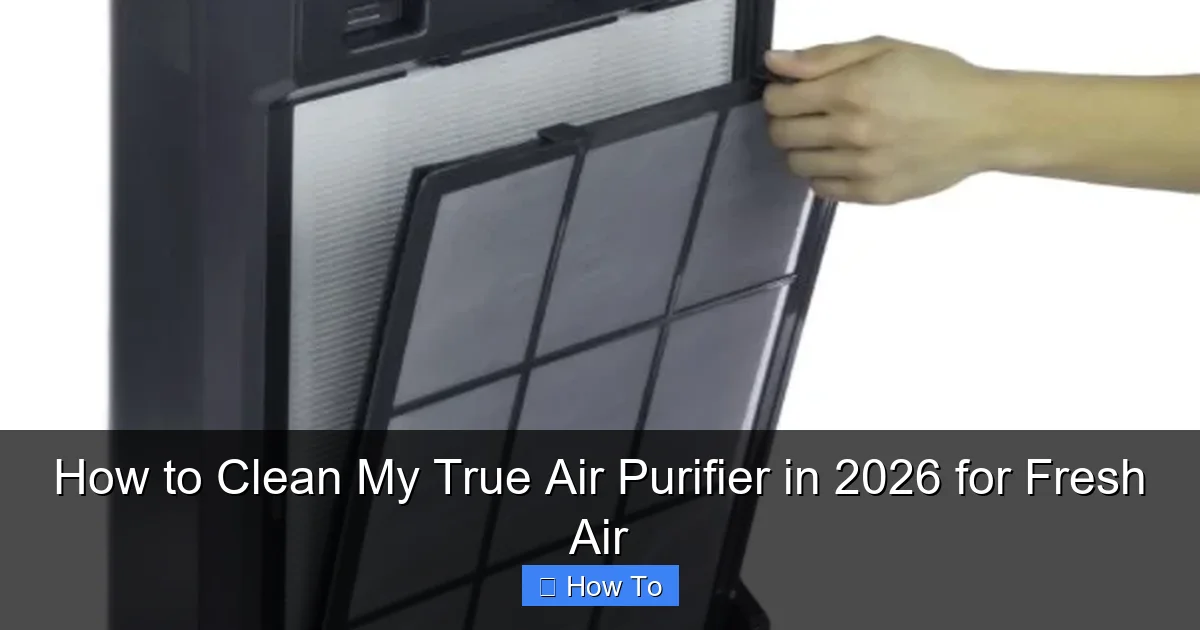
Step 2: Remove and Inspect the Filters
Open the front or side panel (depending on your model) and carefully take out each filter. Most True Air Purifiers have at least two: a pre-filter (often washable) and a True HEPA filter (usually not washable).
Take a close look. Is the pre-filter caked with dust? Does the HEPA filter look gray or discolored? If the HEPA filter is visibly dirty or it’s been over 6–12 months (check your user guide), it’s time to replace it. Don’t try to wash a True HEPA filter—it’ll ruin the delicate fibers.
For the pre-filter: gently tap it over a trash can to loosen loose dust. If it’s washable (most are), rinse it under cool water. Avoid hot water—it can warp the material.
Step 3: Clean the Washable Pre-Filter
If your pre-filter is labeled as washable, give it a gentle bath. Use a mix of mild dish soap and lukewarm distilled water. Scrub lightly with your soft-bristle brush—focus on the folds where dust loves to hide.
Rinse thoroughly until no soap remains. Soap residue can trap more particles later, making your purifier less effective. Then, let it air-dry completely—overnight is ideal. Never reinstall a damp filter. Moisture + electronics = bad news.
While it’s drying, move on to the next step. Patience pays off here.
Step 4: Vacuum the Interior and Fan Blades
Use your vacuum’s brush attachment to gently remove dust from the inside of the unit—especially around the fan housing and intake vents. Be careful not to press too hard; those internal components are delicate.
I like to angle the nozzle sideways to avoid pushing debris deeper into the machine. If you see stubborn grime near the fan blades, use your soft brush to loosen it first, then vacuum it up.
This step is often overlooked, but it’s crucial. A dusty fan has to work harder, which means higher energy bills and shorter lifespan for your purifier.
Step 5: Wipe Down the Exterior and Vents
Dampen a microfiber cloth with a 50/50 mix of white vinegar and distilled water. Wipe down the outer casing, control panel, and air vents. Vinegar cuts through fingerprints, grease, and hard water spots without leaving streaks.
Avoid spraying liquid directly onto the unit—always apply cleaner to the cloth first. And never use abrasive sponges or ammonia-based cleaners. They can scratch the plastic or damage sensitive sensors.
For tight spots around buttons or display screens, fold the cloth into a small corner or use a cotton swab lightly dampened with the vinegar solution.
Step 6: Clean the Air Quality Sensor (If Applicable)
Many newer True Air Purifiers come with built-in air quality sensors. These tiny lenses or ports can get dusty, causing inaccurate readings—and that means your purifier might not kick on when it should.
Use a dry microfiber cloth or a can of compressed air to gently clean the sensor area. Don’t use water here—even a little moisture can interfere with its function.
I check mine every time I clean the filters. It takes 10 seconds and ensures my purifier responds accurately to real-time air quality changes.
Step 7: Reassemble and Reset (If Needed)
Once everything is dry—especially the pre-filter—carefully reinstall all components in the correct order. Most units have alignment guides or labels, so it’s hard to mess up. But double-check your manual if you’re unsure.
If your model has a filter replacement indicator or timer, reset it now. Some True Air Purifiers do this automatically when you replace the HEPA filter, but others require a manual reset via the control panel or companion app.
Plug the unit back in and turn it on. Listen for unusual noises—if something sounds off, power it down and recheck your assembly.
Pro Tips & Common Mistakes to Avoid
After cleaning dozens of air purifiers (mine and friends’), I’ve seen what works—and what doesn’t. Here’s my honest advice:
Visual guide about how to clean my true air purifier
Image source: crazyfreebie.com
Pro Tip: Set a calendar reminder every 2–3 months for routine cleaning. Even if your filters aren’t due for replacement, dust accumulates fast, especially if you have pets or live in a dusty area.
Warning: Never soak non-washable filters in water or cleaning solutions. The True HEPA filter is designed to trap particles—not survive a bath. Water damage is irreversible and voids most warranties.
Common Mistake: Assuming “clean exterior = clean machine.” The real grime lives inside. Skipping internal vacuuming is like washing your car but never cleaning the engine.
Insider Insight: If your purifier smells musty after cleaning, it might be mold in the ductwork or fan housing. In that case, consider a professional deep clean or contact True customer support—they’re surprisingly helpful.
Also, don’t forget about placement! Keep your purifier at least 6 inches away from walls or furniture. Blocked airflow reduces efficiency and makes cleaning even more important.
FAQs About How to Clean My True Air Purifier in 2026 for Fresh Air
Q: How often should I clean my True Air Purifier?
A: For most homes, every 2–3 months is ideal. But if you have pets, smokers, or live in a high-pollution area, aim for monthly exterior wipes and quarterly deep cleans. The washable pre-filter can be rinsed monthly—just let it dry fully before reinstalling.
Q: Can I use bleach or disinfectant wipes?
A: Absolutely not. Harsh chemicals can degrade plastic parts, damage sensors, and leave toxic residues that you’ll breathe in. Stick to mild soap, vinegar, and distilled water—they’re effective and safe.
Q: My HEPA filter looks clean. Do I still need to replace it?
A: Yes—even if it looks fine. True HEPA filters lose efficiency over time as fibers compact and pores clog. Most manufacturers recommend replacement every 6–12 months, regardless of appearance. Check your model’s guidelines.
Q: What if I can’t find my user manual?
A: No worries! Visit True’s official website and search by your model number. They have digital manuals, filter guides, and even video tutorials. Or download their app—many 2026 models sync directly for maintenance alerts.
Q: Will cleaning void my warranty?
A: Not if you follow the manufacturer’s instructions. Using approved cleaning methods and genuine replacement parts keeps your warranty intact. Just avoid DIY modifications or unauthorized cleaners.
Q: My purifier is still noisy after cleaning. What’s wrong?
A: It could be a misaligned fan, worn bearings, or debris stuck in the motor housing. Try reassembling carefully. If the noise persists, contact True support—they often send replacement parts for free under warranty.
Q: Is it worth upgrading to a newer True model in 2026?
A: If your current unit is over 5 years old, maybe! Newer models have smarter sensors, quieter operation, and better energy efficiency. But if yours is still running well, regular cleaning can extend its life significantly. Save your money and clean first!
Final Thoughts
Cleaning your True Air Purifier might not be the most exciting task on your to-do list—but it’s one of the most impactful. Think of it as a small act of self-care for your lungs and your home. By following these steps, you’re not just maintaining a machine; you’re investing in cleaner air, better sleep, and fewer allergy flare-ups.
So next time you walk into a room and take a deep breath of crisp, fresh air, remember: that didn’t happen by accident. It happened because you took 20 minutes to care for your purifier.
Make how to clean my True Air Purifier in 2026 for fresh air part of your seasonal routine. Your future self—and your sinuses—will thank you.
“`