Featured image for how to clean out air purifier
Image source: airpurifierissues.com
Regularly cleaning your air purifier is essential to maintain peak performance and extend its lifespan. In 2026, experts recommend turning off and unplugging the unit, then carefully removing and rinsing reusable filters—like pre-filters and HEPA filters—with water or vacuuming dust buildup; never wash carbon filters, but replace them as needed. Wipe down the interior and exterior with a dry or slightly damp cloth to eliminate mold, dust, and allergens, ensuring optimal airflow and air quality.
How to Clean Out Air Purifier in 2026 for Best Performance
Key Takeaways
- Unplug first: Always disconnect power before cleaning for safety.
- Wipe exterior weekly: Use a dry cloth to remove dust buildup.
- Wash filters monthly: Rinse pre-filters with water; air-dry completely.
- Replace HEPA filters: Install new ones every 6–12 months.
- Vacuum air intakes: Clear debris to maintain airflow efficiency.
- Check UV-C bulbs: Clean or replace annually if equipped.
- Reset indicators: Follow manual to reset post-cleaning alerts.
Why This Matters / Understanding the Problem
Let’s be honest: we often forget about our air purifiers until we notice a strange smell or a drop in air quality. That’s exactly what happened to me last winter. My apartment felt stuffy, and I kept sneezing—even though my purifier was running 24/7.
After some detective work (and a quick call to a technician), I learned the real issue: my air purifier was clogged. Dust, pet hair, and mold spores had built up inside, turning my trusted device into a source of pollution instead of a solution.
That’s when I realized: knowing how to clean out air purifier in 2026 for best performance isn’t just a maintenance task—it’s essential for your health and the device’s longevity. A dirty purifier can’t filter air efficiently, wastes energy, and may even release trapped allergens back into your space.
In 2026, air purifiers are smarter than ever, with advanced filters, sensors, and Wi-Fi controls. But no matter how high-tech your model is, cleaning it regularly is still the #1 way to ensure peak performance. Whether you have a HEPA-based unit, an ionizer, or a smart purifier with auto-detection, this guide will walk you through the process step by step—no engineering degree required.
And don’t worry: you don’t need to take apart your purifier like a robot. With the right tools and a little time, you can keep your air fresh and your machine happy. Let’s get started.
What You Need
Before diving into how to clean out air purifier in 2026 for best performance, gather these essentials. Most are probably already in your home:

Visual guide about how to clean out air purifier
Image source: thumbs.dreamstime.com
- Microfiber cloth – gentle on surfaces and traps dust without scratching
- Soft-bristle brush (like a clean paintbrush or makeup brush) – perfect for crevices and pre-filters
- Vacuum with a brush attachment – great for sucking up loose debris without damaging parts
- Mild dish soap or vinegar solution (1:1 water and white vinegar) – natural, effective, and safe for most surfaces
- Compressed air can (optional) – useful for hard-to-reach vents and sensors
- Bucket of warm water – for wiping down removable parts
- Replacement filters (if due) – check your manual for model-specific HEPA, carbon, or pre-filters
- Gloves (optional) – if you’re sensitive to dust or cleaning solutions
Pro tip: Always check your purifier’s manual first. Some models have unique requirements (like UV-C bulbs or ionizing plates) that need special care. Never submerge electronic parts in water unless the manual says it’s safe.
Now that you’ve got your tools, let’s walk through the process—just like I did when I rescued my own purifier from the “dust dungeon.”
Step-by-Step Guide to How to Clean Out Air Purifier in 2026 for Best Performance
Step 1: Unplug and Power Down
First things first: unplug your air purifier. Even if it’s “off,” it’s still connected to power and could accidentally turn on during cleaning.

Visual guide about how to clean out air purifier
Image source: meliwa.com
This isn’t just about safety—it’s about peace of mind. I once forgot to unplug mine and nearly jumped out of my skin when the fan kicked on mid-wipe. Not fun.
Also, if your purifier has a smart mode or auto-detection (common in 2026 models), give it a few minutes to fully power down. Some units take a minute to shut off sensors completely.
Warning: Never clean your purifier while it’s plugged in. Even a small electric shock can damage internal components or void your warranty.
Step 2: Remove the Outer Casing (If Applicable)
Most air purifiers have a removable outer shell or front panel. This is usually held in place by clips or a simple twist-lock mechanism.
Check your manual for the exact release method. On my Winix 5500-2, I press two side buttons and lift the front panel off. On my friend’s Dyson Purifier Humidify+Cool, it’s a magnetic cover—super easy.
Once removed, set the casing aside. Don’t force anything. If it’s not coming off, double-check for hidden latches or screws (some models hide them under rubber feet).
This step is crucial because it gives you access to the pre-filter, which catches large particles like pet hair and dust bunnies before they reach the main filter. Cleaning it regularly is a big part of how to clean out air purifier in 2026 for best performance.
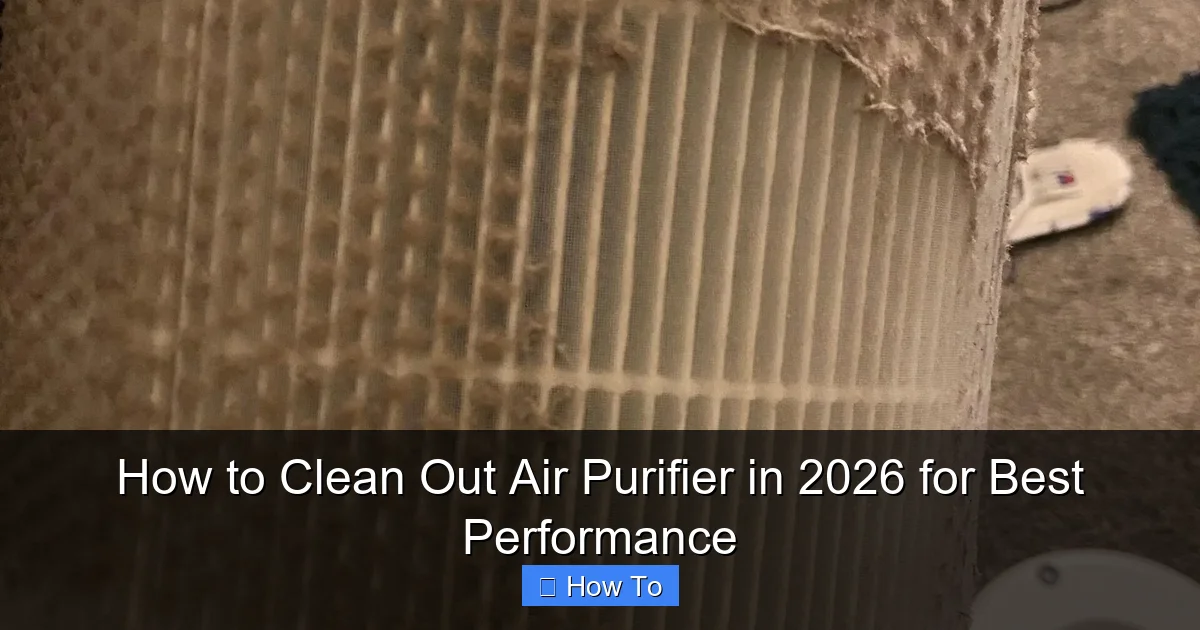
Step 3: Clean the Pre-Filter
The pre-filter is the first line of defense. It’s usually a mesh screen or foam layer that’s washable and reusable.
Here’s how I clean mine:
- Hold the pre-filter under cool running water to rinse off loose dust.
- Use a soft brush to gently scrub both sides. I use an old makeup brush—it’s perfect for getting into the tiny holes.
- If it’s really grimy, soak it for 10–15 minutes in warm water with a few drops of dish soap.
- Rinse thoroughly and let it air-dry completely before reinserting. Never put it back while damp.
Some 2026 models have washable pre-filters with indicator lights that remind you when it’s time to clean. If yours has one, reset the indicator after cleaning.
Pro tip: Clean your pre-filter every 2–4 weeks if you have pets, live in a dusty area, or use the purifier daily. Otherwise, every 6–8 weeks is fine.
Step 4: Vacuum the Interior
Now that the pre-filter is out, use your vacuum’s brush attachment to clean the inside of the purifier.
Focus on:
- The intake vents (where air enters)
- The area behind the pre-filter
- Any crevices or corners where dust hides
I like to go slowly, using short, gentle strokes. Don’t press too hard—some internal components are delicate.
If you don’t have a vacuum, a soft brush works too. Just tap it over a trash can to remove the dust.
This step is often overlooked, but it’s one of the most effective ways to maintain airflow and prevent clogs—key to how to clean out air purifier in 2026 for best performance.
Step 5: Check and Clean the Main Filter (HEPA, Carbon, etc.)
The main filter is the heart of your purifier. In most 2026 models, it’s a HEPA filter (captures tiny particles like pollen and mold spores) and a carbon filter (absorbs odors and VOCs).
Here’s the important part: HEPA and carbon filters are NOT washable.
Instead, use a vacuum with a brush attachment to gently remove surface dust. Hold the filter upright so debris falls away, not deeper into the fibers.
For carbon filters, avoid vacuuming if it has a mesh or paper backing—this can tear. Just use a soft brush.
Now, assess the filter’s condition:
- Light gray or white? It’s probably still good. Vacuum and reuse.
- Dark, matted, or smells musty? Time to replace it.
Most manufacturers recommend replacing HEPA filters every 6–12 months, carbon filters every 3–6 months. But in high-pollution areas (near highways, during wildfire season), you may need to replace them more often.
Warning: Never use water, soap, or compressed air on a HEPA or carbon filter. This damages the fibers and reduces filtration efficiency.
Step 6: Clean the Fan and Internal Components
The fan is what pulls air through the filters. Over time, dust and pet hair can coat the blades, slowing it down and making it noisy.
To clean it:
- Use a soft brush to dislodge dust from the fan blades.
- Vacuum the blades and surrounding area.
- If you have compressed air, give the fan a quick blast (hold the can upright, 6 inches away).
Be careful not to bend the blades. They’re often thin and delicate.
Also, check the fan housing for dust buildup. A clean fan means better airflow and quieter operation—both essential for optimal performance in 2026 models.
Some smart purifiers have self-cleaning modes or anti-dust coatings on the fan. If yours does, run that mode after cleaning for extra protection.
Step 7: Wipe Down Exterior and Controls
While the inside dries, clean the outside. Use a microfiber cloth dampened with your vinegar solution or mild soap.
Wipe:
- The exterior shell
- The control panel (if it has buttons or a touchscreen)
- The air outlet vents (top or back)
For touchscreens, use a screen-safe cleaner or a slightly damp cloth. Never spray liquid directly on the device.
If your purifier has smart sensors (like PM2.5 or odor detectors), gently wipe around them with a dry microfiber cloth. Dust on sensors can cause false readings.
This step not only keeps your purifier looking nice but also prevents dust from entering through vents—another key part of how to clean out air purifier in 2026 for best performance.
Step 8: Reassemble and Reset (If Needed)
Once everything is dry (especially the pre-filter), put your purifier back together.
Insert the pre-filter first, then the main filter. Make sure they’re seated properly—most models have arrows or notches to guide you.
Reattach the outer casing. Double-check that all latches are secure.
Now, plug it back in. If your purifier has a filter life indicator or cleaning reminder, reset it according to the manual. On my Levoit Core 400S, I hold the “Filter” button for 3 seconds after replacing the filter.
Turn it on and listen. It should run smoothly, with no rattling or unusual noises. If it’s still noisy, double-check that the pre-filter is fully dry and seated correctly.
Step 9: Run a Test Cycle
Let your purifier run for 1–2 hours in a clean room. I usually do this in my bedroom while I read or watch TV.
Monitor:
- Airflow (is it strong and even?)
- Noise level (should be quiet on low/medium settings)
- Smell (should be fresh, not musty or dusty)
Some 2026 models have air quality indicators that show PM2.5 levels in real time. If the number drops quickly, your cleaning worked!
If you notice a drop in performance, recheck the pre-filter and main filter placement. A misaligned filter can block airflow.
Pro Tips & Common Mistakes to Avoid
After years of cleaning my own and my friends’ purifiers, I’ve learned a few things the hard way. Here are my top insights:

Visual guide about how to clean out air purifier
Image source: airpurifierfirst.com
Pro Tip 1: Create a Cleaning Schedule
I keep a sticky note on my purifier: “Pre-filter: every 4 weeks. Full clean: every 3 months.” It’s simple, but it works.
Set phone reminders or use a smart home app (like Alexa or Google Home) to notify you when it’s time to clean. Consistency is key to long-term performance.
Pro Tip 2: Label Your Filters
I write the date I installed a new filter with a dry-erase marker. That way, I know exactly when it’s due for replacement.
Some 2026 models have QR codes on filters that you can scan to track usage. If yours does, use it!
Pro Tip 3: Clean During Low-Pollution Hours
I clean my purifier on weekend mornings when the air is fresher. This reduces the chance of re-contaminating it with outdoor pollutants.
Avoid cleaning during wildfire season, pollen peaks, or after painting or construction.
Common Mistake 1: Using Harsh Chemicals
Never use bleach, ammonia, or strong solvents. They can degrade filter materials and leave toxic residues.
Stick to mild soap, vinegar, or manufacturer-approved cleaners.
Common Mistake 2: Forgetting the Pre-Filter
The pre-filter does most of the heavy lifting. Neglecting it forces the main filter to work harder, shortening its life.
I’ve seen purifiers with clean HEPA filters but filthy pre-filters—still performing poorly. Don’t make this mistake.
Common Mistake 3: Rushing the Drying Process
Putting a damp pre-filter back in is a recipe for mold. I learned this when I got a musty smell after cleaning mine too fast.
Always let parts dry for at least 2 hours. If it’s humid, give it longer.
Common Mistake 4: Ignoring the Manual
Every purifier is different. What works for one model might damage another.
For example, some ionizing purifiers have metal plates that can be wiped with a damp cloth—others can’t. Always check the manual first.
FAQs About How to Clean Out Air Purifier in 2026 for Best Performance
Q: How often should I clean my air purifier?
It depends. Clean the pre-filter every 2–4 weeks if you have pets, allergies, or use the purifier daily. Otherwise, every 4–6 weeks is fine.
Do a full clean (including vacuuming inside and wiping down) every 3 months. Replace HEPA filters every 6–12 months, carbon filters every 3–6 months.
Your purifier’s indicator lights (if it has them) are a great guide. But don’t rely on them 100%—sometimes they need manual resetting.
Q: Can I wash my HEPA filter?
No. HEPA filters are made of delicate fiberglass or synthetic fibers. Water, soap, or compressed air will destroy them.
Vacuum the surface gently, but if it’s dark, matted, or smells bad, replace it. A washed HEPA filter is worse than a dirty one—it can release trapped particles back into the air.
Q: My purifier smells musty after cleaning. What’s wrong?
That’s usually mold. It means the pre-filter wasn’t fully dry before reinsertion, or there’s residual moisture inside.
Turn the purifier off, unplug it, and let it sit in a dry, sunny spot for 24–48 hours. If the smell persists, check for mold on the main filter or inside the housing. Replace any affected parts.
To prevent this, always dry filters completely and clean during dry weather.
Q: Do I need to clean smart air purifiers differently?
Mostly, no—but pay attention to sensors and electronics. Never spray liquids near the control panel or sensor vents.
Some 2026 models have self-cleaning modes (like UV-C light or ionizing plates). Run these after manual cleaning to kill bacteria and viruses.
Also, check if your purifier has a filter life tracker. Reset it after cleaning or replacing filters to keep the app accurate.
Q: Can I use compressed air on the entire purifier?
Only on dry, hard-to-reach areas like fan vents or sensor grilles. Never use it on HEPA filters, carbon filters, or electronics.
Hold the can upright and spray in short bursts. Too much pressure can damage internal components.
Q: My purifier is still noisy after cleaning. What should I do?
Check for:
- A misaligned pre-filter or main filter
- Fan blades bent or obstructed
- Excessive dust in the motor housing (requires professional service)
If it’s a new noise, contact the manufacturer. Some 2026 models have noise-reduction technology that can be reset or recalibrated.
Q: Is it worth buying a purifier with a washable HEPA filter?
Rarely. True HEPA filters aren’t washable. Some brands claim their “washable HEPA” filters are as good as true HEPA, but tests show they lose efficiency after washing.
Stick with replaceable HEPA filters for the best performance. It’s more expensive long-term, but worth it for your health.
Final Thoughts
Cleaning your air purifier might not be the most exciting chore, but it’s one of the most impactful things you can do for your indoor air quality—and your wallet.
By following this guide on how to clean out air purifier in 2026 for best performance, you’ll extend your device’s life, reduce energy use, and keep your home fresh and healthy.
Remember: it’s not about perfection. It’s about consistency. Set a reminder, gather your supplies, and spend 20–30 minutes every few weeks. That’s all it takes.
And if you’re ever in doubt, check the manual. Your purifier is an investment—treat it like one.
Now, go enjoy that crisp, clean air. You’ve earned it.