
Featured image for how to install f1 filter in filtrete air purifier
Image source: mobileimages.lowes.com
Installing the F1 filter in your Filtrete Air Purifier 2026 is quick and straightforward—simply open the front panel, remove the old filter, and slide the new F1 filter into place with the arrow pointing toward the unit. Ensure the filter is securely seated and close the panel until it clicks, then reset the filter change indicator to maintain optimal air purification performance.
“`html
How to Install F1 Filter in Filtrete Air Purifier 2026
So, you’ve got your Filtrete Air Purifier 2026 humming along, quietly doing its job of cleaning the air in your home. But now it’s time to replace that old filter—specifically the F1 filter—and you’re not quite sure where to start. Don’t worry, I’ve been there. I remember the first time I opened mine up, staring at the compartment like it was a puzzle from another planet. But trust me, once you know the steps, it’s actually super simple.
In this guide, I’ll walk you through how to install F1 filter in Filtrete Air Purifier 2026—no jargon, no confusion, just clear, friendly instructions. Whether you’re a first-timer or just need a refresher, you’ll be back to breathing cleaner air in under five minutes.
Key Takeaways
- Turn off and unplug the air purifier before starting installation for safety.
- Locate the filter compartment by opening the front or side panel as indicated in the manual.
- Remove the old filter carefully to avoid spreading trapped dust and debris.
- Check the F1 filter size matches your Filtrete 2026 model before inserting.
- Insert the F1 filter with the airflow arrow pointing toward the unit.
- Secure the compartment and ensure it clicks or locks properly in place.
- Reset the filter indicator if your model has one to track usage accurately.
Why This Matters / Understanding the Problem
Let’s be real—air purifiers only work as well as their filters. If you’ve been using your Filtrete 2026 for a few months, that F1 filter has probably caught dust, pet dander, pollen, and who knows what else. Over time, it gets clogged, which means your purifier has to work harder—and your air quality drops.
Replacing the filter isn’t just about maintenance; it’s about performance. A fresh F1 filter restores your purifier’s ability to capture 99.97% of airborne particles as small as 0.3 microns. That includes things like smoke, mold spores, and even some bacteria. So yes, this small task makes a big difference.
And here’s the thing: skipping filter changes is one of the most common mistakes people make. I used to think, “It still looks okay,” or “It’s only been two months.” But filters don’t always look dirty when they’re full. The Filtrete 2026 has a filter life indicator, but even that’s just an estimate. The best practice? Replace the F1 filter every 3 months—or sooner if you have pets, allergies, or live in a dusty area.
By learning how to install F1 filter in Filtrete Air Purifier 2026, you’re not just fixing a machine—you’re investing in your health and comfort. Clean air means better sleep, fewer allergy flare-ups, and peace of mind.
What You Need
Before we dive in, let’s make sure you have everything ready. The good news? You probably already have most of this at home.

Visual guide about how to install f1 filter in filtrete air purifier
Image source: compressorlab.com
- A new F1 filter (compatible with Filtrete Air Purifier 2026—double-check the model number on the box)
- A clean, flat surface (like a table or countertop)
- A soft cloth or duster (optional, for cleaning the inside)
- Your hands (no tools required—seriously!)
Pro tip: Buy your replacement filter ahead of time. I learned the hard way when my purifier started beeping at 10 p.m. and I had to wait two days for delivery. Now I keep a spare in my closet.
Also, make sure your purifier is unplugged before you start. Safety first—even though it’s a low-voltage device, it’s always better to be cautious.
Step-by-Step Guide to How to Install F1 Filter in Filtrete Air Purifier 2026
Alright, let’s get to the good stuff. I’ll break this down into simple, no-stress steps. Think of it like changing a lightbulb—once you’ve done it once, you’ll never forget.
Visual guide about how to install f1 filter in filtrete air purifier
Image source: filtrete.com
Step 1: Turn Off and Unplug the Purifier
First things first: safety. Even though the Filtrete 2026 doesn’t have any exposed wires, it’s always smart to unplug it before opening anything up. I made the mistake once of changing the filter while it was still plugged in, and let’s just say the sudden power cycle startled me enough to drop the old filter on the floor. Not ideal.
So, unplug the unit from the wall. Then, place it on a stable surface—kitchen counter, coffee table, whatever works. You want it at a comfortable height so you’re not bending over or straining your back.
Step 2: Locate the Filter Compartment
Now, look at the back of your Filtrete 2026. You’ll see a large rectangular panel with a latch or handle. That’s your filter door. It’s usually on the lower half of the unit, but don’t worry—it’s hard to miss.
Gently press the latch (it might be a button or a small lever) and pull the door open. It should swing outward smoothly. If it feels stiff, don’t force it. Sometimes dust builds up around the hinges. A quick wipe with a dry cloth usually does the trick.
Once the door is open, you’ll see the old F1 filter sitting inside. It’s a flat, pleated filter with a cardboard frame—kind of like a mini accordion. Take a moment to look at how it’s positioned. Notice the direction of the pleats and which way it’s facing. This will help when you install the new one.
Step 3: Remove the Old F1 Filter
Carefully slide the old filter out of the compartment. It should come out easily—no tugging or yanking needed. If it’s stuck, check for any clips or tabs holding it in place. Most Filtrete 2026 models just use a snug fit, so it should slide right out.
As you remove it, you might notice how dirty it is. Even if it doesn’t look black or gross, it’s likely packed with microscopic particles. I remember the first time I changed mine—I was shocked at how much gunk had built up in just 90 days. That’s when I realized how important regular changes really are.
Set the old filter aside. You can wrap it in a plastic bag before tossing it to contain any dust. Or, if you’re feeling eco-friendly, check if your local recycling center accepts filter materials (some do, but not all).
Step 4: Clean the Filter Chamber (Optional but Recommended)
Before putting in the new filter, take 30 seconds to wipe down the inside of the compartment. Use a dry cloth or a soft brush to remove any loose dust or debris. I like to use a microfiber cloth—it picks up even the tiniest particles.
This step isn’t mandatory, but it helps your new filter last longer and work more efficiently. Think of it like cleaning out your vacuum before inserting a new bag. A little effort now prevents bigger problems later.
Also, check the air intake vents (usually around the sides or back). If they’re clogged with dust, gently wipe them down too. Good airflow is key to your purifier’s performance.
Step 5: Prepare the New F1 Filter
Now, grab your new F1 filter. Take it out of the packaging—most come in a plastic sleeve or cardboard box. Remove any plastic wrap or protective covering. Don’t skip this step! I’ve seen people install filters still wrapped in plastic and wonder why their purifier isn’t working. (Spoiler: it’s because air can’t pass through plastic.)
Check the filter for any labels or arrows. Some F1 filters have an airflow direction arrow printed on the frame. If yours does, make sure it’s pointing toward the inside of the purifier—that’s usually toward the fan or motor side.
If there’s no arrow, don’t stress. The pleats should face outward (toward you) when installed. That’s the standard orientation for most Filtrete models.
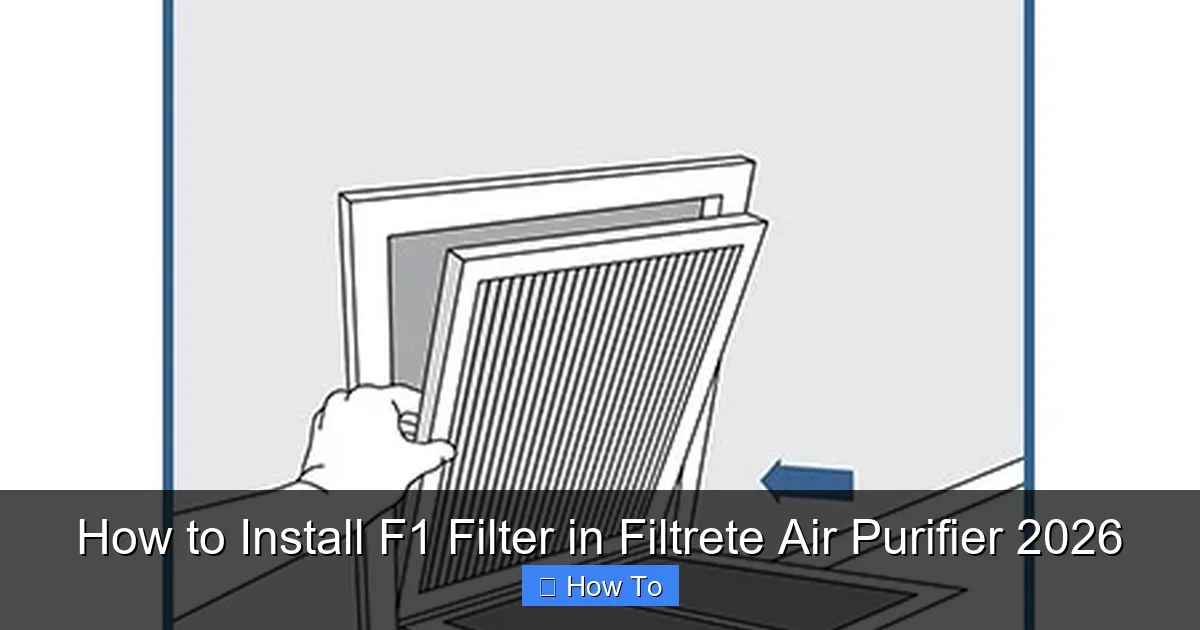
Step 6: Install the New F1 Filter
Here’s the main event: inserting the new filter. Hold it by the edges to avoid touching the pleated material—oils from your hands can reduce its effectiveness over time.
Slide the filter into the compartment, making sure it fits snugly. It should sit flat and level, with no gaps on the sides. If it’s crooked or tilted, it won’t seal properly, and air will bypass the filter—defeating the whole purpose.
Once it’s in place, gently press around the edges to ensure it’s seated correctly. You shouldn’t have to force it, but it should feel secure.
Double-check the orientation. If your filter has an arrow, confirm it’s pointing the right way. If not, just make sure the pleats are facing outward.
Step 7: Close the Filter Door
Now, carefully close the filter compartment door. It should click or snap into place. If it doesn’t close easily, don’t force it—double-check that the filter isn’t sticking out or misaligned.
Once it’s shut, give it a gentle tug to make sure it’s secure. You don’t want it popping open during operation.
Step 8: Reset the Filter Life Indicator (If Applicable)
Your Filtrete 2026 has a built-in filter life monitor. After installing the new F1 filter, you’ll want to reset it so it starts counting down from 90 days.
To do this, plug the purifier back in and turn it on. Then, press and hold the “Filter” button (usually located on the control panel) for about 5 seconds. You should see the indicator light blink or change color, confirming the reset.
If you’re not sure which button it is, check your user manual—or look for a button with a filter icon. Most models use a single button for both filter status and reset.
Once reset, the light should turn green or stop blinking, depending on your model. That means you’re all set!
Step 9: Test the Purifier
Finally, turn on your purifier and let it run for a few minutes. Listen for any unusual noises—like rattling or grinding. If everything sounds normal, you’ve successfully completed the installation.
You might notice a slight “new filter” smell at first. That’s normal and should fade within a day or two. It’s just the activated carbon layer adjusting to the air.
And just like that, you’ve mastered how to install F1 filter in Filtrete Air Purifier 2026. Pat yourself on the back—you’ve just taken a big step toward healthier indoor air.
Pro Tips & Common Mistakes to Avoid
Even simple tasks can go sideways if you’re not careful. Here are some real-world insights I’ve picked up from my own experiences and from helping friends troubleshoot their purifiers.

Visual guide about how to install f1 filter in filtrete air purifier
Image source: filtrete.com
Pro Tip: Label your filters with the installation date using a permanent marker. I write the month and year on the frame so I never have to guess when it was last changed. It’s a small habit that saves a lot of headaches.
Warning: Don’t use third-party or “compatible” filters unless they’re certified for the Filtrete 2026. I tried a cheaper off-brand once, and it didn’t fit right. The purifier kept shutting off, and the airflow was weak. Stick with genuine Filtrete F1 filters for best results.
Common Mistake: Installing the filter upside down. It’s easy to do, especially if there’s no arrow. Always double-check the orientation before closing the door. A backward filter won’t capture particles efficiently.
Pro Tip: Set a calendar reminder for filter changes. I use my phone to alert me every 90 days. That way, I never forget—and my purifier always runs at peak performance.
Warning: Don’t wash or vacuum the F1 filter. It’s not washable. I made that mistake early on, thinking I could “refresh” it. Spoiler: it ruined the filter. These are designed for single use only.
Another thing: if your purifier starts making noise after a filter change, don’t panic. Sometimes the new filter needs a day or two to settle in. But if the noise persists, check that the filter is seated properly and the door is fully closed.
FAQs About How to Install F1 Filter in Filtrete Air Purifier 2026
Got questions? I’ve got answers. Here are the most common ones I hear from people tackling this task for the first time.
Q: How often should I replace the F1 filter in my Filtrete 2026?
A: Every 3 months is the standard recommendation. But if you have pets, smoke, or live in a high-pollen area, consider changing it every 60–80 days. The filter life indicator is a good guide, but your environment matters more.
Q: Can I reuse the old F1 filter?
A: No. The F1 filter is not washable or reusable. Once it’s full, it’s done. Trying to clean it will damage the fibers and reduce its effectiveness.
Q: What happens if I don’t replace the filter?
A: Your purifier will still run, but it won’t clean the air effectively. Over time, the motor may overwork, leading to louder operation or even failure. Plus, dirty filters can harbor mold and bacteria—definitely not what you want circulating in your home.
Q: Is the F1 filter the only filter in the Filtrete 2026?
A: Yes. The Filtrete Air Purifier 2026 uses a single F1 filter that combines a pre-filter, HEPA layer, and activated carbon. It’s an all-in-one design, so you only need to replace one component.
Q: Can I install the filter while the purifier is on?
A: Technically, yes—but don’t. Always unplug the unit first. It’s safer and prevents any accidental damage to the motor or electronics.
Q: My filter door won’t close after installing the new filter. What’s wrong?
A: Most likely, the filter isn’t seated properly. Open the door, remove the filter, and reinsert it making sure it’s flat and aligned. Also, check for any packaging material left inside the compartment.
Q: Where can I buy a replacement F1 filter?
A: You can find genuine Filtrete F1 filters on Amazon, Walmart, Target, or directly from the Filtrete website. Just search for “Filtrete F1 filter for 2026” to ensure compatibility.
Final Thoughts
Learning how to install F1 filter in Filtrete Air Purifier 2026 might seem like a small task, but it’s one of those quiet wins that makes a big difference in your daily life. Clean air isn’t just a luxury—it’s a necessity, especially if you have allergies, asthma, or just want to breathe easier at home.
The process is simple, takes less than five minutes, and requires no tools. Once you’ve done it once, you’ll wonder why you ever stressed about it. And with the tips and reminders I’ve shared, you’ll never miss a filter change again.
So go ahead—grab that new filter, unplug your purifier, and give it a try. Your lungs (and your purifier) will thank you. And if you run into any hiccups, just remember: you’re not alone. We’ve all been there.
Now, take a deep breath. It’s about to get a lot cleaner.
“`