
Featured image for how to install iwave-r air purifier
Image source: i.ytimg.com
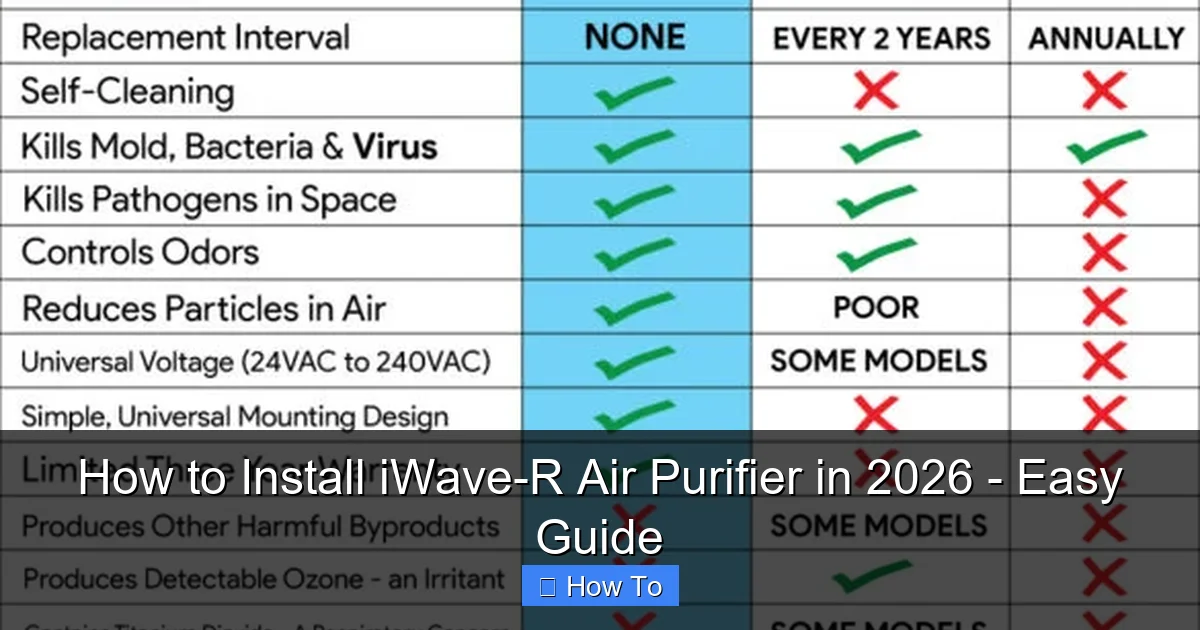
Installing the iWave-R Air Purifier in 2026 is a straightforward, DIY-friendly process that takes under 30 minutes—no professional help required. Simply locate your HVAC system’s air handler, mount the device securely, connect the power leads, and activate it for immediate, advanced air purification. With no filters to replace and smart self-cleaning technology, the iWave-R offers effortless, year-round indoor air quality improvement.
“`html
How to Install iWave-R Air Purifier in 2026 – Easy Guide
Key Takeaways
- Turn off power before installation for safety and compliance with electrical standards.
- Choose optimal location near air handler for maximum air purification efficiency.
- Secure mounting bracket properly to ensure stable and vibration-free operation.
- Connect wires correctly following color codes to avoid system malfunctions.
- Test system after install to confirm iWave-R activates with HVAC airflow.
- Schedule regular maintenance to maintain peak performance and extend device lifespan.
Why This Matters / Understanding the Problem
Let’s be real—indoor air quality isn’t something most of us think about until we’re sneezing, coughing, or feeling that weird “stuffy” vibe in our homes. I used to blame it on allergies or just “bad luck,” but after doing some digging (and a few too many trips to the doctor), I realized my home’s air was part of the problem. Dust, pet dander, mold spores, and even viruses can linger in the air we breathe every day—especially if your HVAC system isn’t filtering them out effectively.
That’s where the iWave-R comes in. It’s not your typical plug-in air purifier you stick in a corner. Instead, it’s a whole-home air purification system that installs directly into your HVAC ductwork. Think of it like giving your heating and cooling system a superpower: actively neutralizing pollutants, odors, and even pathogens as air flows through your vents.
If you’ve been searching for how to install iWave-R air purifier in 2026 – easy guide, you’re probably ready to take control of your indoor air quality without hiring an expensive contractor. And guess what? You absolutely can do this yourself—if you follow the right steps. I did it last spring, and honestly, it was easier than assembling IKEA furniture (and way more rewarding).
What You Need
Before we dive into the installation, let’s make sure you’ve got everything you need. Don’t worry—this isn’t a complicated list. Most of these items you might already have lying around the garage or basement.
Here’s your quick checklist:
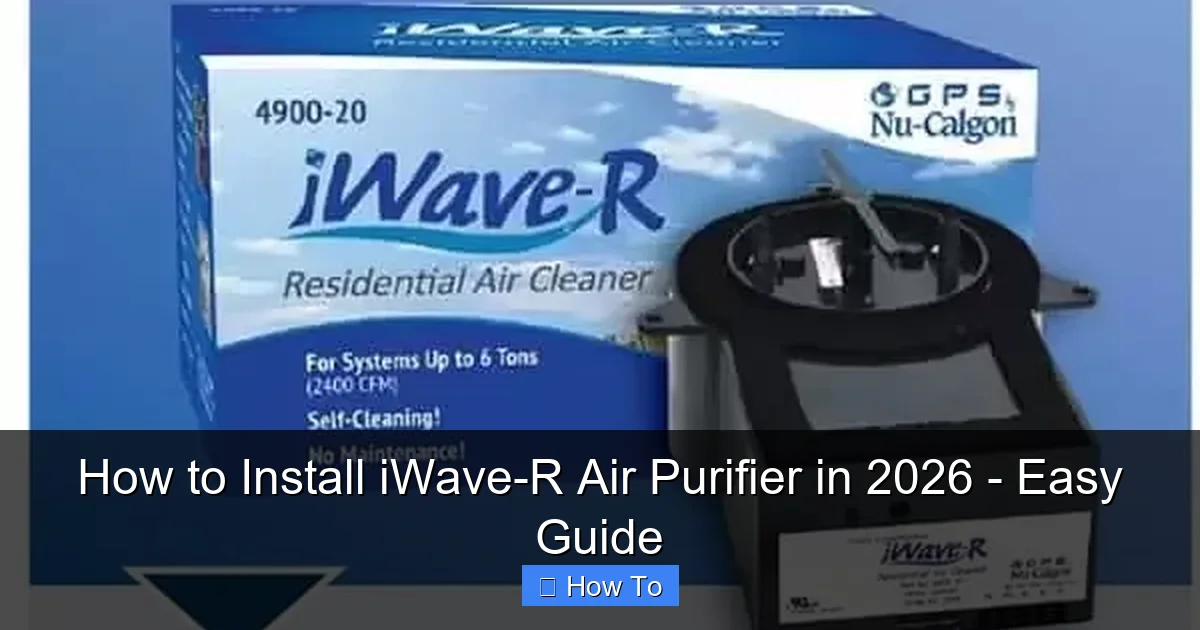
- iWave-R Air Purifier unit – Make sure you’ve got the right model for your system (it works with most residential HVAC setups).
- Phillips-head screwdriver – For mounting the unit and securing wires.
- Wire strippers – You’ll need to connect low-voltage wiring to your HVAC control board.
- Electrical tape or wire nuts – For safe, secure connections.
- Drill with 3/8″ drill bit – To create the mounting hole in your ductwork.
- Measuring tape – Precision matters when positioning the unit.
- Safety glasses and gloves – Ductwork can be dusty, and you don’t want metal shavings in your eyes.
- Optional: Multimeter – Helpful if you want to double-check voltage before connecting wires.
Pro tip: If your HVAC system is in a tight space (like an attic or crawlspace), grab a headlamp or portable work light. Trust me, trying to see inside a dark duct at 7 PM on a Tuesday isn’t fun.
Step-by-Step Guide to How to Install iWave-R Air Purifier in 2026 – Easy Guide
Alright, let’s get to the good stuff. Installing the iWave-R isn’t rocket science, but it does require careful attention to detail—especially when dealing with electrical connections. I’ll walk you through each step exactly as I did it in my own home.
Step 1: Turn Off Power to Your HVAC System
Safety first—always. Before you touch anything near your furnace or air handler, shut off the power at the main breaker panel. I learned this the hard way once (sparks + panic = not a good combo). Locate the breaker labeled “Furnace,” “HVAC,” or “Air Handler” and flip it off.
Once it’s off, double-check by trying to turn on your thermostat. If the fan or heat doesn’t kick on, you’re good to go. This step is non-negotiable—even though the iWave-R uses low voltage, you’re still working near high-voltage components.
Step 2: Choose the Right Location in Your Ductwork
The iWave-R should be installed in the return air duct, ideally within 6–12 feet of your air handler or furnace. Why? Because that’s where air is pulled in before being conditioned and sent back through your home. By treating the air here, you ensure every breath you take is cleaner.
Use your measuring tape to find a flat, vertical section of ductwork—avoid elbows, transitions, or areas with insulation blocking access. The unit needs at least 6 inches of clearance on all sides for airflow and maintenance.
Mark the spot with a pencil. I chose a spot right above my furnace in the basement—easy to reach and out of the way.
Step 3: Drill the Mounting Hole
Now it’s time to make a hole in your duct. Don’t panic—this is totally normal and won’t weaken your system.
Using your 3/8″ drill bit, carefully drill a hole where you marked. Go slow to avoid tearing the metal. Once the hole is made, deburr the edges with a file or sandpaper to prevent sharp edges from cutting wires later.
Pro tip: Place a piece of cardboard or a rag underneath to catch metal shavings. You don’t want those falling into your ductwork.
Step 4: Mount the iWave-R Unit
Slide the iWave-R into the hole you just drilled. The flange should sit flush against the outside of the duct. Use the included self-tapping screws (usually 4) to secure it tightly. Don’t overtighten—you don’t want to warp the duct or crack the housing.
Once it’s mounted, give it a gentle tug to make sure it’s secure. If it wobbles, tighten the screws a bit more.
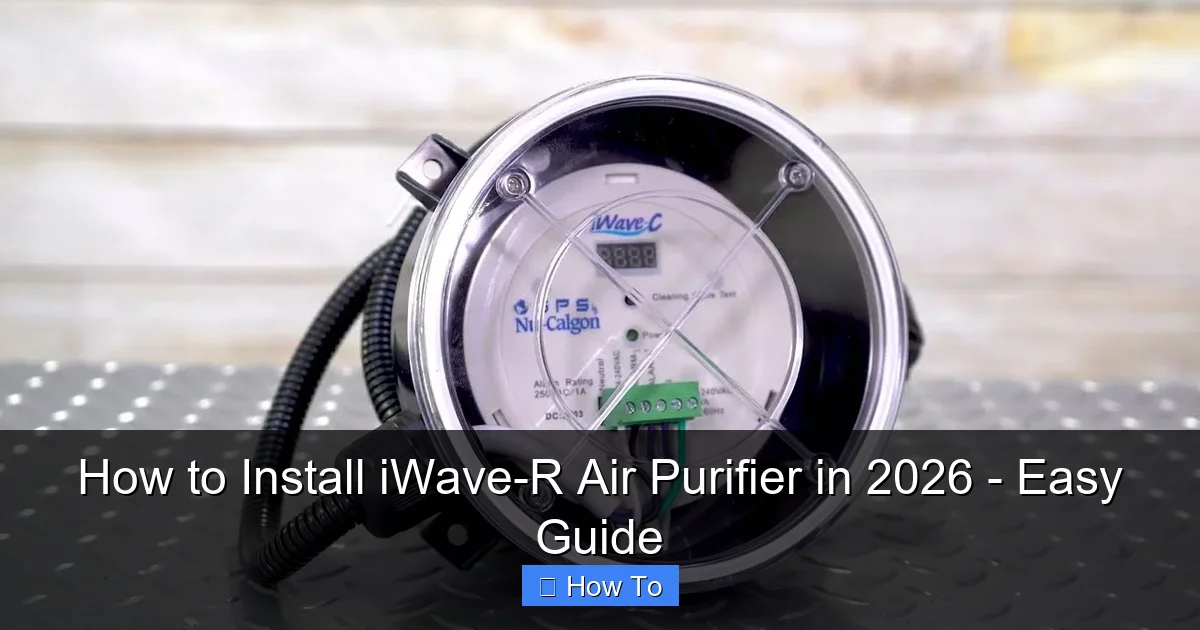
Step 5: Connect the Wiring to Your HVAC Control Board
This is the part that makes some people nervous—but it’s simpler than it looks. The iWave-R runs on 24V AC, the same low voltage that powers your thermostat.
Here’s how I did it:
- Locate your furnace or air handler’s control board. It’s usually behind a metal panel secured with screws.
- Find the “G” (fan) and “C” (common) terminals. These are standard on most systems.
- Strip about 1/4 inch of insulation from the red and white wires coming from the iWave-R.
- Connect the red wire to the “G” terminal and the white wire to the “C” terminal. Use wire nuts or terminal screws—whatever your board uses.
- Secure the connections with electrical tape for extra safety.
Important: Never connect to high-voltage lines (like the main power to the furnace). Stick to the low-voltage thermostat wires only.
If you’re unsure which terminals are which, check your furnace’s manual or look for labels on the board. When in doubt, snap a photo before disconnecting anything—it’ll help you remember how things were wired.
Step 6: Test the System
Now for the moment of truth. Turn the power back on at the breaker panel. Set your thermostat to “Fan On” (not heat or cool) so the blower runs continuously.
Listen for the iWave-R—it should emit a faint humming sound when active. You might also notice a slight ozone smell at first (it’s normal and dissipates quickly). If nothing happens, double-check your wiring and make sure the fan is actually running.
Bonus: Some models have an LED indicator light. If yours does, it should glow blue when working properly.
Step 7: Reassemble and Clean Up
Once you’ve confirmed everything is working, replace the access panel on your furnace or air handler. Tuck any loose wires neatly out of the way using zip ties or wire clips.
Wipe down the iWave-R housing with a dry cloth to remove dust or fingerprints. Then vacuum up any metal shavings or debris from your workspace.
And that’s it! You’ve just installed a whole-home air purifier that will actively clean your air 24/7—no filters to replace, no noise, just cleaner breathing.
Pro Tips & Common Mistakes to Avoid
Even with a solid plan, things can go sideways. Here’s what I learned from my own install (and a few panicked calls to customer support):
Pro Tip: Install the iWave-R downstream of your air filter. This keeps the ionization pins cleaner and extends the unit’s lifespan. I didn’t do this at first, and had to clean the pins after just two months.
Warning: Don’t install in humid areas like near a condensate drain or in unconditioned attics without insulation. Moisture can damage the electronics over time.
Common Mistake: Forgetting to turn the fan to “On” during testing. The iWave-R only works when air is moving—so if your thermostat is set to “Auto,” it won’t activate unless heating or cooling is running.
Pro Insight: Clean the ionization pins every 6–12 months. Just wipe them gently with a soft cloth or toothbrush. No tools needed—it takes 30 seconds.
Also, avoid installing near electronic devices like routers or smart thermostats. While the iWave-R is shielded, strong electromagnetic fields can occasionally cause interference (rare, but possible).
FAQs About How to Install iWave-R Air Purifier in 2026 – Easy Guide
Do I really need an electrician to install the iWave-R?
Nope! The iWave-R is designed for DIY installation. As long as you’re comfortable working with low-voltage wiring and your HVAC system, you can handle it yourself. Just remember to turn off the power first.
Visual guide about how to install iwave-r air purifier
Image source: colonyheating.com
Visual guide about how to install iwave-r air purifier
Image source: newsgater.com
Visual guide about how to install iwave-r air purifier
Image source: i.ytimg.com
Will the iWave-R work with my heat pump or mini-split system?
The iWave-R is compatible with most forced-air systems, including heat pumps. However, it won’t work with ductless mini-splits since they don’t have central ductwork. Check the manufacturer’s compatibility list if you’re unsure.
Does it produce ozone? Is it safe?
The iWave-R produces minimal ozone—well below FDA and UL safety limits. It’s certified by Intertek to meet UL 867 standards for indoor air cleaning devices. Most users don’t notice any smell after the first few days.
How long does the installation take?
For a first-timer, plan on 45 minutes to an hour. If you’re experienced with HVAC systems, you might be done in 30. Rushing leads to mistakes—take your time.
What if my ductwork is made of flex duct or fiberglass?
The iWave-R is designed for metal ducts. If you have flex duct, you’ll need to install a short metal sleeve or transition piece where the unit mounts. Fiberglass ducts aren’t recommended—consult iWave support before proceeding.
Can I install it myself if I rent my home?
Technically yes, but check with your landlord first. Since it involves modifying ductwork and wiring, they may prefer a licensed technician do the install. Some landlords even cover the cost as an air quality upgrade!
Will it reduce my energy bills?
Not directly—but by keeping your coils and ducts cleaner, your HVAC system may run more efficiently over time. Think of it as preventive maintenance with air-cleaning benefits.
Final Thoughts
Installing the iWave-R was one of the best home upgrades I’ve made in years. Not only did my allergy symptoms improve within a week, but my house just *feels* fresher—even when the windows are closed. And the peace of mind knowing my family is breathing cleaner air? Priceless.
If you’ve been on the fence about tackling the how to install iWave-R air purifier in 2026 – easy guide project, I say go for it. With the right tools, a little patience, and this step-by-step walkthrough, you’ll have a professional-grade air purification system running in under an hour.
Just remember: safety first, double-check your wiring, and don’t skip the testing phase. Your lungs (and your HVAC system) will thank you.
Ready to breathe easier? Grab your drill, turn off that breaker, and let’s get purifying.
“`