Featured image for how to install the filters winex c35 air purifier
Image source: winixeurope.eu
Installing the filters in your Winex C35 Air Purifier 2026 is a quick, tool-free process that ensures optimal air quality in minutes. Simply open the front panel, remove the old filters (if present), and insert the new pre-filter, HEPA, and activated carbon filters in their designated slots—ensuring the airflow arrows face inward. Secure the panel, power on the unit, and reset the filter indicator light to complete setup and breathe cleaner air immediately.
“`html
How to Install the Filters Winex C35 Air Purifier 2026
Key Takeaways
- Turn off and unplug the purifier before replacing filters for safety.
- Remove the front panel by gently pulling it away from the unit.
- Replace all filters in the correct order: pre-filter, HEPA, and carbon.
- Align filters properly to ensure a secure fit and optimal performance.
- Reattach the front panel until it clicks securely into place.
- Reset the filter indicator using the control panel after installation.
- Run a test cycle to confirm proper operation and airflow.
Why This Matters / Understanding the Problem
Let’s be honest—nobody buys an air purifier because they love doing maintenance. But here’s the thing: if you don’t change the filters regularly, your Winex C35 Air Purifier 2026 becomes about as useful as a screen door on a submarine. I learned this the hard way last winter when my allergies kicked into overdrive, even though I thought my purifier was working just fine. Turns out, the filters were clogged with dust, pet dander, and who-knows-what-else. The air quality in my living room dropped, and so did my energy levels.
That’s when I realized how important it is to know how to install the filters Winex C35 Air Purifier 2026—not just once, but every few months. The good news? It’s way easier than you’d think. With the right steps (and a little patience), you can have fresh, clean air flowing through your home in under 10 minutes. Whether you’re a first-time user or just need a refresher, this guide will walk you through the entire process—no engineering degree required.
And don’t worry—you’re not alone. Many people skip filter changes because they’re unsure about the process or worried they’ll break something. But the Winex C35 is designed with user-friendliness in mind. Once you’ve done it once, you’ll wonder why you ever stressed about it. Plus, clean filters mean better performance, longer appliance life, and fewer sneezes. Who doesn’t want that?
What You Need
Before we dive into the steps, let’s make sure you’ve got everything ready. Trust me, there’s nothing worse than getting halfway through and realizing you’re missing a key piece. Here’s your quick checklist:
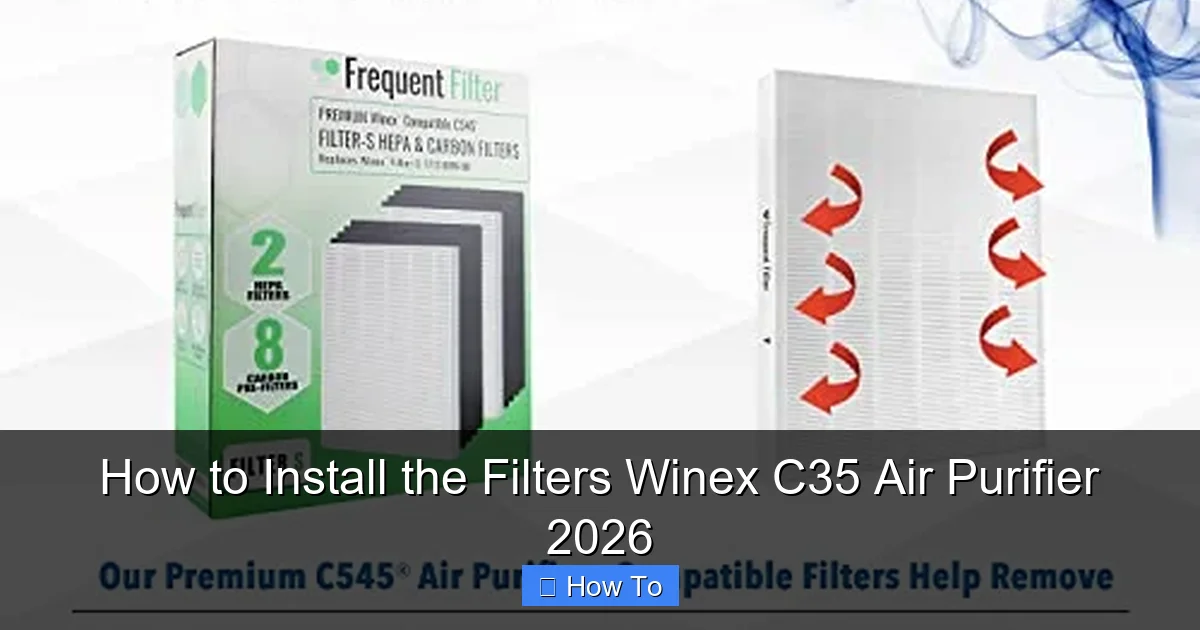
Visual guide about how to install the filters winex c35 air purifier
Image source: cdn.shopify.com
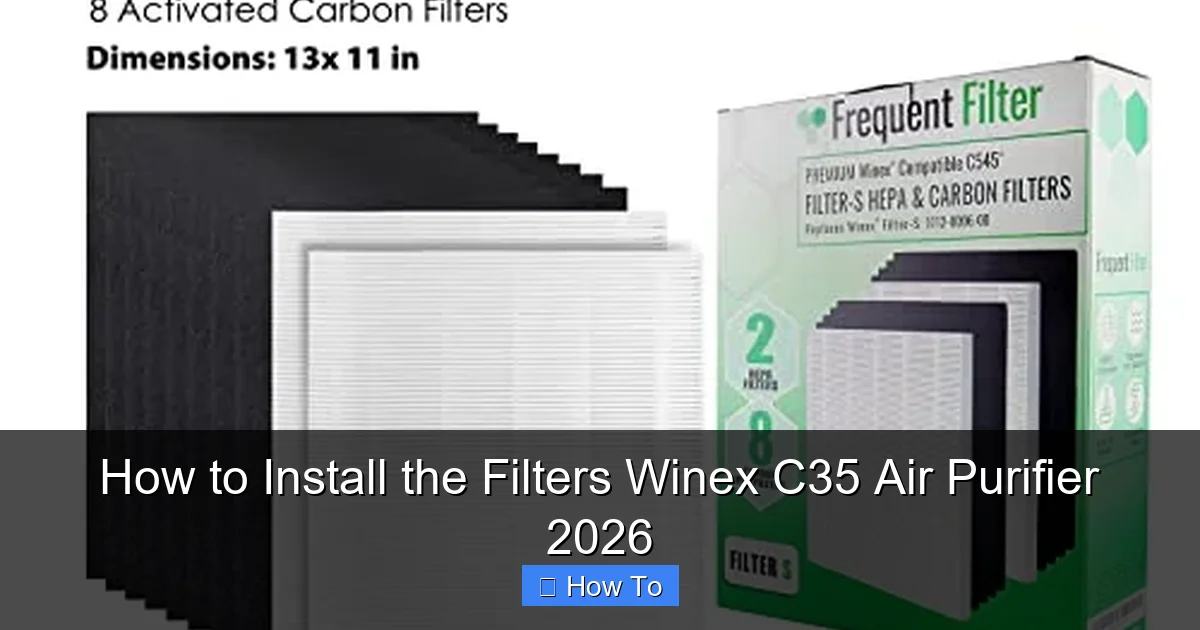
- Replacement filters (HEPA + activated carbon combo recommended for the Winex C35)
- A clean, flat workspace (a kitchen counter or table works great)
- A soft cloth or microfiber towel
- Your Winex C35 Air Purifier 2026 (obviously!)
- Optional: a small flashlight (to check for dust buildup inside)
Most replacement filters come in a sealed package, so you won’t need scissors or tape—just your hands. If you bought the official Winex filter set, it should include both the HEPA filter (for trapping particles like pollen and dust) and the carbon filter (for odors and VOCs). Using third-party filters? Just double-check they’re compatible with the C35 model to avoid fit issues.
Pro tip: I always keep an extra set of filters in my closet. That way, when the indicator light flashes or it’s been three months (whichever comes first), I’m ready to go—no last-minute Amazon runs needed.
Step-by-Step Guide to How to Install the Filters Winex C35 Air Purifier 2026
Step 1: Turn Off and Unplug the Unit
Safety first, always. Before you touch anything, make sure your Winex C35 is completely powered off and unplugged from the wall. I know this seems obvious, but I’ve seen people skip this step and end up fumbling with wires or accidentally turning the unit on mid-install. Not fun.
Visual guide about how to install the filters winex c35 air purifier
Image source: frequentfilter.com
Once it’s unplugged, give it a minute to cool down if it’s been running. The internal components can get warm, and you don’t want to burn your fingers while handling the filters. While you’re at it, take a quick look at the exterior. If there’s visible dust on the vents or casing, wipe it down with a dry cloth. A clean machine makes for a smoother filter swap.
Step 2: Locate and Open the Filter Access Panel
Now, find the filter compartment. On the Winex C35, it’s usually on the back or side of the unit—look for a rectangular panel with small ventilation slots. There should be a latch or release button near the top or bottom edge. Press or slide it gently, and the panel should pop open with a soft click.
If it doesn’t budge, don’t force it. Check the user manual (or look up a quick video) to confirm the exact mechanism. Some models have a magnetic latch, while others use a push-button system. Once it’s open, you’ll see the old filters sitting snugly inside. Take a moment to inspect them—if they’re dark gray or packed with debris, it’s definitely time for a change.
Step 3: Remove the Old Filters
Carefully pull out the used filters. The HEPA filter is usually the larger, pleated one, while the carbon filter is thinner and often black or dark gray. They should slide out smoothly—no yanking required. If they’re stuck, gently wiggle them side to side while pulling.
As you remove them, notice how they’re positioned. Most Winex C35 models have a specific order: carbon filter first (closest to the intake), then HEPA. Take a mental note or snap a quick photo with your phone. This will help when you install the new ones. Also, check for any dust buildup around the filter housing. If it’s dirty, use a dry cloth or soft brush to clean it out before inserting the new filters.
Step 4: Prepare the New Filters
Unpack your new filters from their plastic wrapping. Be careful not to tear or puncture them—especially the HEPA filter, which is delicate. I once accidentally poked a hole in mine with my keys and had to return it. Lesson learned: handle with care.
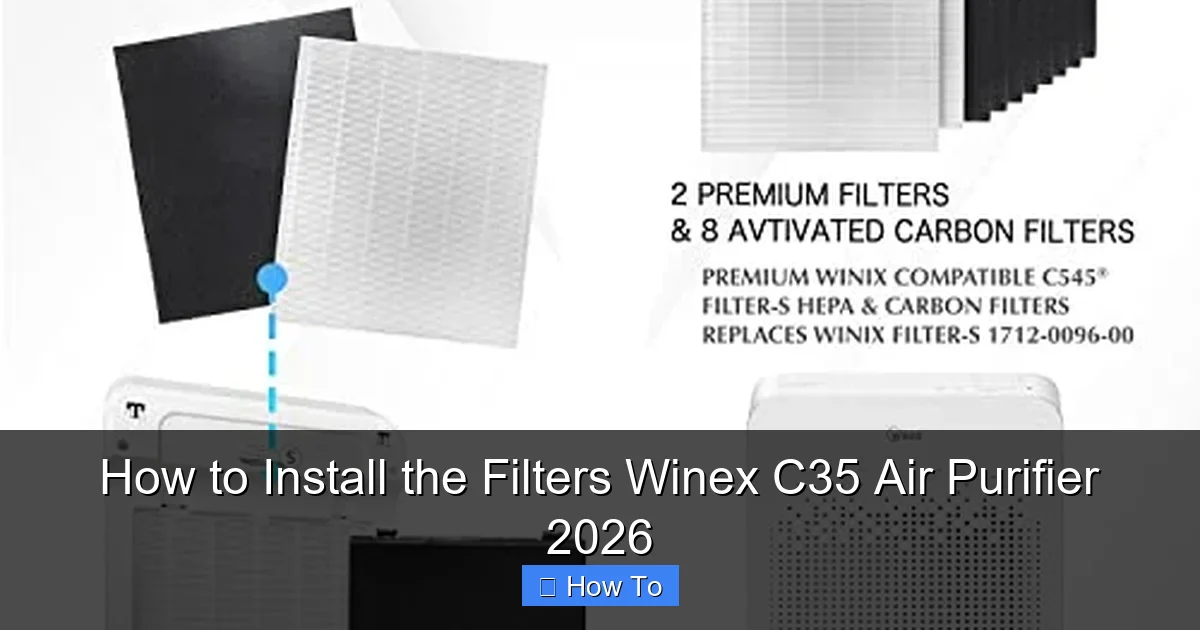
Check the arrows or labels on the filters. Most have an airflow direction indicator (like “Air In” or an arrow pointing toward the unit). Make sure these are facing the correct way—usually toward the interior of the purifier. If you’re unsure, refer to the packaging or the old filter’s orientation. Installing them backward can reduce efficiency and strain the motor.
Step 5: Insert the New Filters
Now, gently slide the new filters into place. Start with the carbon filter (if applicable), then add the HEPA filter on top or behind it, depending on your model. They should fit snugly but not tightly. If you’re forcing it, double-check the order and direction.
Once both filters are in, give them a light press to ensure they’re seated properly. You don’t want them shifting around when the unit runs. Then, close the access panel firmly until you hear it click shut. Don’t slam it—just a firm press should do the trick.
Step 6: Reset the Filter Indicator (If Applicable)
Many Winex C35 models have a filter replacement indicator light that turns on after a set number of hours. After installing new filters, you’ll want to reset this so it gives you accurate reminders in the future.
To reset it, plug the unit back in and turn it on. Then, press and hold the “Filter Reset” button (usually labeled or found in the settings menu) for 3–5 seconds until the light turns off or changes color. If your model doesn’t have this feature, no worries—just mark your calendar for the next change in 2–3 months.
Step 7: Test the Unit
Finally, run the purifier on a low or medium setting for about 10–15 minutes. Listen for unusual noises—like grinding or rattling—which could mean the filters aren’t seated correctly. Also, feel the airflow from the vents. It should be strong and consistent.
If everything sounds and feels right, congratulations! You’ve successfully completed how to install the filters Winex C35 Air Purifier 2026. Your home is now on its way to cleaner, fresher air.
Pro Tips & Common Mistakes to Avoid
Even simple tasks can go sideways if you’re not careful. Over the years, I’ve made a few mistakes—and learned some tricks—that I wish I’d known from the start.
Visual guide about how to install the filters winex c35 air purifier
Image source: frequentfilter.com
Pro Tip: Always install filters in a dust-free environment. I once did a filter change in my garage during a windy day and ended up with more dust in the unit than before. Do it indoors, away from open windows or high-traffic areas.
Warning: Don’t reuse old filters, even if they “look okay.” Over time, filters lose their effectiveness, even if they don’t appear dirty. Reusing them can lead to poor air quality and strain on the motor.
Another common mistake? Forgetting to reset the filter timer. I did this once and spent weeks wondering why the indicator light stayed on. It turns out the unit was still counting down from the old filter’s lifespan. Resetting it fixed the issue instantly.
Also, avoid using compressed air to “clean” HEPA filters. Unlike some older models, the Winex C35’s HEPA filter isn’t washable or reusable. Blowing air through it can damage the delicate fibers and reduce its ability to trap particles.
Lastly, don’t rush. I used to try to do the whole process in under two minutes, but that led to misaligned filters and a noisy motor. Take your time—five extra minutes now can save you headaches (and repair costs) later.
FAQs About How to Install the Filters Winex C35 Air Purifier 2026
Q: How often do I need to replace the filters?
A: It depends on usage, but most experts recommend every 2–3 months. If you have pets, live in a dusty area, or suffer from allergies, you might need to change them more often. The filter indicator light is a great guide—when it flashes, it’s time.
Q: Can I use third-party filters instead of Winex brand?
A: Technically, yes—but I’d be cautious. Third-party filters might save you a few bucks, but they often don’t fit as well or perform as efficiently. I tried a cheaper brand once and noticed a drop in air quality within a week. Stick with certified replacements for the best results.
Q: What if the new filter doesn’t fit?
A: Double-check the model number on your purifier and the filter packaging. The Winex C35 has specific dimensions, and not all “universal” filters are truly compatible. If it’s still not fitting, contact Winex customer support—they’re usually very helpful.
Q: Do I need to clean the inside of the unit when changing filters?
A: Not necessarily, but it’s a good idea every few changes. Use a dry cloth or soft brush to wipe away dust from the fan blades and interior walls. Avoid water or cleaning sprays—they can damage the electronics.
Q: Why is my purifier making a loud noise after installing new filters?
A: This usually means the filters aren’t seated properly. Turn off the unit, reopen the panel, and make sure both filters are aligned and pushed in fully. Also, check that the panel is closed securely—loose parts can cause vibrations.
Q: Can I install the filters while the unit is on?
A: Absolutely not. Always unplug the purifier before handling filters. Running the unit with the panel open or filters removed can damage the motor and pose a safety risk.
Q: How do I know which filter goes where?
A: The carbon filter typically goes in first (closest to the air intake), followed by the HEPA filter. Look for labels or arrows on the filters, and refer to the user manual if you’re unsure. When in doubt, match the order of the old filters.
Final Thoughts
Learning how to install the filters Winex C35 Air Purifier 2026 might seem like a small task, but it makes a big difference in your home’s air quality—and your peace of mind. It’s one of those things that’s easy to put off, but once you’ve done it a couple of times, it becomes second nature.
Remember: clean filters mean cleaner air, better performance, and a longer life for your purifier. Plus, you’ll breathe easier—literally. So the next time that indicator light flashes or three months roll around, don’t hit snooze. Grab your new filters, follow these steps, and enjoy the fresh, crisp air that comes with a well-maintained machine.
And hey, if you found this guide helpful, share it with a friend who’s still struggling with their air purifier. After all, clean air is better when everyone can enjoy it.
“`