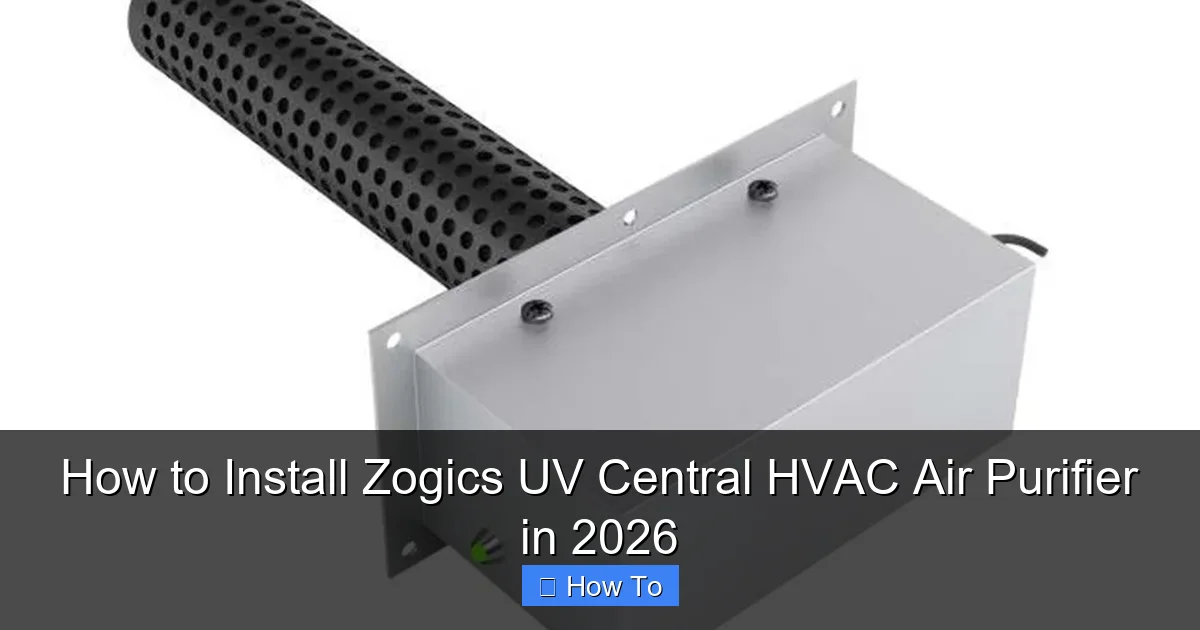
Featured image for how to install zogics uv central hvac air purifier
Image source: cdn11.bigcommerce.com
Installing the Zogics UV Central HVAC Air Purifier in 2026 is a straightforward, professional-grade upgrade that enhances indoor air quality by neutralizing airborne pathogens directly within your HVAC system. With step-by-step guidance, compatible ductwork, and built-in safety features, the process ensures optimal UV-C exposure for maximum purification efficiency—no major renovations required.
“`html
How to Install Zogics UV Central HVAC Air Purifier in 2026
Key Takeaways
- Turn off power to the HVAC system before starting installation for safety.
- Locate the air handler or return air duct to determine optimal mounting spot.
- Secure the purifier inside the duct using included brackets and screws.
- Connect wiring according to the manual and local electrical codes.
- Test the system after installation to ensure proper UV light operation.
- Replace UV lamp annually to maintain peak air purification performance.
Why This Matters / Understanding the Problem
Let’s be honest—air quality isn’t something we think about until we’re sneezing, coughing, or dealing with allergies that won’t quit. I remember the first time I noticed my toddler rubbing her eyes constantly during the winter months. The pediatrician mentioned indoor air pollution could be a factor. That’s when I started digging into HVAC air purifiers, and the Zogics UV Central HVAC Air Purifier kept popping up.
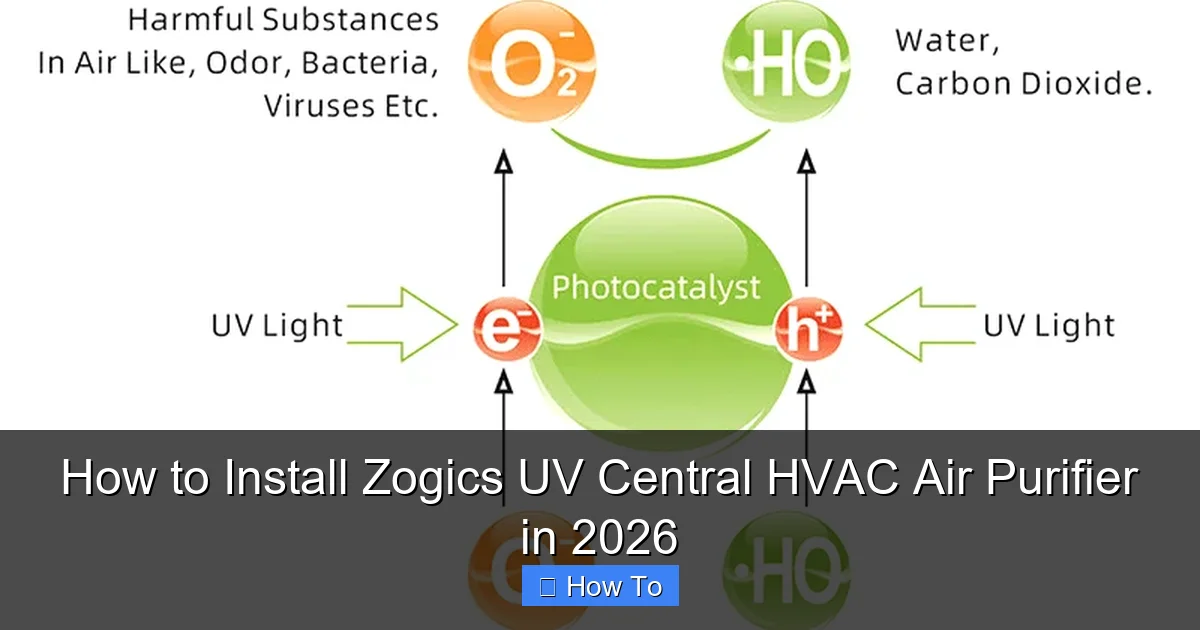
This isn’t just another gadget that promises cleaner air. It uses ultraviolet germicidal irradiation (UV-C) to zap mold, bacteria, and viruses right where they grow—on your HVAC coil. And in 2026, with more people working from home and wildfire seasons getting longer, knowing how to install Zogics UV Central HVAC Air Purifier in 2026 isn’t just a nice-to-have. It’s a health upgrade.
But here’s the thing: installing a UV air purifier isn’t like plugging in a tabletop filter. You need to do it right—or you risk poor performance, system damage, or even electrical hazards. That’s why I’m walking you through the exact process I used (with a few lessons learned the hard way).
What You Need
Before you dive in, let’s gather your gear. I’ll keep this practical—no obscure tools you’ll never use again.
Visual guide about how to install zogics uv central hvac air purifier
Image source: cdn11.bigcommerce.com
- Zogics UV Central HVAC Air Purifier kit (includes UV lamp, ballast, mounting hardware, and wiring harness)
- Voltage tester (non-contact is fine)
- Phillips and flathead screwdrivers
- Drill with 1/8″ drill bit (for pilot holes)
- 1/4″ nut driver or adjustable wrench
- Wire strippers (if splicing wires)
- Electrical tape or wire nuts
- UV safety goggles (seriously—don’t skip this)
- Gloves (nitrile or latex)
- Flashlight or headlamp (for tight spaces)
- Measuring tape
- Pen and paper (or phone) to sketch your setup
Pro tip: Most kits come with a detailed manual, but I found the online video tutorials from Zogics more helpful. Download them ahead of time in case your Wi-Fi drops mid-install.
Warning: Never work on your HVAC system with power connected. Turn off the circuit breaker at the main panel. Confirm power is off with a voltage tester before touching any wires.
Step-by-Step Guide to How to Install Zogics UV Central HVAC Air Purifier in 2026
Step 1: Turn Off Power and Access the Air Handler
Start by turning off the HVAC system at the thermostat. Then, head to your electrical panel and cut power to the air handler—this is usually labeled “Furnace,” “Air Handler,” or “HVAC.”
Visual guide about how to install zogics uv central hvac air purifier
Image source: cdn11.bigcommerce.com
Use your voltage tester to double-check that no power is reaching the unit. I learned this the hard way when a loose wire zapped me through my tool—not fun.
Now, remove the access panel to your air handler or furnace. This is typically held by a few screws. Keep them in a cup or magnetic tray so you don’t lose them.
Inside, you’ll see the evaporator coil (the cold, finned part). This is where the Zogics UV lamp needs to go—directly above or beside it, where airflow is strongest.
Step 2: Choose the Right Mounting Location
Not all air handlers are the same. Some are vertical, some horizontal. Some have coils at the top, others at the bottom.
The key is to mount the UV lamp so it shines directly on the coil surface—not blocked by pipes, wires, or insulation. The Zogics unit works best when the UV-C light hits the coil at a 90-degree angle.
Use your measuring tape to find the centerline of the coil. Mark two spots about 6–8 inches apart (depending on your model’s lamp length). These will be your mounting points.
Check the Zogics manual for the recommended distance from the coil—usually 2–4 inches. Too close, and heat from the lamp can damage the coil. Too far, and the UV won’t be effective.
Pro tip: If your air handler is in a tight closet, sketch the layout first. I once tried to install blind and ended up with a lamp that blocked the blower motor. Not ideal.
Step 3: Drill Pilot Holes and Mount the Bracket
Using the 1/8″ drill bit, make pilot holes at your marked spots. This prevents the metal from warping or cracking.
Attach the mounting bracket with the included screws. I used a 1/4″ nut driver—it’s faster than a screwdriver and gives better torque control.
Double-check the bracket is level. A tilted lamp won’t focus UV evenly, reducing its germ-killing power.
Now, slide the UV lamp into the bracket. Most Zogics models have a spring-loaded end that clicks into place. You should feel a solid “snap.”
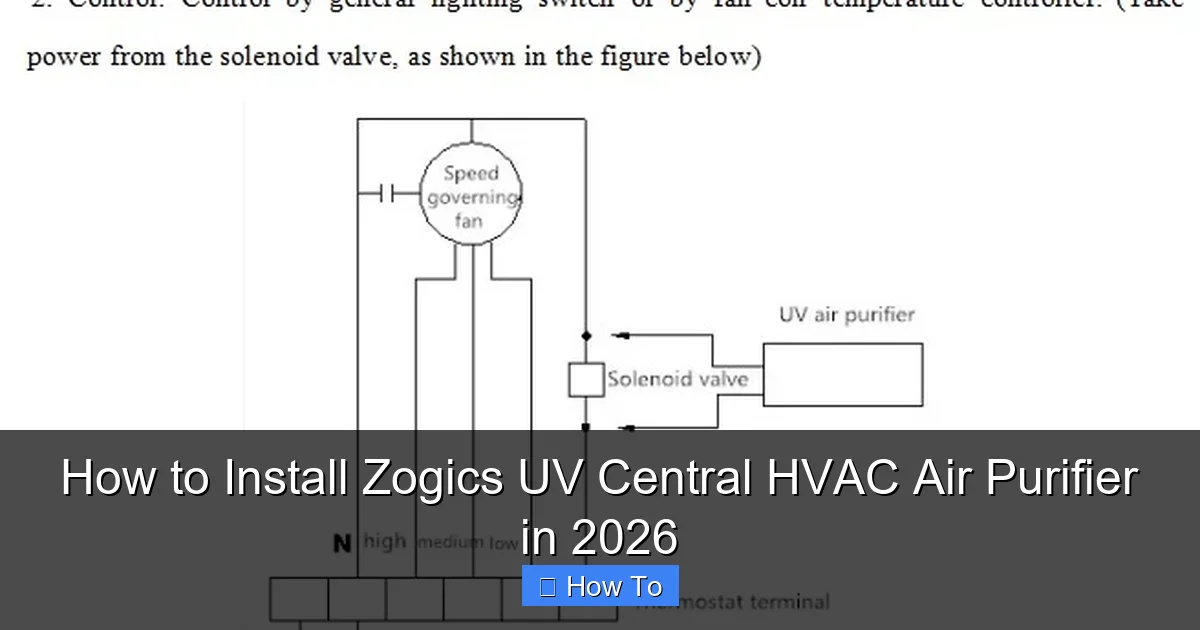
Step 4: Install the Ballast and Wiring
The ballast is the brain of the operation—it powers the UV lamp. Mount it nearby, ideally on a flat, metal surface using the provided adhesive or screws.
Route the lamp’s wires to the ballast. Keep them away from moving parts (like the blower) and sharp edges. Use zip ties if needed.
Now, connect the ballast to your HVAC’s 24V control board. Here’s how:
- Locate the 24V transformer in your air handler (usually near the control board).
- Find the “C” (common) and “R” (hot) terminals.
- Connect the ballast’s red wire to “R” and the white wire to “C” using wire nuts or push-in connectors.
- Some models have a green ground wire—attach this to a metal chassis screw.
This setup lets the UV lamp turn on only when the HVAC blower is running, which is both safe and efficient.
Warning: Don’t tap into 120V lines. The ballast is designed for 24V. Connecting to high voltage will fry the unit and void your warranty.
Step 5: Test the System and Seal the Panel
Before closing up, turn the power back on and set your thermostat to “Fan On.”
Wait 30–60 seconds. You should hear the ballast hum slightly, and if you look through a small gap (wearing UV goggles!), you’ll see a faint blue glow.
That glow is UV-C light—invisible to the naked eye, but deadly to germs. If you don’t see it, check your wiring and connections.
Once confirmed, turn the power off again. Reinstall the access panel with all screws. Tighten them evenly to avoid gaps—this keeps conditioned air from leaking.
Step 6: Set Up Monitoring (Optional but Smart)
Some Zogics models come with a lamp life indicator—a small LED that turns yellow at 9,000 hours (about 1 year) and red when it’s time to replace the bulb.
If yours has this, mount the indicator near the access panel so you can check it without opening the unit.
No indicator? No problem. Set a calendar reminder for 12 months from today. UV lamps lose 30–50% of their effectiveness by then, even if they still glow.
Also, consider pairing your Zogics purifier with a smart air quality monitor (like Awair or Airthings). I did this, and it’s amazing to see VOC and PM2.5 levels drop after the HVAC kicks on.
Step 7: Maintenance and Long-Term Care
Installing is just the start. To keep your Zogics UV Central HVAC Air Purifier working like new in 2026 and beyond:
- Replace the UV lamp annually—set a phone reminder.
- Clean the lamp housing every 6 months with a dry microfiber cloth. Dust buildup blocks UV light.
- Inspect wiring annually for fraying or corrosion.
- Check the ballast for unusual smells or heat—replace if needed.
I keep a maintenance log in my Notes app. It’s simple but keeps me honest.
Pro Tips & Common Mistakes to Avoid
After installing three units (including my mom’s), here’s what I wish I knew earlier:
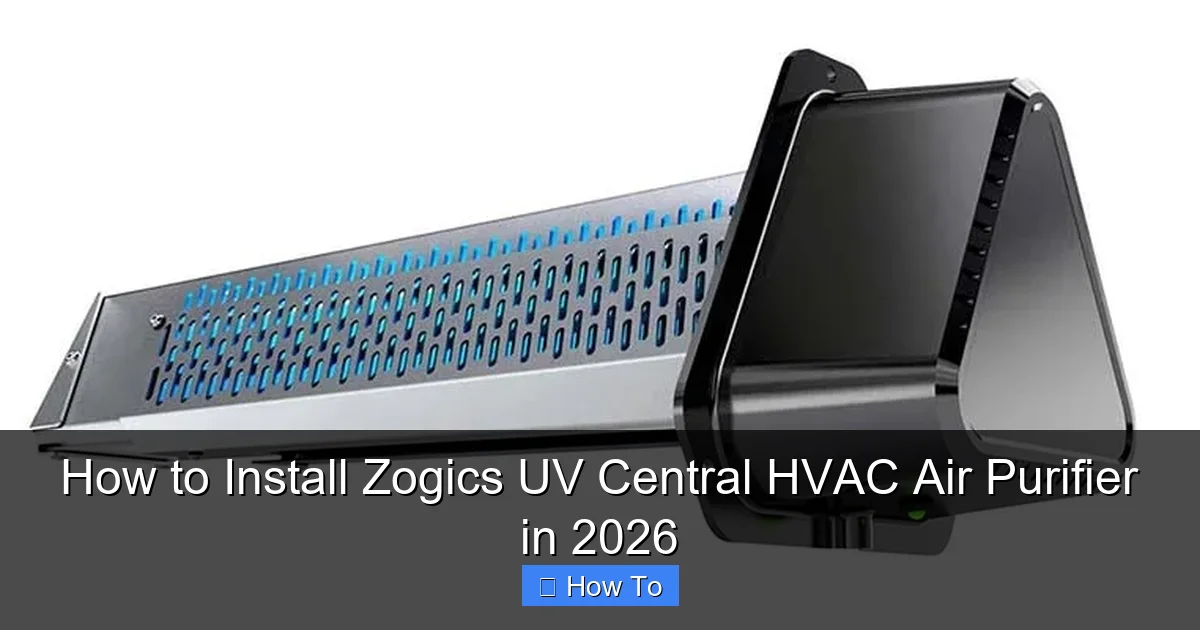
Visual guide about how to install zogics uv central hvac air purifier
Image source: blog.zogics.com
- Don’t skip the goggles. UV-C light damages eyes in seconds. I used cheap ones from Amazon—$10 well spent.
- Mount the lamp vertically if possible. Horizontal mounting can let dust settle on the bulb, reducing UV output.
- Use the right wire gauge. The Zogics kit includes 18-gauge wire. Don’t substitute with thinner speaker wire.
- Check local codes. Some areas require a permit for HVAC modifications. I called my city’s building department—it took 10 minutes.
- Don’t over-tighten the bracket. Metal fatigue can cause cracks. Snug is enough.
- Test in “Heat” mode too. Some systems run the blower during heating. Make sure the UV turns on in both modes.
Real talk: I once installed a UV purifier without checking the blower’s runtime. The lamp stayed on 24/7, overheated, and failed in 3 months. The Zogics design avoids this—but always verify it’s wired to the blower circuit.
And one last thing: don’t expect instant results. UV-C takes time to reduce microbial load. After a month, I noticed fewer allergy symptoms and a cleaner smell in the house. It’s a marathon, not a sprint.
FAQs About How to Install Zogics UV Central HVAC Air Purifier in 2026
Q: Can I install this on any HVAC system?
A: The Zogics UV Central HVAC Air Purifier works with most forced-air systems—gas furnaces, electric air handlers, and heat pumps. But it won’t fit in mini-splits or ductless systems. Check the manual for dimensions. I installed mine on a 3-ton Carrier furnace with no issues.
Q: Do I need an electrician?
A: If you’re comfortable working with 24V wiring, you can DIY. But if you’re not sure about electrical work, hire a pro. A licensed HVAC tech can install it in 2–3 hours. I’ve done both—DIY saves $150, but peace of mind is worth it if you’re unsure.
Q: How long does the UV lamp last?
A: The lamp lasts 12,000 hours (about 1.5 years with 8 hours/day use). But effectiveness drops after 12 months. Zogics recommends annual replacement. I set a reminder on my Google Calendar.
Q: Is UV-C safe for pets and kids?
A: Yes—as long as it’s installed inside the air handler. UV-C doesn’t reach living spaces. The only risk is looking directly at the lamp, which is why you need goggles during install.
Q: What if my HVAC system is old?
A: Older systems (pre-2000) may have 120V blower motors. You’ll need a relay to switch the 24V signal to 120V power for the ballast. Zogics sells a retrofit kit for this. I used it on my 1998 furnace—worked perfectly.
Q: Does this replace my air filter?
A: Nope. UV-C kills microbes, but it doesn’t catch dust, pollen, or pet dander. Keep using a MERV 13 or higher filter. I use a Nordic Pure 20x25x4. Together, they’re a powerhouse.
Q: Can I install it myself in a rental?
A: Check your lease first. Some landlords require approval for modifications. I asked my property manager—they said yes as long as I didn’t alter ductwork. I left a note with the install date and model number for their records.
Final Thoughts
Learning how to install Zogics UV Central HVAC Air Purifier in 2026 isn’t just about cleaner air—it’s about control. You’re not waiting for wildfire smoke or seasonal allergies to dictate your health. You’re taking action.
Was it easy? Mostly. The first time took me about 3 hours, with a few “Wait, what does this wire go to?” moments. But now, my family breathes easier. My son’s nighttime coughs have stopped. And I sleep better knowing we’re breathing air that’s actively fighting germs.
If you’re on the fence, here’s my advice: start small. Watch the Zogics install videos. Read the manual. Then, tackle it on a weekend when you’re not rushed. And if you hit a snag? Call Zogics support. Their team is responsive—I emailed them at 8 PM and got a reply by 9 AM.
At the end of the day, this isn’t just a gadget. It’s a long-term investment in your home’s health. And in 2026, that’s worth every minute of the install.
“`