Featured image for how to maintain an air purifier
Image source: cdn.gameplanet.com
Regularly replacing or cleaning your air purifier’s filters every 3–6 months is the most critical step to ensure peak performance and long-term efficiency in 2026. Neglecting filter maintenance reduces airflow, strains the motor, and allows pollutants to recirculate. Pair this with monthly exterior wipe-downs and annual internal inspections to keep your unit running like new and your indoor air truly clean.
“`html
How to Maintain an Air Purifier in 2026 for Optimal Performance
Let’s be honest—most of us buy an air purifier hoping it’ll quietly do its job while we go about our lives. And for a while, it does. The air feels fresher, allergies ease up, and that dusty smell fades. But then… something changes. Maybe the fan sounds louder. Or the “filter change” light won’t stop blinking. Or worse—your allergies come back with a vengeance.
Sound familiar? You’re not alone. The truth is, even the best air purifiers need regular care to keep working at their best. That’s exactly why knowing how to maintain an air purifier in 2026 for optimal performance isn’t just helpful—it’s essential. Whether you’ve had yours for six months or six years, a little TLC goes a long way in keeping your indoor air clean, your unit efficient, and your peace of mind intact.
In this guide, I’ll walk you through everything you need to know—from the tools you’ll need to step-by-step cleaning routines, common mistakes to avoid, and answers to real questions I’ve gotten from friends, family, and readers over the years. Think of this as your friendly, no-fluff roadmap to breathing easier in 2026.
Key Takeaways
- Clean or replace filters every 3–6 months to ensure peak efficiency.
- Vacuum the exterior and vents monthly to prevent dust buildup.
- Use the purifier consistently in occupied rooms for best air quality.
- Check indicator lights and follow manufacturer alerts for timely maintenance.
- Keep the unit on a stable, open surface for optimal airflow.
- Avoid placing near humidity sources like showers to protect internal components.
Why This Matters / Understanding the Problem
Air purifiers are like the unsung heroes of home health. They trap dust, pollen, pet dander, smoke, and even some viruses—all invisible enemies that can trigger asthma, allergies, or just make you feel “off.” But here’s the catch: if you don’t maintain them, they become part of the problem.
Imagine running your vacuum cleaner with a full bag. It struggles, loses suction, and eventually stops working. The same thing happens with air purifiers. Over time, filters get clogged, fans slow down, and sensors get dusty. The result? Your purifier works harder, uses more energy, and cleans less effectively—even if it’s still “on.”
Worse, a neglected unit can start circulating dirty air. Mold can grow in damp filters. Dust builds up inside the machine. And that “fresh” smell? It might actually be off-gassing from overheated components or trapped pollutants.
Maintaining your air purifier isn’t about being obsessive—it’s about being smart. A few minutes a week can extend your unit’s life, save you money on replacements, and ensure you’re actually getting the clean air you paid for. In 2026, with indoor air quality more important than ever, how to maintain an air purifier in 2026 for optimal performance is a skill worth mastering.
What You Need
Good news: you don’t need a toolkit or a degree in engineering. Most air purifier maintenance uses items you probably already have at home. Here’s your quick checklist:
Visual guide about how to maintain an air purifier
Image source: cdn.mos.cms.futurecdn.net
- Soft microfiber cloths – Gentle on surfaces and great for dusting.
- Vacuum with a brush attachment – Ideal for gently cleaning filters and vents.
- Mild dish soap and warm water – For washing removable pre-filters.
- Compressed air (optional) – Helpful for blowing dust out of hard-to-reach areas.
- Replacement filters (HEPA, carbon, etc.) – Check your model’s recommendations.
- Timer or calendar reminder – Because life gets busy, and it’s easy to forget.
Pro tip: Keep your user manual handy (or saved as a PDF). Every model is a little different, and the manufacturer’s guidelines are your best friend when it comes to filter types, cleaning schedules, and warranty info.
Step-by-Step Guide to How to Maintain an Air Purifier in 2026 for Optimal Performance
Now, let’s get into the nitty-gritty. I’ve broken this down into simple, doable steps based on what I’ve learned from maintaining my own units over the years—and from helping friends troubleshoot theirs. Follow this routine, and your air purifier will thank you.
Visual guide about how to maintain an air purifier
Image source: notebookcheck.net
Step 1: Turn Off and Unplug the Unit
Before you do anything, safety first. Always turn off your air purifier and unplug it from the wall. This isn’t just about avoiding shocks—it’s about protecting the internal electronics from accidental damage while you clean.
I learned this the hard way when I once tried to wipe down a running unit and accidentally bumped the fan. It screeched, sparked, and I spent the next hour praying it would still work. Spoiler: it did, but barely. Don’t be like me. Unplug it.
While you’re at it, give the exterior a quick wipe with a dry microfiber cloth. Dust loves to settle on the outer casing, and over time, it can get sucked into the machine. A clean outside helps keep the inside cleaner longer.
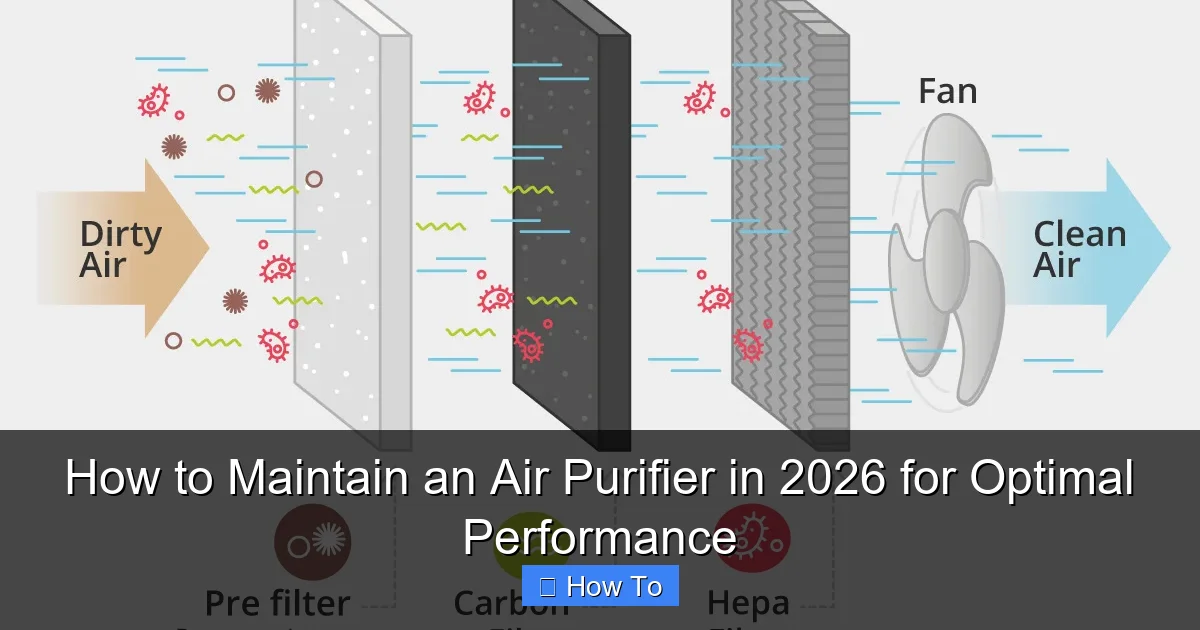
Step 2: Remove and Inspect the Filters
Most air purifiers have at least two filters: a pre-filter (usually washable) and a HEPA filter (often not washable). Some also include a carbon filter for odors and gases.
Start by opening the front or side panel—this varies by model, so check your manual. Gently pull out each filter and inspect them.
Ask yourself:
- Is the pre-filter visibly dirty or clogged with hair and dust?
- Does the HEPA filter look gray or brown instead of white?
- Is there a musty smell coming from any filter?
If the HEPA filter is dark or smells off, it’s probably time to replace it. Most last 6–12 months, but that depends on usage, air quality, and how often you run the unit. Don’t wait for the “replace filter” light—sometimes those sensors lag or fail.
For the pre-filter: if it’s washable, rinse it under lukewarm water. Use a tiny drop of mild soap if needed, but avoid harsh cleaners. Let it air dry completely—never reinstall a damp filter. Moisture is a mold magnet.
And here’s a personal tip: I keep a spare pre-filter on hand. That way, I can swap it out while the other dries, so my purifier never has to sit idle.
Step 3: Clean the Pre-Filter (If Washable)
If your pre-filter is the reusable kind—great! These catch larger particles like pet hair and dust before they reach the HEPA filter, which helps extend its life.
Remove the pre-filter and shake it outside to loosen loose debris. Then, rinse it under cool or lukewarm water. Avoid hot water—it can warp some materials.
Gently rub the surface with your fingers if needed, but don’t scrub aggressively. You’re not trying to polish it—just remove buildup. If it’s really grimy, a drop of dish soap can help, but rinse thoroughly.
Once clean, place it on a clean towel and let it air dry for at least 4–6 hours. Never speed-dry with a hairdryer or put it in the sun—heat can damage the fibers.
While it’s drying, take the opportunity to vacuum the inside of the filter compartment. Dust loves to hide in corners, and over time, it can restrict airflow.
Step 4: Vacuum the Interior and Vents
Even with clean filters, dust accumulates inside the unit. Use your vacuum’s brush attachment to gently clean the intake and exhaust vents, as well as the area around the fan.
Be careful not to touch the fan blades directly—they’re often delicate. If you can’t reach inside with the vacuum, a can of compressed air works well. Just hold the can upright and give short bursts to avoid moisture buildup.
I like to do this every 1–2 months, especially during high-use seasons like winter (when windows are closed) or spring (hello, pollen!).
Pro tip: If you have pets, you might need to do this more often. Pet hair is sneaky—it wraps around fan motors and clogs vents faster than you’d think.
Step 5: Wipe Down the Exterior and Sensors
Your air purifier’s exterior collects dust, fingerprints, and even cooking grease if it’s near a kitchen. A quick wipe-down keeps it looking fresh and functioning well.
Use a microfiber cloth slightly dampened with water. Avoid spraying cleaner directly on the unit—moisture can seep into electronics. If you need a cleaner, use a mild all-purpose spray on the cloth, not the machine.
Pay special attention to the air quality sensor (usually a small window or grille on the front or side). Dust here can give false readings, making your purifier think the air is cleaner—or dirtier—than it really is. Gently wipe it with a dry cloth or use compressed air.
I once ignored my sensor for months. My purifier kept running on high even when the air was clear. Turns out, a layer of dust was tricking it into thinking pollution levels were high. A 30-second wipe fixed the problem.
Step 6: Replace Filters as Needed
This is the big one. No amount of cleaning can revive a worn-out HEPA filter. When it’s time to replace, don’t delay.
Check your user manual for the correct filter type and replacement schedule. Most manufacturers recommend every 6–12 months, but real-world use matters more.
Ask yourself:
- Do I run the purifier daily?
- Do I have pets, smokers, or allergy sufferers in the home?
- Is my area prone to wildfires, high pollen, or urban pollution?
If you answered “yes” to any of these, you might need to replace filters more often—even every 4–6 months.
When replacing, make sure the new filter is seated properly. A loose filter can let unfiltered air bypass the system, defeating the whole purpose. Listen for clicks or check alignment marks.
And please—buy genuine or high-quality compatible filters. Cheap knockoffs might fit, but they often don’t capture particles as effectively. Your lungs will thank you.
Step 7: Reset the Filter Indicator (If Applicable)
Many modern air purifiers have a filter replacement light or timer. After installing a new filter, you’ll need to reset it.
This usually involves holding a button for 3–5 seconds, but it varies by model. Check your manual—don’t assume it’s automatic.
I’ve seen people replace filters correctly but forget this step. The light stays on, they think the new filter is defective, and they end up buying another one unnecessarily. Don’t waste your money.
Some smart models (like those with app connectivity) will reset automatically when they detect a new filter. Still, it’s good to double-check.
Step 8: Run a Test Cycle
Once everything is clean and reassembled, plug the unit back in and turn it on. Let it run for 10–15 minutes on medium or high.
Listen for unusual noises—grinding, rattling, or a high-pitched whine. These could indicate a loose part, a damaged fan, or a filter that’s not seated right.
Also, feel the airflow. Is it strong and consistent? If it’s weak, double-check that all filters are properly installed and that vents aren’t blocked.
This simple test can catch problems early, before they become costly repairs.
Pro Tips & Common Mistakes to Avoid
Over the years, I’ve made my share of mistakes—and learned from them. Here are the biggest lessons I’ve picked up about how to maintain an air purifier in 2026 for optimal performance.
Visual guide about how to maintain an air purifier
Image source: housefresh.com
Pro Tip: Set a recurring calendar reminder. I use my phone to alert me every 30 days for a quick check and every 90 days for a deep clean. It’s saved me from forgetting more times than I can count.
Warning: Never wash a HEPA filter unless the manual explicitly says it’s washable. Most aren’t. Water ruins the delicate fibers, and you’ll end up with a useless filter and a wasted $50.
Common Mistake: Ignoring the pre-filter. It’s easy to focus only on the HEPA filter, but a clogged pre-filter forces the HEPA to work harder, shortening its life. Clean it monthly—it takes two minutes.
Pro Tip: Keep your purifier running 24/7 on low when possible. Constant airflow helps prevent dust buildup and keeps filters from getting “stale.” Modern units are energy-efficient, so the cost is minimal.
Warning: Don’t place your purifier in a corner or behind furniture. It needs space to draw in air. Aim for at least 6–12 inches of clearance on all sides.
Common Mistake: Using scented cleaners near the unit. Strong fragrances can confuse air quality sensors and leave residues that affect performance. Stick to mild, unscented products.
FAQs About How to Maintain an Air Purifier in 2026 for Optimal Performance
Q: How often should I clean my air purifier?
A: It depends! For most people, a quick exterior wipe and pre-filter check every 30 days works well. Deep cleaning (including interior vacuuming and sensor care) every 90 days is ideal. If you have pets, allergies, or live in a dusty area, consider doing it monthly.
Q: Can I vacuum the HEPA filter instead of replacing it?
A: Technically, yes—but it’s not recommended. Vacuuming can damage the fine fibers and reduce efficiency. Most manufacturers say it voids the warranty. Save the vacuum for the pre-filter and exterior, and replace the HEPA when needed.
Q: My “replace filter” light is on, but the filter looks fine. What now?
A: The light is based on time or usage, not visual inspection. Even if the filter looks clean, it may no longer capture ultrafine particles effectively. Replace it—it’s better to be safe than sorry.
Q: Can I use my air purifier in the bathroom or kitchen?
A: Yes, but with caution. High humidity (like from showers) can damage electronics and promote mold in filters. If you do use it there, run it briefly and ensure good ventilation. Avoid placing it directly over stoves or sinks.
Q: Do I really need to unplug it before cleaning?
A: Absolutely. Even if the unit is off, electricity can still flow. Unplugging prevents shocks, short circuits, and accidental damage to internal components. It’s a small step that saves big headaches.
Q: What if my air purifier starts making noise after cleaning?
A: First, double-check that all filters are properly seated and the cover is securely closed. If the noise persists, it could be a fan issue. Stop using it and contact the manufacturer—don’t risk damaging the motor.
Q: Are smart air purifiers easier to maintain?
A: In some ways, yes. Many send filter reminders, track air quality, and even order replacements automatically. But they still need physical cleaning. Don’t let the “smart” label make you lazy—manual care is still essential.
Final Thoughts
Maintaining your air purifier doesn’t have to be complicated or time-consuming. With a little routine and attention, you can keep it running like new for years. Remember, how to maintain an air purifier in 2026 for optimal performance isn’t about perfection—it’s about consistency.
Start small: clean the pre-filter monthly, wipe the exterior, and replace filters on schedule. Set reminders, listen to your unit, and don’t ignore warning signs. Your air purifier is an investment in your health—treat it with care, and it’ll take care of you.
And if you’ve been neglecting yours? No judgment. We’ve all been there. Just start today. Even one cleaning session makes a difference. Breathe easy, friend—your 2026 self will thank you.
“`