Featured image for how to make a box fan air purifier
Image source: ecoactions.homedepot.com
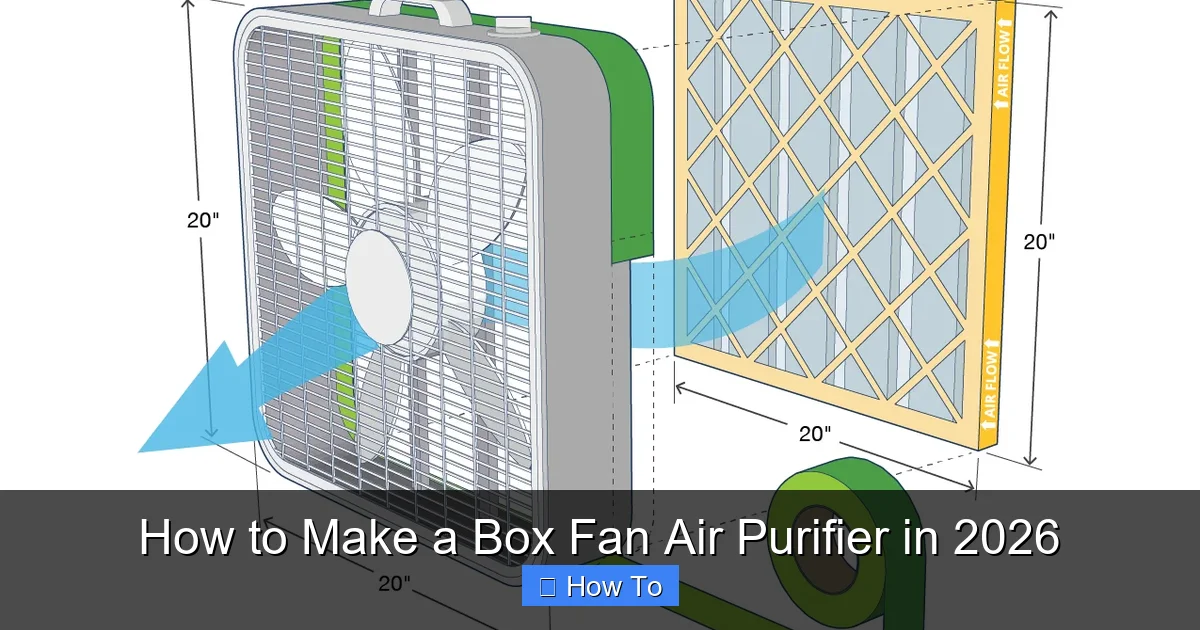
Transform your box fan into a powerful air purifier in 2026 by simply attaching a high-efficiency MERV-13 or HEPA filter to the intake side, creating a cost-effective DIY solution that drastically reduces airborne pollutants like dust, pollen, and smoke. This easy upgrade boosts indoor air quality in minutes—no tools required—making it a smart, eco-friendly alternative to expensive commercial purifiers.
“`html
How to Make a Box Fan Air Purifier in 2026
Key Takeaways
- Use a MERV 13 filter to effectively capture airborne particles and improve air quality.
- Secure the filter tightly to the back of the box fan with tape or bungee cords.
- Ensure proper airflow direction by aligning the filter with the fan’s intake side.
- Replace filters regularly every 2–3 months for optimal performance and clean air output.
- Run the fan continuously during high-pollution periods to maximize purification effectiveness.
- Choose a high-quality fan with strong airflow to boost the purifier’s efficiency.
Why This Matters / Understanding the Problem
Let’s be real—air quality isn’t getting better. Between wildfire smoke, seasonal allergies, and indoor pollutants like dust and pet dander, breathing clean air at home can feel like a luxury. I remember last summer when the smoke from nearby wildfires rolled in, and my usual HEPA purifier just couldn’t keep up. That’s when I stumbled on a simple, budget-friendly hack: the box fan air purifier.
This DIY solution isn’t just for emergencies. In 2026, more people are looking for affordable, sustainable ways to improve indoor air without breaking the bank or relying on expensive electronics. Whether you’re dealing with pollen season, cooking fumes, or just want fresher air while you sleep, learning how to make a box fan air purifier in 2026 is a smart, practical move.
And the best part? It works surprisingly well. Studies have shown that a properly built box fan filter can capture a significant amount of airborne particles—especially when you use the right filter. It’s not a replacement for a high-end air purifier in every situation, but for under $30 and 10 minutes of your time, it’s one of the most effective DIY air-cleaning projects out there.
What You Need
Before we dive into the steps, let’s gather everything. Don’t worry—this isn’t a complicated build. You probably already have most of these items lying around.

Visual guide about how to make a box fan air purifier
Image source: digitaltrends.com
- A standard 20-inch box fan – This is the heart of your purifier. Look for one with a flat, sturdy front grille. Older models work great, and you can often find them secondhand.
- A 20x20x1-inch furnace filter (MERV 13 or higher) – This is crucial. The filter does the actual cleaning. MERV 13 filters capture smaller particles like smoke, bacteria, and allergens. Avoid lower ratings—they won’t cut it for serious air cleaning.
- Duct tape or bungee cords – You’ll use these to secure the filter to the back of the fan. Duct tape is quick and strong, but bungee cords let you swap filters easily.
- Scissors or a utility knife – Only if your filter needs trimming to fit perfectly.
- Measuring tape (optional) – Helpful if you’re customizing the fit.
That’s it! No soldering, no coding, no fancy tools. Just a fan, a filter, and something to hold them together. I’ve made these for friends during allergy season, and they’re always shocked by how simple—and effective—it is.
Step-by-Step Guide to How to Make a Box Fan Air Purifier in 2026
Step 1: Choose the Right Filter
Not all filters are created equal. When I first tried this, I grabbed a cheap MERV 8 filter from the hardware store. Big mistake. It helped a little with dust, but it didn’t touch smoke or fine allergens.

Visual guide about how to make a box fan air purifier
Image source: i.pinimg.com
For how to make a box fan air purifier in 2026, you want a MERV 13 filter or higher. These are designed to trap particles as small as 0.3 to 1 micron—think pollen, mold spores, pet dander, and even some smoke particles. You can find them at most home improvement stores or online. Brands like Filtrete or Honeywell make reliable options.
Pro tip: Check the filter’s airflow rating. Some high-MERV filters are too dense and can restrict airflow, making your fan work harder. Look for one labeled “high airflow” or “low resistance” if you’re in a smoky area or have severe allergies.
Step 2: Prep Your Box Fan
Unplug your fan and give it a quick wipe-down. Dust buildup on the blades or grille can reduce efficiency and blow dirty air into your room. I like to use a damp cloth and a little vinegar solution—natural and effective.
Make sure the fan is stable and placed on a flat surface. You don’t want it tipping over, especially if you’re running it overnight. I once knocked mine over while reaching for a book, and the noise woke me up. Lesson learned: place it on the floor or a low, sturdy table.
Also, check the fan’s direction. Most box fans blow air out the front. For this purifier to work, the filter needs to be on the back (intake side), so air gets cleaned as it’s pulled through. If your fan blows air backward, just flip it around or adjust your setup.
Step 3: Attach the Filter to the Fan
This is the core of how to make a box fan air purifier in 2026. You’re essentially turning your fan into a makeshift air scrubber by forcing air through the filter.
Place the filter directly against the back of the fan, covering the entire intake area. If it’s a perfect fit, great! If not, trim the edges with scissors or a utility knife. I’ve done this a dozen times, and even a slightly loose fit works as long as there are no big gaps.
Now, secure it. I prefer duct tape for a tight seal—wrap it around the edges of the filter and fan frame. Make sure there are no leaks. Even small gaps let unfiltered air slip through, which defeats the whole purpose.
Alternatively, use bungee cords. Loop them over the fan’s corners and around the filter. This method is reusable and lets you swap filters quickly. I keep a few extra filters on hand during wildfire season, so I can rotate them without stopping the fan.
Double-check that the filter is flat and snug. Wrinkles or bulges can create air pockets. A smooth, tight fit ensures maximum filtration.
Step 4: Test and Position Your Purifier
Plug in the fan and turn it on to the lowest setting first. Listen for unusual noises—rattling or grinding could mean the filter is loose or the fan is struggling.
If everything sounds good, crank it up. You should feel a steady stream of air coming from the front. Place the purifier in the room where you spend the most time—your bedroom, living room, or home office.
For best results, position it away from walls or furniture. Air needs to flow freely into the back and out the front. I keep mine about 2 feet from the wall, near a window if possible. This helps pull in fresh air and circulate it through the filter.
Run it continuously during high-pollution days or while you’re sleeping. I’ve noticed a real difference in how I breathe at night—less congestion, fewer sneezes. My dog even seems to sleep better!
Step 5: Maintain and Replace the Filter
Like any air filter, your DIY purifier needs regular maintenance. Check the filter every 2–4 weeks, depending on air quality. If it looks dark or clogged, it’s time to swap it.
To clean the fan, unplug it and wipe the blades and grille with a dry cloth. Never use water near the motor. I made that mistake once and had to buy a new fan. Learn from my errors!
When replacing the filter, dispose of the old one carefully—especially if you’ve been filtering smoke or allergens. Seal it in a plastic bag before tossing it. Then install a fresh MERV 13 filter and re-secure it with tape or bungees.
Keep a log if you want. I jot down the date I change the filter in my phone. It helps me stay consistent, especially during peak allergy or wildfire seasons.
Pro Tips & Common Mistakes to Avoid
After making several of these for myself and friends, I’ve picked up a few insider tips—and learned from some blunders.

Visual guide about how to make a box fan air purifier
Image source: cdn.shortpixel.ai
Pro Tip: Use two filters for extra cleaning power. Stack a MERV 13 with a carbon filter (like those used in odor-absorbing masks) to tackle smoke and smells. Just make sure the fan can still pull air through—don’t overdo it.
Warning: Don’t run the fan on high for too long if the filter is clogged. It can overheat the motor. If the fan feels hot or sounds strained, turn it off and check the filter.
One common mistake? Using the wrong filter size. I once tried a 16×20 filter on a 20-inch fan—big gaps on the sides. Unfiltered air just slipped through. Measure twice, cut once.
Another pitfall: placing the purifier in a corner. Airflow gets blocked, and the fan works harder for less benefit. Give it space to breathe—literally.
And please, don’t skip the MERV 13. I get it—higher-rated filters cost more. But if you’re serious about clean air, it’s worth the investment. Think of it like buying good tires for your car. You want the best protection.
FAQs About How to Make a Box Fan Air Purifier in 2026
Q: How effective is a box fan air purifier compared to a real HEPA purifier?
A: It’s not as powerful as a true HEPA unit, but it’s surprisingly close for the price. A MERV 13 filter captures about 75–85% of particles between 0.3 and 1 micron—similar to many entry-level HEPA purifiers. It won’t remove gases or odors as well, but for dust, pollen, and smoke, it’s a solid budget alternative.
Q: Can I use this during wildfire season?
A: Absolutely. In fact, this is one of the most recommended DIY solutions during smoke events. Just make sure you’re using a MERV 13 or higher filter and run it continuously in a sealed room. Close windows and doors, and consider sealing gaps with towels for maximum effect.
Q: Will this reduce pet dander and allergens?
A: Yes! Pet dander, pollen, and mold spores are all within the range that MERV 13 filters can capture. I’ve used this setup in my bedroom for years, and my allergy symptoms have dropped significantly. Just remember to change the filter regularly—pets shed a lot!
Q: How loud is it?
A: It depends on your fan. Most box fans are moderately noisy on high, but quieter on low. I run mine on medium at night and use a white noise app to mask the sound. If noise is a concern, look for a fan with a “quiet” or “sleep” mode.
Q: Can I leave it running 24/7?
A: Yes, as long as the filter isn’t clogged and the fan isn’t overheating. I’ve run mine continuously for weeks during wildfire season with no issues. Just check it weekly and replace the filter as needed.
Q: What if my fan is a different size?
A: No problem! The same principles apply. Just match the filter size to your fan. A 16-inch fan needs a 16×16 filter. You can even make smaller versions for bedrooms or offices. The key is a tight seal and a high-MERV filter.
Q: Is this safe? Could it cause a fire?
A: When used correctly, it’s very safe. The risk comes from overheating due to a clogged filter or faulty fan. Always use a clean filter, don’t block airflow, and unplug the fan if it feels hot or smells burnt. I’ve never had an issue, but it’s smart to stay cautious.
Final Thoughts
Learning how to make a box fan air purifier in 2026 isn’t just a fun weekend project—it’s a practical way to take control of your indoor air quality. Whether you’re battling allergies, smoke, or just want to breathe easier, this simple hack delivers real results without the high cost.
I’ve shared this method with neighbors, family, and even my local community center. It’s empowering to know you can create something effective with items you already have. Plus, it’s eco-friendly—no plastic packaging, no shipping emissions, just reuse and recycle.
So grab that old box fan, pick up a MERV 13 filter, and give it a try. Start small—maybe just for your bedroom—and see how you feel. I bet you’ll notice the difference within a few days. And if you do, pass it on. Clean air shouldn’t be a luxury. With a little effort, it can be within everyone’s reach.
Stay healthy, stay informed, and breathe easy.
“`