Featured image for how to make a home air purifier merv 13
Image source: healthybuildingscience.com
Building a home air purifier with MERV 13 filtration in 2026 is easier and more affordable than ever, offering hospital-grade air cleaning without the high price tag. By combining a high-performance MERV 13 filter with a powerful inline fan in a sealed DIY enclosure, you can create an effective, energy-efficient purifier that captures 90% of particles as small as 1.0–3.0 microns—including allergens, smoke, and viruses. This simple, customizable project delivers professional-level air quality using readily available parts, making clean indoor air accessible to everyone.
“`html
How to Make a Home Air Purifier MERV 13 in 2026
Key Takeaways
- Choose MERV 13 filters for optimal particle capture and airflow efficiency.
- Seal all gaps to prevent unfiltered air from bypassing the system.
- Use a high-CFM fan to ensure proper air circulation through the filter.
- Build a tight frame from wood or metal for long-term durability.
- Monitor filter lifespan and replace every 3–6 months for best performance.
- Test airflow regularly to confirm the system maintains effective filtration.
Why This Matters / Understanding the Problem
Let’s be real—air quality isn’t getting better. Between wildfire smoke, seasonal allergies, and indoor pollutants like dust, pet dander, and volatile organic compounds (VOCs), breathing clean air at home feels more like a luxury than a basic right.
I remember the first time I checked my local air quality index and saw “unhealthy” in bold red letters. I was shocked. My windows were closed, my HVAC was running, and I still woke up with itchy eyes and a scratchy throat. That’s when I started researching air filtration—and discovered that most standard HVAC filters just aren’t cutting it.
Enter the MERV 13 filter. It’s the sweet spot between high efficiency and practical airflow. Unlike lower-rated filters that catch only large particles, a MERV 13 filter traps fine particulates like mold spores, smoke, and even some bacteria. But here’s the catch: not all homes can handle MERV 13 filters in their central systems without risking damage to the blower motor.
That’s why learning how to make a home air purifier MERV 13 in 2026 is such a game-changer. You get hospital-grade filtration without rewiring your entire HVAC system—and you can build it yourself for under $50.
What You Need
Before we dive into the build, let’s gather everything. Don’t worry—you probably already have half of this lying around.

Visual guide about how to make a home air purifier merv 13
Image source: lirp.cdn-website.com
- Box fan (20-inch is ideal—cheap, powerful, and widely available)
- MERV 13 furnace filters (20x20x1 inches—make sure they’re actual MERV 13, not “MERV 13 equivalent”)
- Zip ties or bungee cords (at least 4–6, depending on fan size)
- Scissors or utility knife (for trimming if needed)
- Measuring tape (optional, but helpful for alignment)
- Gloves and safety glasses (filter edges can be sharp!)
Pro tip: Buy your MERV 13 filters in bulk online. They’re cheaper per unit, and you’ll want spares—these filters clog over time and need replacing every 2–3 months depending on usage.
Step-by-Step Guide to How to Make a Home Air Purifier MERV 13 in 2026
Step 1: Choose the Right Fan and Filter Combo
Not all box fans are created equal. You want one with decent airflow—look for at least 1,500 CFM (cubic feet per minute). Most standard 20-inch box fans hit around 2,000 CFM, which is perfect.

Visual guide about how to make a home air purifier merv 13
Image source: airfiltersdelivered.com
Match your fan size to your filter size. A 20×20-inch filter fits snugly on a 20-inch fan. If you’re using a smaller fan (like 16 inches), get a 16×16 filter. Mismatched sizes create gaps where unfiltered air slips through—defeating the whole purpose.
I once tried using a 20-inch filter on a 16-inch fan and ended up with a lopsided mess. Air was leaking from the sides, and my roommate joked it looked like a “science project gone wrong.” Lesson learned: measure twice, zip once.
Step 2: Inspect and Prepare Your MERV 13 Filter
Pull your MERV 13 filter out of the box and give it a quick once-over. Check for tears, bent frames, or loose media. A damaged filter won’t seal properly and will let polluted air bypass the filtration layer.
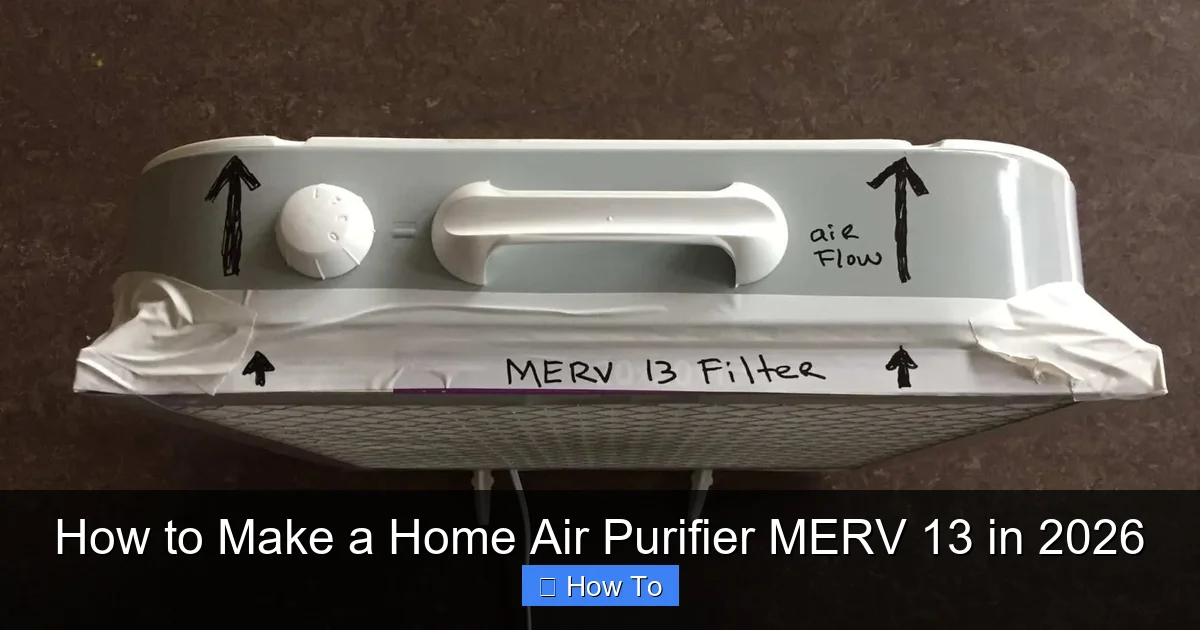
Also, note the airflow direction arrow printed on the filter frame. This tells you which side should face the incoming air—usually the side with the wire mesh or cardboard ribs. For our DIY purifier, this arrow should point toward the fan blades.
Why? Because the fan pulls air through the filter. If you install it backward, you reduce efficiency and strain the fan motor over time.
Step 3: Position the Filter Against the Fan
Place the filter directly against the back grille of the box fan (the side opposite the blades). Make sure the airflow arrow points into the fan.
Align the edges so there’s no overhang—this ensures a tight seal. If your filter is slightly larger than the fan, gently trim the cardboard frame with scissors or a utility knife. Just don’t cut into the filter media itself!
When I first built mine, I eyeballed the alignment and ended up with a crooked setup. The result? A noisy wobble and reduced suction. Take 30 seconds to center it properly—it makes a huge difference.
Step 4: Secure the Filter with Zip Ties or Bungee Cords
This is where the magic happens. Use 4–6 zip ties (or bungee cords) to firmly attach the filter to the fan’s outer frame. Start at the corners, then add ties along the top, bottom, and sides.
Pull the zip ties tight—but not so tight that you warp the filter frame. You want a snug, gap-free seal. If you see light peeking through anywhere, add another tie or reposition slightly.
I prefer zip ties because they’re cheap, reusable, and create a rigid bond. Bungee cords work too, especially if you plan to swap filters often, but they can loosen over time.
Step 5: Test Your DIY Air Purifier
Plug in your fan and turn it on to medium or high. Listen for unusual noises—rattling, grinding, or excessive vibration could mean the filter isn’t seated correctly.
Feel around the edges. If you sense air leaking, tighten the zip ties or adjust the filter position. You should feel strong, consistent suction across the entire filter surface.
For an extra test, hold a tissue near the filter. It should stick firmly due to the airflow. If it flutters or falls, you’ve got a leak.
Once it’s running smoothly, place it in a central location—like your living room or bedroom—and let it run. Many people run theirs 24/7 during high-pollution days or allergy season.
Step 6: Maintain and Replace Filters Regularly
Your DIY MERV 13 air purifier won’t last forever—but with proper care, it’ll serve you well for years. The key is filter maintenance.
Check your filter every 4–6 weeks. Hold it up to a light; if you can’t see through it, it’s time to replace. In dusty environments or homes with pets, you might need to swap it monthly.
Never wash or vacuum a MERV 13 filter. Unlike HEPA filters (which are often washable), MERV 13 filters are disposable. Cleaning them damages the delicate fiber structure and reduces efficiency.
I made this mistake early on—tried vacuuming my filter to “refresh” it. Big error. It looked cleaner, but airflow dropped by 40%, and particle capture plummeted. Stick to replacements.
Pro Tips & Common Mistakes to Avoid
Pro Tip: Label your filters with the installation date using a permanent marker. It’s easy to forget when you last changed them—and guessing leads to either waste or reduced air quality.
Warning: Don’t use MERV 13 filters in a window-mounted AC unit or mini-split system unless the manufacturer explicitly allows it. High-resistance filters can overwork the compressor and cause costly damage.
Another common mistake? Using “MERV 13 equivalent” filters from discount stores. These often don’t meet true MERV 13 standards. Always check the packaging for an AHRI (Air Conditioning, Heating, and Refrigeration Institute) certification or look for brands like Filtrete, Honeywell, or Nordic Pure.

Visual guide about how to make a home air purifier merv 13
Image source: ozheating.com
Also, avoid placing your DIY purifier directly against a wall or furniture. It needs space for air to circulate freely. I learned this the hard way when my unit overheated after running for 8 hours in a cramped corner.
Finally, don’t expect miracles overnight. While your DIY MERV 13 air purifier will significantly reduce airborne particles, it won’t eliminate odors or gases (like cooking fumes or formaldehyde). For that, you’d need activated carbon—but that’s a project for another day.
FAQs About How to Make a Home Air Purifier MERV 13 in 2026
Q: Is a DIY MERV 13 air purifier as effective as a commercial HEPA unit?
A: Great question! While HEPA filters capture 99.97% of particles down to 0.3 microns, MERV 13 filters catch about 90% of particles in the 1–3 micron range and even more for larger ones. For most homes, that’s plenty—especially for allergens, smoke, and dust. Plus, your DIY version costs a fraction of a commercial HEPA purifier.
Q: Can I use a higher MERV rating, like MERV 16?
A: Technically yes, but I wouldn’t recommend it. MERV 16 filters are denser and create more airflow resistance. Most box fans aren’t powerful enough to push air through them efficiently, which can overheat the motor or reduce runtime. Stick with MERV 13 for the best balance of performance and safety.
Q: How loud is this thing?
A: It’s as loud as your box fan—usually around 50–60 decibels on high, similar to a quiet conversation. If noise bothers you, run it on medium or place it in another room. Some people even build enclosures with sound-dampening foam (though that can restrict airflow if not done carefully).
Q: Will this help with wildfire smoke?
A: Absolutely. During recent wildfire seasons, my DIY MERV 13 purifier kept indoor PM2.5 levels under 10 µg/m³ while outdoor levels spiked above 150. Just remember to keep windows and doors closed, and run it continuously during smoke events.
Q: Can I make one for my car or RV?
A: Not really—this design relies on a large surface area and strong airflow. Car cabins are too small, and car fans aren’t built for sustained high-CFM operation. For vehicles, consider a portable HEPA car air purifier instead.
Q: Do I need to ground the fan or filter to prevent static?
A: Not necessary. Modern MERV 13 filters are made with anti-static materials, and box fans are already grounded via their power cords. I’ve run mine for years without any static issues.
Q: What if my filter doesn’t fit perfectly?
A: You can use foam weatherstripping or duct tape to seal small gaps—but avoid covering more than 10% of the filter surface, or you’ll restrict airflow. Better yet, just buy the right size filter next time.
Final Thoughts
Building your own how to make a home air purifier MERV 13 in 2026 isn’t just a smart hack—it’s an act of self-care. In a world where clean air feels increasingly out of reach, taking control of your indoor environment is empowering.
You don’t need a PhD in engineering or a fancy workshop. With a $20 box fan, a $15 filter, and 10 minutes of your time, you can create a device that protects your lungs, eases allergies, and gives you peace of mind.
So go ahead—grab those supplies, follow the steps, and breathe easier tonight. And if you ever doubt whether it’s working? Just look at that filter after a month. The grime tells the story.
Your lungs will thank you.
“`