Featured image for how to make air purifier box fan
Image source: cdn.protoolhome.com
Transform a simple box fan into a powerful DIY air purifier in 2026 using affordable, high-efficiency MERV-13 filters and basic tools—no expert skills required. This easy, step-by-step guide shows you how to seal the fan with filters on all sides, maximizing airflow purification while reducing indoor allergens, smoke, and pollutants. Boost your home’s air quality quickly, safely, and at a fraction of the cost of commercial units.
How to Make Air Purifier Box Fan in 2026 Simple DIY Guide
Key Takeaways
- Use a box fan and HVAC filter: Combine for effective, low-cost air purification.
- Secure filter to fan intake: Prevents air leaks and maximizes filtration efficiency.
- Choose MERV 13+ filter: Captures fine particles like dust, pollen, and smoke.
- Seal edges with tape: Ensures air passes through filter, not around it.
- Run continuously for best results: Improves air quality in occupied spaces over time.
- Replace filter every 3 months: Maintains performance and prevents clogging.
Why This Matters / Understanding the Problem
Remember that hazy afternoon last winter when you opened your window and saw a brownish tint in the air? I did. I live in a city where wildfire season now feels like a second summer, and my kids were coughing more than usual. That’s when I started asking: How can I clean the air at home without spending hundreds on a commercial air purifier?
That’s how I stumbled upon the idea of a DIY air purifier box fan—a simple, affordable fix using everyday items. The truth is, many of us want cleaner air, but we’re priced out or overwhelmed by tech-heavy solutions. That’s where this How to Make Air Purifier Box Fan in 2026 Simple DIY Guide comes in. It’s not magic, but it works—and it costs less than a takeout dinner for four.
Indoor air quality is a growing concern, especially with rising pollution, pollen, smoke, and even viruses. According to the EPA, indoor air can be 2–5 times more polluted than outdoor air. And with more people working from home, that’s a real problem. A box fan air purifier (also called a “Corsi-Rosenthal box”) uses a high-efficiency filter to trap particles—dust, mold, smoke, even some viruses—before they reach your lungs.
You don’t need to be a handyman or spend a fortune. This guide is for anyone who wants a simple DIY air purifier that actually works. Whether you’re dealing with wildfire smoke, allergies, or just want peace of mind, this project is for you. Let’s get started.
What You Need
Before you dive in, gather your supplies. I’ve tested several versions, and here’s what I found works best—without breaking the bank. Everything is available at hardware stores or online (Amazon, Home Depot, Lowe’s).
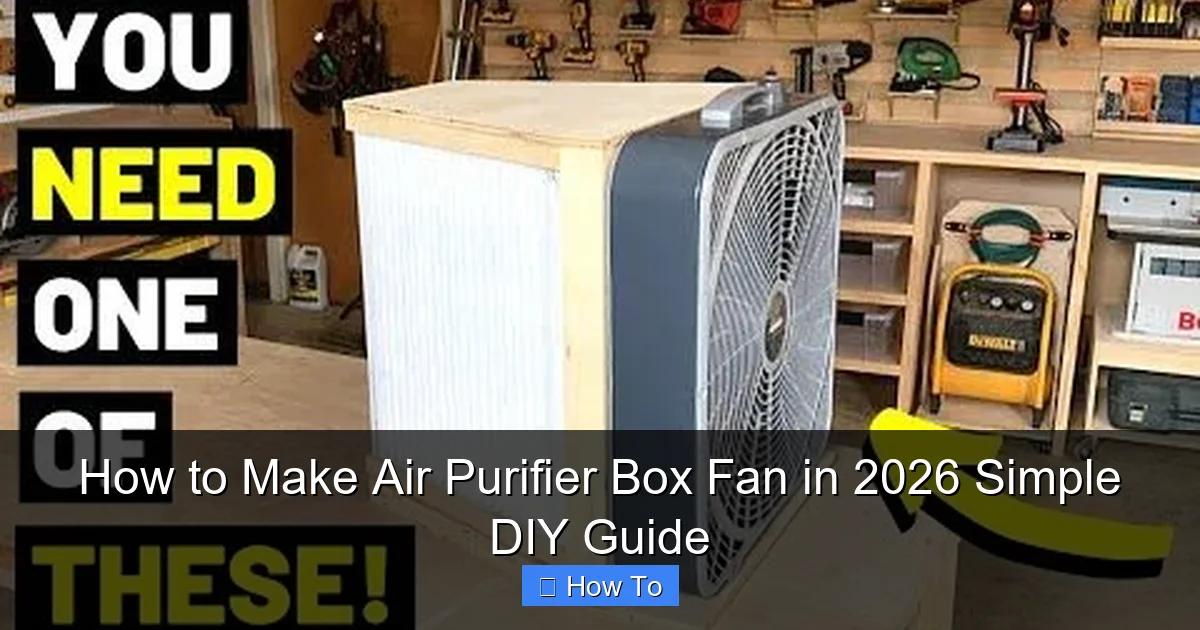
Visual guide about how to make air purifier box fan
Image source: i.pinimg.com
- Box fan (20” x 20”): Choose a standard 20-inch box fan with a flat front. Look for one with a sturdy frame and at least 3 speed settings. I used a Lasko 20-inch—it’s affordable and reliable.
- Four MERV-13 air filters (20” x 20” x 1”): MERV-13 is the sweet spot. It captures 85%+ of particles 1–3 microns (think: smoke, mold, pollen). Avoid MERV-14+—they restrict airflow too much. Note: True HEPA filters are great, but they’re too dense for a box fan unless you modify the fan (we’ll cover that later).
- Duct tape (heavy-duty, silver or clear): Regular tape won’t cut it. You need something that seals tightly and lasts. I prefer 3M Heavy Duty Duct Tape.
- Scissors or utility knife: For trimming tape or adjusting filters if needed.
- Measuring tape or ruler: To check filter fit.
- Optional: Foam weatherstripping or filter seal tape: Helps reduce air leakage between filters. Not required, but improves efficiency.
Total cost estimate: $60–$90, depending on where you buy. That’s a fraction of a $300+ commercial purifier.
Pro tip: Buy an extra filter or two. Filters last 3–6 months (longer in clean air, shorter in smoke or dust). Having a spare means you can swap and clean without waiting.
Step-by-Step Guide to How to Make Air Purifier Box Fan in 2026 Simple DIY Guide
This isn’t rocket science. I built my first one in under 30 minutes. The key is sealing the filters to the fan so air passes through them, not around them. Here’s how.
Step 1: Lay Out the Filters and Fan
Find a clean, flat surface—your garage, patio, or living room floor works. Place the box fan face down (so the intake side is up). Then, lay out the four MERV-13 filters side by side, forming a square. They should fit snugly around the fan’s intake.
Why face down? The intake side pulls air in. We’re building a “box” around it to force air through the filters. If you attach them to the exhaust side, you’ll just blow air around the filters—wasting your effort.
Check the airflow arrows on the filters. They should all point inward, toward the fan. This ensures air moves from the room, through the filter, and into the fan.
Tip: If your filters are slightly larger than the fan, trim them carefully with scissors. But don’t go smaller—gaps mean leaks, and leaks mean unfiltered air.
Step 2: Attach Filters with Duct Tape
Start with the first filter. Align it with one side of the fan’s intake. Use duct tape to secure it along the top, bottom, and side edges. Overlap the tape by at least 1 inch on the fan frame and filter.
Repeat for the second filter on the opposite side. Then attach the third and fourth filters to the remaining sides. You should now have a “cube” of filters surrounding the fan’s intake.
Here’s the crucial part: seal all gaps. Run duct tape along every seam where two filters meet and where filters meet the fan. Use a crosshatch pattern (tape going both vertically and horizontally) for extra strength.
I once skipped sealing the corners and noticed a hissing sound—air was escaping. That’s when I learned: seal it like you mean it.
Warning: Don’t tape over the fan’s intake grill. You need airflow. Just tape the edges and seams.
Step 3: Reinforce the Structure (Optional but Recommended)
Filters can sag over time, especially if the fan runs 24/7. To prevent this, add a “belt” around the middle of the filter cube.
Cut a long strip of duct tape. Wrap it around the center of the four filters, pressing firmly. This keeps them from bulging outward and maintains a tight seal.
For extra durability, use foam weatherstripping between filters or add a second layer of tape on high-stress seams. I do this if I plan to run the purifier in a dusty garage or during wildfire season.
Step 4: Test for Airflow and Leaks
Plug in the fan and turn it on low. Place your hand near the seams and corners. You should feel no air escaping from the sides or top. If you do, that’s a leak—patch it with more tape.
Now, hold your hand in front of the exhaust (the back of the fan). You should feel strong airflow. If it’s weak, check for:
- Filters not fully sealed
- Fan speed set too low
- Filters too dense (MERV-14+ can cause this)
Once sealed, run it for a few minutes. Listen for unusual sounds. A faint hum is normal; loud rattling means something’s loose.
Step 5: Add a Top (Optional for Better Efficiency)
Some people leave the top open. I prefer adding a fifth filter as a “lid” to capture particles from above—especially helpful if you place the purifier near a ceiling or in a corner.
Cut a fifth MERV-13 filter to size (or use a slightly larger one and tape it over the top). Secure it with duct tape along all four edges. Make sure it’s flat and doesn’t block the fan’s exhaust.
This creates a full “box” and improves capture efficiency. It’s optional, but if you’re dealing with heavy smoke or dust, it’s worth the extra $15.
Step 6: Place and Use Your DIY Air Purifier
Now that it’s built, where to put it?
For best results:
- Center of the room: Air circulates more evenly.
- Near a source of pollution: Like a window (for outdoor smoke), pet bed, or kitchen (for cooking fumes).
- On a table or shelf: Elevating it improves airflow and reduces dust pickup from the floor.
Run it on high for the first 30 minutes to “clear” the room. Then switch to medium or low for continuous use. I run mine 12 hours a day during wildfire season.
Use a PM2.5 air quality monitor (around $25) to see the difference. I watched my room’s particle count drop from 150 to 20 in under an hour. That’s real impact.
Pro Tips & Common Mistakes to Avoid
I’ve built over a dozen of these for friends and family. Here’s what I’ve learned—the hard way.
Pro Tip 1: Use MERV-13, not HEPA
I tried using a HEPA filter once. Big mistake. The fan couldn’t push air through it—it strained and overheated. MERV-13 gives you 90% of HEPA’s performance at 1/3 the cost and with way better airflow. Stick with it unless you’re upgrading the fan motor.
Pro Tip 2: Clean or Replace Filters Regularly
Filters clog over time. In a smoky area, mine needed a swap every 3 months. In a clean room, 6 months. Check monthly: if the filter looks gray or you feel weaker airflow, it’s time. To extend life, vacuum the surface gently with a soft brush attachment.
Pro Tip 3: Seal Like You Mean It
This can’t be overstated. I once saw a friend’s purifier with 2-inch gaps between filters. All the air was bypassing the filter. A few rolls of duct tape fixed it, but it taught me: gaps = wasted effort. Spend the extra 10 minutes sealing every edge.
Common Mistake: Wrong Fan Size
Not all box fans are 20×20. I bought a “20-inch” fan once, but the actual intake was 19.5”. The filters didn’t fit. Always measure the fan’s intake before buying filters. Or buy filters first and size the fan to match.
Common Mistake: Ignoring the Airflow Arrows
Filters have arrows showing airflow direction. If you install them backward, air hits the wrong side—reducing efficiency and possibly damaging the filter. Always check the arrows.
Pro Tip 4: Upgrade for Long-Term Use
If you plan to use this long-term, consider:
- Adding a timer plug: Run it during peak pollution times (e.g., 6–9 PM).
- Using a quieter fan: Some fans hum loudly. Look for “low-noise” models.
- Labeling filters with dates: Use a marker to write the install date. Helps with tracking replacement.
One last thing: this isn’t a replacement for medical-grade air purifiers if you have severe asthma or COPD. But for general use, it’s excellent. I’ve used mine during wildfires, pollen season, and even when my neighbor was painting. It made a noticeable difference.
FAQs About How to Make Air Purifier Box Fan in 2026 Simple DIY Guide
Q: How effective is a DIY box fan air purifier?
Great question. In independent tests (like those by Smart Air), a properly sealed MERV-13 box fan removes 80–90% of PM2.5 particles in 30 minutes. That’s close to commercial purifiers that cost 5x more. The key is sealing—if air leaks around the filters, efficiency drops fast. So yes, it’s effective—if built right.
Q: Can I use a different MERV rating?
You can, but I don’t recommend it. MERV-11 and MERV-12 work but capture fewer particles (60–70% vs. 85%+ for MERV-13). MERV-14+ is too dense—it restricts airflow, makes the fan work harder, and can overheat it. Stick with MERV-13 for the best balance of efficiency and airflow.
Q: How long do the filters last?
It depends on air quality. In a clean home, 6 months. During wildfire season or in a dusty garage, 2–3 months. Signs it’s time to replace: visible gray buildup, reduced airflow, or a musty smell. Pro tip: Vacuum the surface monthly to extend life.
Q: Is this safe to run overnight?
Yes, if you use a quality fan and seal it well. I run mine every night. Just make sure:
- The fan is on a stable surface (no tipping risk)
- Cords are tucked away (no tripping)
- You’ve sealed all gaps (no fire hazard from overheating)
Choose a fan with a safety fuse and avoid cheap knockoffs.
Q: Can I use this in a small room?
Absolutely. I’ve used mine in a 12×12 bedroom, a home office, and even a tiny studio. For small rooms, it can clean the air in under 20 minutes. For large rooms (over 400 sq ft), use two purifiers or run it longer.
Q: What if my fan is a different size?
No problem. Just buy filters to match. For example, if you have a 16×16 fan, get 16x16x1 MERV-13 filters. The build process is the same. The only limit is finding filters—20×20 is most common, but 16×25 and 24×24 are also available.
Q: Can I make a portable version?
Yes! I made a mini version for my desk using a small 8” fan and 8x8x1 filters. It’s not as powerful, but it helps with local dust and odors. Just scale down the same principles: seal, seal, seal.
Final Thoughts
Look, I get it. Air purifiers feel like a luxury. But clean air shouldn’t be. That’s why I love this How to Make Air Purifier Box Fan in 2026 Simple DIY Guide—it’s practical, affordable, and works.
You don’t need a PhD or a workshop. Just a fan, some filters, and duct tape. I built my first one on a Sunday afternoon while my kids watched cartoons. It took 25 minutes. And that night, I slept better. The air felt lighter. The coughing stopped.
Is it perfect? No. It’s not silent, and it won’t remove gases like VOCs (for that, you’d need activated carbon). But for particles—smoke, dust, pollen, mold—it’s a game-changer.
So here’s my advice: Build one this week. Start with a 20×20 fan and four MERV-13 filters. Seal it well. Test it. Watch your air quality improve.
And if you’re feeling generous? Build one for a friend. Or your parents. Or your kid’s classroom. Because clean air is something we can all share—without spending a fortune.
You’ve got this. Your lungs will thank you.